
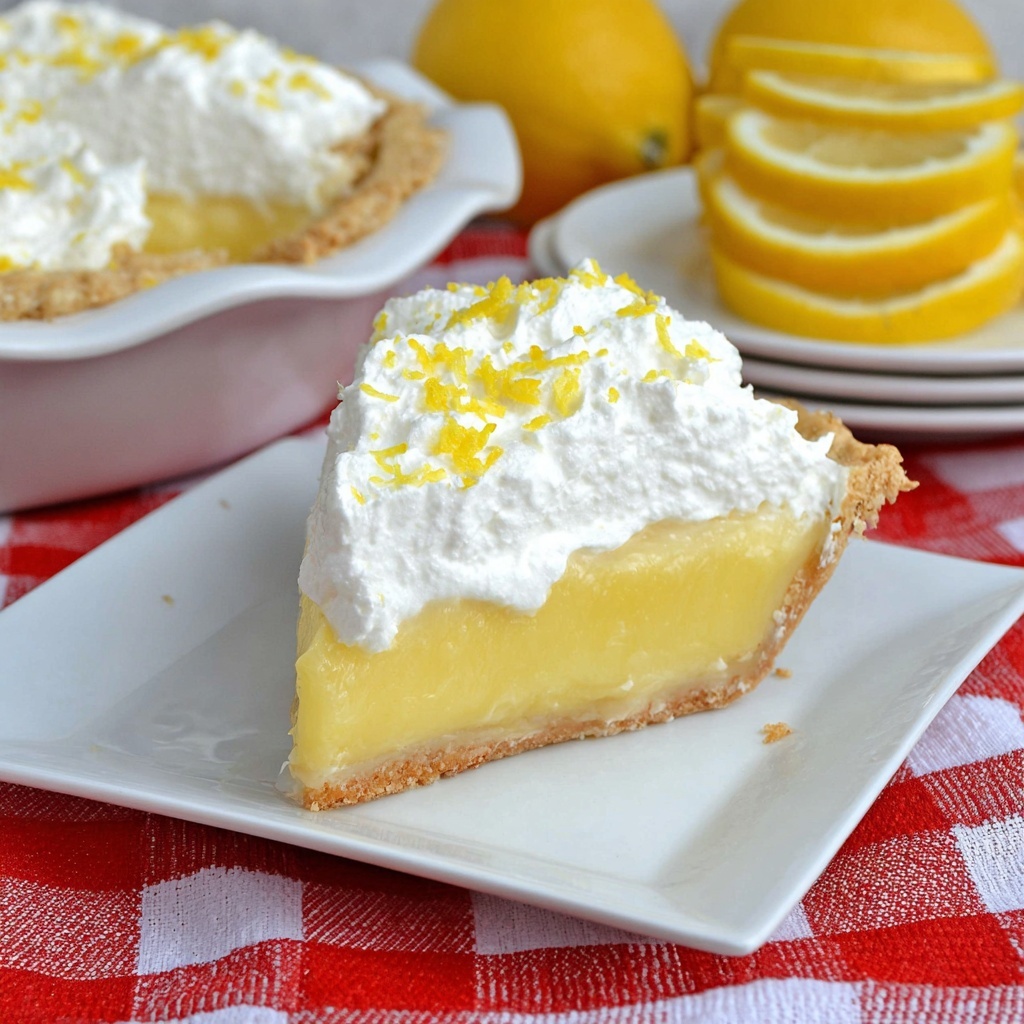
If you love a dessert that’s bursting with bright citrus flavor and incredibly easy to make, this Blender Lemon Pie Recipe is absolutely going to become one of your favorites. With just a handful of simple ingredients and a blender, you can create a luscious, creamy lemon filling that bakes into a perfectly tangy and smooth pie. It’s like a sunny slice of happiness that’s both refreshing and indulgent, perfect for any occasion where you want to impress without the fuss.
Ingredients You’ll Need
Gathering these ingredients is the first step to creating a blissfully simple but delicious lemon pie. Each one plays a key role: the fresh lemons provide that signature zing, the eggs and butter add richness and creaminess, while the sugar balances the tartness perfectly. The crust and Cool Whip bring the texture and finishing touch that transform it into a decadent treat.
- 2 small Lemons (sliced into wedges): Fresh lemons are crucial for that bright and vibrant lemon flavor.
- 1 zest Lemon: Adds aroma and a decorative touch to the pie’s top.
- 4 large Eggs: These give the pie its custardy texture and help it set perfectly.
- 1/2 cup unsalted Butter: Adds richness and a silky smooth finish to the filling.
- 1 1/2 cups Sugar: Balances the tart lemon with just the right amount of sweetness.
- 1 teaspoon Vanilla Extract: Enhances the overall flavor with subtle warmth.
- 1 Pie crust or frozen pie shell: Makes the base crisp and buttery, anchoring all the flavors.
- 1 container Cool Whip: Creates a light, creamy topping that complements the tangy filling beautifully.
How to Make Blender Lemon Pie Recipe
Step 1: Preheat Your Oven
Start by preheating your oven to 350 degrees Fahrenheit. This ensures your pie will bake evenly and the filling will set to that perfect custard-like texture.
Step 2: Prepare the Lemons
Slice the two small lemons into wedges and carefully remove all seeds. This step ensures the blender mixture stays smooth and seedless, giving you that silky pie filling everyone will love.
Step 3: Blend the Ingredients
Add the lemon wedges, eggs, butter, sugar, and vanilla extract into your blender. Blend on medium speed for 3 to 4 minutes or until the mixture becomes completely smooth and uniform. This blending step is the magic that creates a perfectly creamy, no-fuss filling.
Step 4: Pour into Pie Shell
Pour the luscious lemon mixture into your prepared pie crust or frozen pie shell. The crust will hold the filling nicely and give that satisfying crunch with every bite.
Step 5: Bake the Pie
Bake the pie in your preheated oven for 45 minutes. During this time, the filling will set beautifully, firm but still soft and creamy on the inside.
Step 6: Cool the Pie
Once baked, let the pie cool to room temperature. This resting time helps the filling to finish setting, making it easier to slice and serve later.
Step 7: Add the Topping and Chill
Spread a generous layer of Cool Whip over the cooled pie and then chill it in the refrigerator for at least an hour. This step transforms the pie into a cool, light dessert with a perfect balance of tartness and sweetness.
Step 8: Serve and Enjoy!
Now the fun part — slice yourself a generous piece, serve it up, and enjoy the bright, creamy delight of this Blender Lemon Pie Recipe. You just made something truly special!
How to Serve Blender Lemon Pie Recipe

Garnishes
A sprinkle of lemon zest on top adds a pop of color and extra zing. You can also add a few fresh lemon wedges or a sprig of mint to make it look as beautiful as it tastes.
Side Dishes
This pie pairs wonderfully with a cup of hot tea or freshly brewed coffee. For a summer gathering, serve alongside fresh berries or a light fruit salad to enhance its refreshing character.
Creative Ways to Present
Try serving individual mini lemon pies by using small tart shells, or layer chilled slices with whipped cream and berries in clear glasses for a fancy trifle-inspired dessert. No matter how you present it, the vibrant flavor will shine.
Make Ahead and Storage
Storing Leftovers
Leftover pie should be covered tightly with plastic wrap or stored in an airtight container in the refrigerator. It will stay fresh for 3 to 4 days, making it a convenient dessert to enjoy over several days.
Freezing
You can freeze the baked lemon pie without the Cool Whip topping. Wrap it well in plastic wrap and aluminum foil, then freeze for up to 2 months. Thaw overnight in the fridge before serving and add fresh Cool Whip on top.
Reheating
This pie is best served chilled, so reheating is generally not recommended. If you prefer a slightly warmer slice, let it sit at room temperature for 15 to 20 minutes before serving.
FAQs
Can I use bottled lemon juice instead of fresh lemons?
Fresh lemons are highly recommended for this Blender Lemon Pie Recipe because they provide real zest and bright flavor that bottled juice just can’t match.
Is it necessary to use Cool Whip on top?
While Cool Whip adds a light, creamy finish that balances the tanginess, you could substitute with whipped cream or even serve the pie plain for a more intense lemon flavor.
Can I make the pie gluten-free?
Absolutely! Use a gluten-free pie crust or shell, and the rest of the ingredients naturally don’t contain gluten, so this pie is easy to adapt.
What if I don’t have a blender?
While the blender really simplifies the process and ensures smoothness, you could finely chop the lemon wedges and whisk the ingredients vigorously by hand, but it will take more effort and might have a different texture.
How tart is this pie?
This pie balances tart lemon flavor with sweet sugar, creating a refreshingly tangy taste that’s never overpowering, making it perfect for those who enjoy a lively citrus dessert.
Final Thoughts
This Blender Lemon Pie Recipe is a true gem for anyone looking to create a bright, creamy, and utterly satisfying dessert without complicated steps or ingredients. Whether you’re new to baking or a seasoned pro, this no-fuss pie brings a burst of sunshine to your table that everyone will love. Dive in, whip it up, and share the joy of fresh lemony goodness with your friends and family!
Print
Blender Lemon Pie Recipe
- Prep Time: 5 minutes
- Cook Time: 45 minutes
- Total Time: 1 hour 50 minutes
- Yield: 8 to 8 slices
- Category: Dessert
- Method: Baking
- Cuisine: American
- Diet: Vegetarian
Description
A creamy and tangy blender lemon pie featuring a smooth lemon filling made effortlessly in a blender, baked until set in a buttery pie crust, then topped with cool whip for a refreshing finish. Perfectly balanced citrus flavor with a tender texture, ideal for a delightful dessert.
Ingredients
Filling
- 2 small lemons (sliced into wedges, seeds removed)
- 1 zest lemon (for garnish)
- 4 large eggs
- 1/2 cup unsalted butter
- 1 1/2 cups sugar
- 1 teaspoon vanilla extract
Crust
- 1 pie crust or frozen pie shell
Topping
- 1 container Cool Whip
Instructions
- Preheat Oven: Preheat your oven to 350°F (175°C) to ensure it is hot enough for baking the pie evenly.
- Prepare Lemons: Cut the 2 small lemons into wedges and carefully remove all seeds to avoid bitterness in the pie.
- Blend Ingredients: Place the lemon wedges, eggs, unsalted butter, sugar, and vanilla extract into the blender. Blend on medium speed for 3-4 minutes until the mixture is completely smooth and well combined.
- Pour Mixture: Pour the blended lemon pie filling into the prepared pie crust or frozen pie shell evenly.
- Bake Pie: Bake the pie in the preheated oven for 45 minutes, until the filling is set and the edges are lightly golden.
- Cool Pie: Allow the baked pie to cool to room temperature to let the filling firm up properly.
- Add Topping and Chill: Spread the container of Cool Whip evenly over the cooled pie and chill it in the refrigerator for at least 1 hour to set the topping and enhance flavors.
- Serve: Garnish with lemon zest, slice, serve chilled, and enjoy this luscious lemon pie dessert.
Notes
- Removing lemon seeds is important to prevent bitter flavors.
- Using unsalted butter allows better control over saltiness in the pie.
- Chilling the pie after adding Cool Whip helps achieve the best texture and flavor combination.
- You can substitute Cool Whip with whipped cream for a fresher option.
- Make sure to blend thoroughly to avoid any lumps in the filling.


