If you’re looking for a warm, inviting bread that’s bursting with flavor yet quick to make, this Cheese, Garlic, and Herb Quick Bread Recipe is your new best friend in the kitchen. Imagine a golden loaf layered with gooey cheese, infused with fragrant garlic and fresh herbs, all coming together in a tender crumb without waiting hours for yeast to work its magic. It’s the perfect companion for soups, salads, or simply enjoyed on its own with a pat of butter on top, making every bite a little celebration of comfort and taste.
Ingredients You’ll Need
This recipe is all about simplicity that delivers big on flavor. Each ingredient plays a key role, whether it’s the cheese adding gooey richness, the herbs providing vibrant freshness, or the yogurt and milk ensuring a soft yet sturdy texture. Let’s dive into these kitchen essentials that you likely already have or can easily pick up.
- 7 oz / 200g block of cheese: Choose a flavorful cheese like cheddar for richness and meltiness throughout the bread.
- 2 tbsp fresh rosemary, finely chopped: Adds earthy pine notes that elevate the bread’s aromatic profile.
- 2 tbsp fresh parsley leaves, finely chopped: Brings a bright, slightly peppery freshness to balance the heavier flavors.
- 1 tsp dried oregano: Offers a subtle sweetness and depth from this classic Mediterranean herb.
- 1/2 tsp dried thyme: Provides gentle herbal warmth that complements the garlic beautifully.
- 2 garlic cloves, crushed or finely grated: Infuses that unmistakable punch of savory garlic flavor right into the dough.
- 3 tbsp extra virgin olive oil: Delivers smooth richness and helps keep the bread moist.
- 1/2 tsp cooking salt / kosher salt: Enhances all the other flavors without overpowering them.
- 2 1/4 cups plain flour (all-purpose): The foundation for the bread’s structure and texture.
- 1 tsp baking soda (bi-carbonate soda): Makes the bread rise quickly, creating a tender crumb.
- 3/4 tsp cooking salt / kosher salt: Balanced seasoning in the dry ingredients.
- 1/2 cup plain yogurt (Greek or regular, full fat, unsweetened): Adds moisture and slight tang for depth.
- 3/4 cup milk (full fat best, low fat ok): Combines with the yogurt to create a lush, tender crumb.
- 2 large eggs (~50-55g each): Provide structure and richness to the batter.
- 3 1/2 tbsp (50g) unsalted butter, melted: Enhances flavor and contributes to a moist texture.
- 2 tbsp olive oil: Used in herb swirl for a silky, fragrant layer.
- 2 small garlic cloves, crushed or grated: Added to the herb swirl for extra garlicky goodness.
How to Make Cheese, Garlic, and Herb Quick Bread Recipe
Step 1: Preheat and Prepare Your Pan
Start by setting your oven to 180°C/350°F. Grease a 21 x 11 x 7 cm loaf pan lightly with butter or oil spray, then line it with baking paper. This prep ensures that your bread releases easily after baking and keeps its beautiful shape.
Step 2: Make the Herb and Garlic Swirl
In a small bowl, mix together the olive oil, crushed garlic, chopped rosemary, parsley, oregano, thyme, and salt. The result should be a thick, dollop-able mixture that will create stunning swirls of herby, garlicky magic inside the bread. This is one of those steps where you can already smell just how tasty this bread will be.
Step 3: Combine the Dry Ingredients
In a large mixing bowl, whisk plain flour, baking soda, and salt together until evenly combined. Properly blending these dry ingredients helps your bread rise nicely and keeps the texture consistent, so don’t skip this step.
Step 4: Whisk the Wet Ingredients
In a separate bowl, whisk the eggs, yogurt, milk, and melted butter together until smooth and creamy. This luscious mixture is what brings moisture and tenderness to your quick bread.
Step 5: Bring It All Together
Create a well in the center of your dry ingredients and pour in the wet mixture. Gently mix until just combined—overmixing can make the bread tough, so it’s okay if a few small lumps remain. This is the quick bread batter magic starting to happen!
Step 6: Layering Your Bread
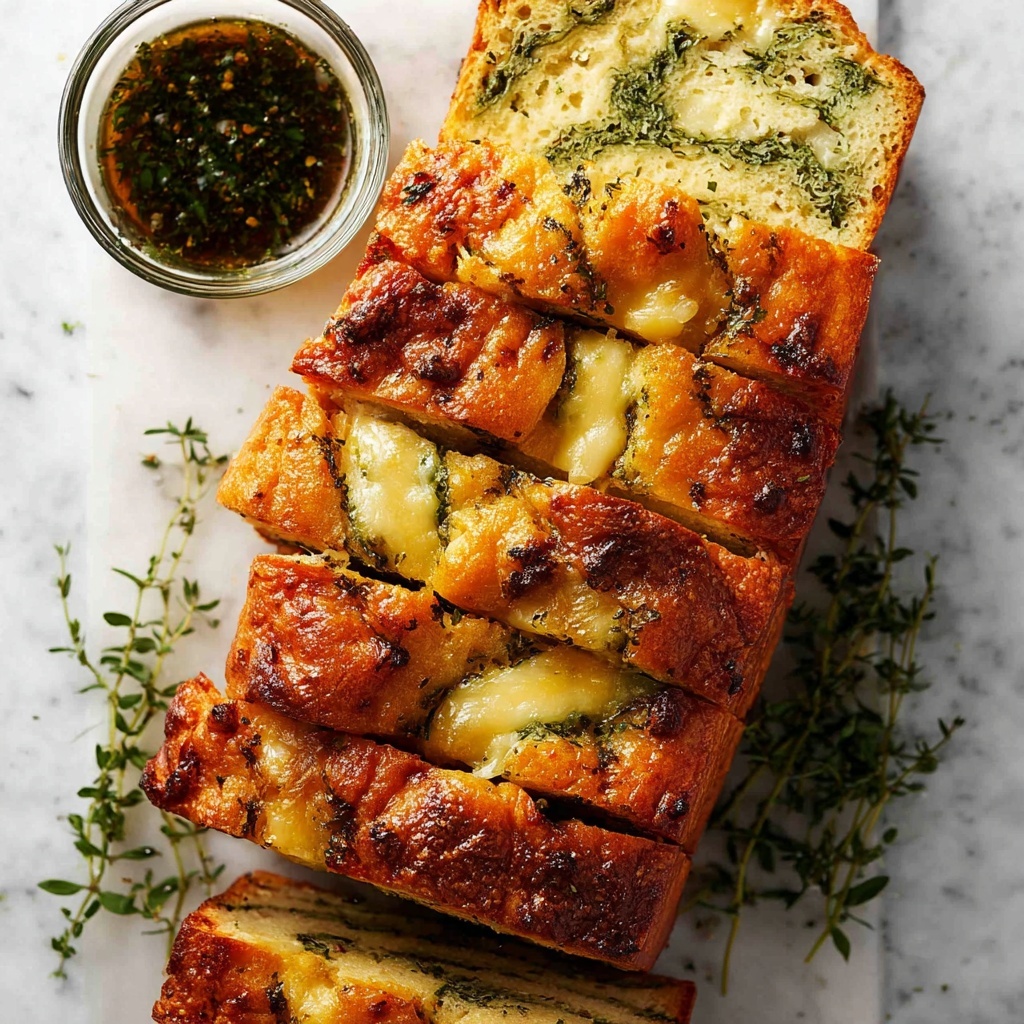
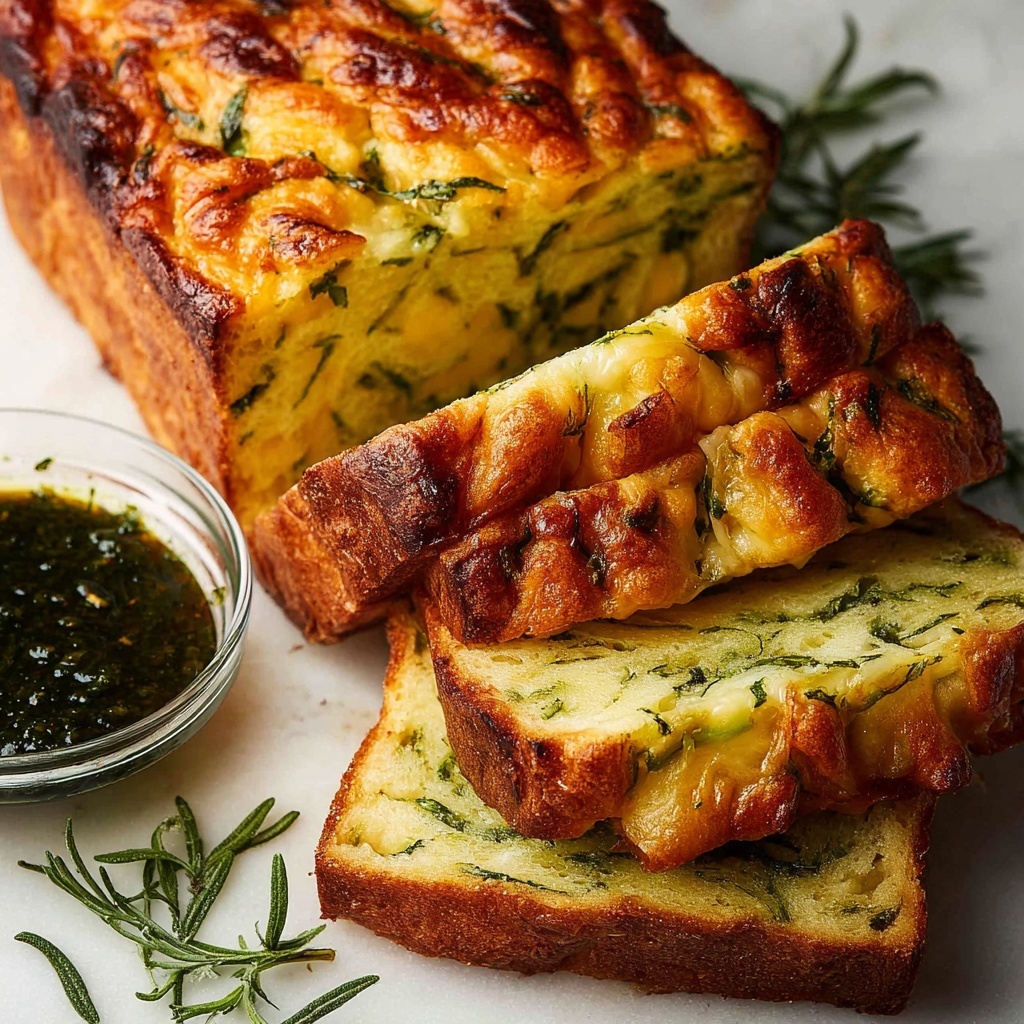
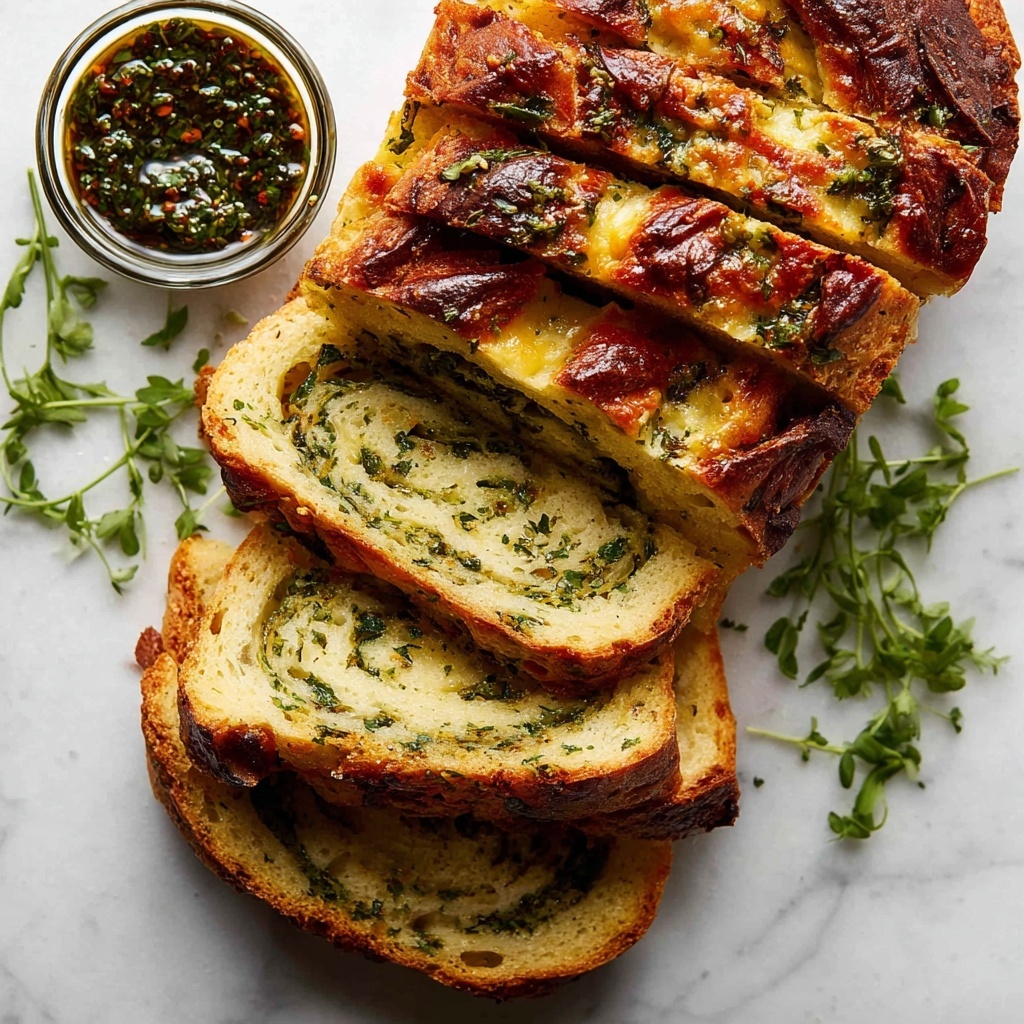
Pour one-third of the batter into the prepared loaf pan. Drop one-third of the herb and garlic mixture in dollops across the batter, then use a knife to swirl it in with gentle upward and downward motions, folding some herbs through the dough. Next, press slices of cheese randomly into the batter—push some all the way in and leave some poking out; this creates those gorgeous melty pockets. Repeat this process two more times with the remaining batter, herb mixture, and cheese. Don’t worry about the rustic look—this is what gives the bread its charming, homemade appeal.
Step 7: Bake Until Golden and Perfect
Bake the bread for 30 minutes uncovered until the top turns a divine golden brown. Then cover loosely with foil and continue baking for an additional 20 minutes. This two-phase baking ensures the crust doesn’t burn while allowing the loaf to cook through evenly. To test doneness, insert a skewer in the center; it should come out clean without wet batter clinging to it.
Step 8: Cool and Enjoy
Allow the bread to cool in the pan for 5 minutes before turning it out onto a wire rack to cool further for at least 10 minutes. This resting step lets all the flavors settle and the cheese set slightly, making it easier to slice thick, satisfying pieces. Serve warm with butter or on its own to fully appreciate the layers of cheese, garlic, and herbs.
How to Serve Cheese, Garlic, and Herb Quick Bread Recipe
Garnishes
A sprinkle of flaky sea salt or a drizzle of extra virgin olive oil can elevate the flavor even more before serving. Fresh herbs, like a few sprigs of rosemary or parsley, can add an inviting pop of green and fragrance for your guests’ eyes and noses.
Side Dishes
This bread shines alongside hearty soups like tomato basil or butternut squash, and makes a wonderful partner to fresh salads tossed with lemon vinaigrette. It’s also fantastic beside a cheese board or antipasto platter, where the bread’s savory punch complements cured meats and olives.
Creative Ways to Present
Turn this quick bread into individual portions by baking it in muffin tins or mini loaf pans for gatherings. You can also slice and toast thick pieces, top them with fresh tomato slices and basil for an instant bruschetta, or use it as a sandwich base for gourmet grilled cheese sandwiches. The possibilities are as endless as your appetite!
Make Ahead and Storage
Storing Leftovers
Wrap cooled bread tightly in plastic wrap or store in an airtight container at room temperature. It will stay fresh for up to 3 days, making it perfect for quick breakfasts or snacks throughout the week.
Freezing
If you want to keep the magic longer, slice the bread and freeze in an airtight bag. You can thaw slices individually by leaving them out or warming them gently in a toaster or oven, preserving all that cheesy, garlicky goodness.
Reheating
To enjoy the bread fresh again, reheat slices in the oven at 160°C/320°F for 8–10 minutes or toast until warmed through and slightly crisp. This revives the flavors and the wonderful texture, making each bite taste as good as new.
FAQs
Can I use a different type of cheese?
Absolutely! Cheddar is a great choice, but feel free to experiment with mozzarella for gooey pulls, gouda for smokiness, or even a sharp Parmesan for a bold kick. Just keep the quantity similar to maintain the balance in the bread.
What if I don’t have fresh herbs?
Substitute dried herbs thoughtfully; use about one-third of the amount called for fresh herbs since dried herbs have a stronger concentration. Your bread will still be flavorful, just a touch different in aroma and texture.
Is this recipe suitable for vegetarians?
Yes, this quick bread is perfect for vegetarians. Just ensure that the cheese you select is free from animal rennet to align with strict vegetarian preferences.
Can I make this bread gluten-free?
You can experiment by substituting a gluten-free all-purpose flour blend that includes xanthan gum or another binder. Keep in mind that texture might vary slightly, so a bit of trial and error could be needed for perfect results.
How long will the bread last after baking?
Stored properly at room temperature in an airtight container, the bread stays delicious for about 3 days. For longer storage, freezing is recommended, preserving the wonderful flavors for up to 2 months.
Final Thoughts
Making this Cheese, Garlic, and Herb Quick Bread Recipe is like bringing a little warmth and deliciousness into your kitchen with minimal fuss. Whether you’re serving it for family dinners, casual get-togethers, or a cozy solo snack, its gooey cheese, fragrant garlic, and fresh herbs never fail to impress. I encourage you to give it a try—you might just find your new go-to bread that everyone asks for again and again!
Print
Cheese, Garlic, and Herb Quick Bread Recipe
- Prep Time: 15 minutes
- Cook Time: 50 minutes
- Total Time: 1 hour 5 minutes
- Yield: 8 to 10 servings
- Category: Bread
- Method: Baking
- Cuisine: Western
- Diet: Vegetarian
Description
This Cheese, Garlic, and Herb Quick Bread is a flavorful no-yeast bread perfect for those who want a savory loaf without the wait. Loaded with fresh herbs, garlic, and melty cheese, this quick bread offers a delightful swirl of flavors baked to a golden perfection. Its moist texture and aromatic herbs make it a great accompaniment for any meal or a tasty snack on its own.
Ingredients
Cheese and Herb Mixture
- 7 oz / 200g block of cheese
- 2 tbsp fresh rosemary, finely chopped
- 2 tbsp fresh parsley leaves, finely chopped
- 1 tsp dried oregano
- 1/2 tsp dried thyme
- 2 garlic cloves, crushed using garlic press or finely grated
- 3 tbsp extra virgin olive oil
- 1/2 tsp cooking salt / kosher salt (halve for fine table salt)
Dry Ingredients
- 2 1/4 cups plain flour (all-purpose flour)
- 1 tsp baking soda (bi-carbonate soda), sub 3 1/2 tsp baking powder if preferred
- 3/4 tsp cooking salt / kosher salt (halve for table salt)
Wet Ingredients
- 1/2 cup plain yogurt (Greek or regular, full fat, unsweetened)
- 3/4 cup milk (full fat best, low fat okay)
- 2 large eggs (~50-55g/2oz each)
- 3 1/2 tbsp (50g) unsalted butter, melted
Garlic Oil for Swirl
- 2 tbsp olive oil
- 2 small garlic cloves, crushed with garlic crusher or grated
Instructions
- Preheat Oven: Preheat your oven to 180°C/350°F, suitable for both fan and standard ovens to ensure even baking.
- Prepare Loaf Tin: Lightly grease a 21 x 11 x 7 cm (8.3 x 4.5 x 2.75″) loaf pan with butter or oil spray. Line the pan with baking paper (parchment paper) to prevent sticking and make removal easier.
- Make Herb and Garlic Swirl: In a small bowl, combine the rosemary, parsley, oregano, thyme, crushed garlic, olive oil, and salt. Mix until you achieve a thick, dollop-able mixture perfect for swirling.
- Whisk Dry Ingredients: In a large bowl, whisk together the plain flour, baking soda, and cooking salt until evenly combined.
- Whisk Wet Ingredients: In a separate bowl, whisk together the yogurt, milk, eggs, and melted unsalted butter until smooth and well blended.
- Combine Batters: Make a well in the center of the dry ingredients and pour in the wet ingredients. Gently mix until just combined, being careful not to overmix to keep the bread tender.
- Create First Layer with Swirl and Cheese: Pour one-third of the batter into the prepared loaf tin. Dollop one-third of the herb and garlic swirl mixture across the top. Use a knife to gently swirl it up and down and fold some into the batter. Add one-third of the cheese slices randomly, pushing some fully in and allowing others to peek out.
- Repeat Layers Two and Three: Repeat the swirling and cheese layering process two more times with the remaining batter, herb mixture, and cheese. Don’t worry if the herb mixture and cheese stick out on the surface; this creates an appealing baked appearance.
- Bake the Quick Bread: Bake for 30 minutes until the top is golden. Then cover the bread loosely with foil and bake for an additional 20 minutes (total baking time 50 minutes). Test doneness by inserting a skewer into the center; it should come out clean.
- Cool and Serve: Allow the bread to cool in the loaf tin for 5 minutes, then transfer onto a cooling rack. Let it cool for at least 10 more minutes before slicing thickly. Serve with butter if desired.
Notes
- Use full-fat milk and yogurt for the best moist texture and flavor, though low-fat options are acceptable.
- Adjust salt quantities if using table salt instead of kosher salt as noted.
- Greasing and lining the loaf tin ensures easy removal and prevents sticking.
- Swirling the herb mixture into the batter evenly distributes flavor and creates a beautiful marbled look.
- Check the bread’s doneness with a skewer to avoid undercooked or gummy centers.
- Butter is optional when serving but enhances the flavor and richness of the bread.


