
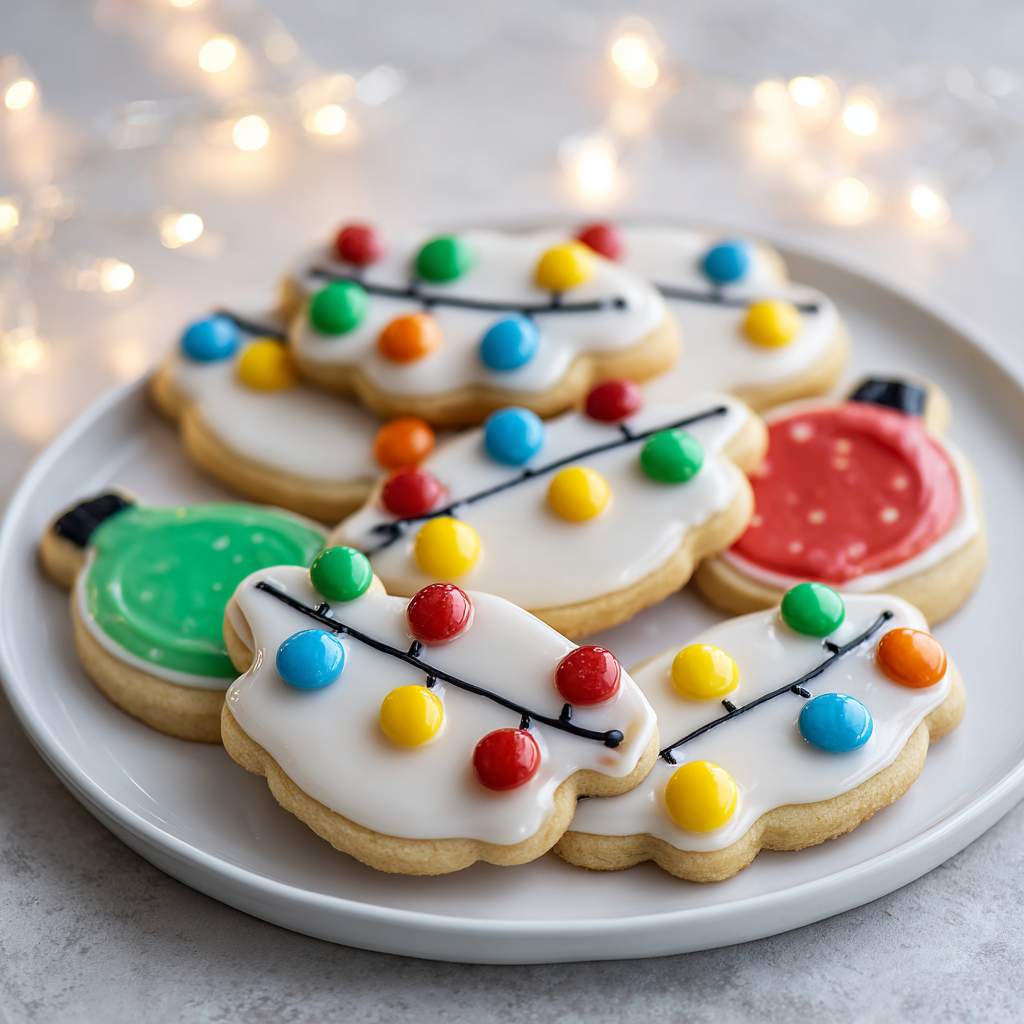
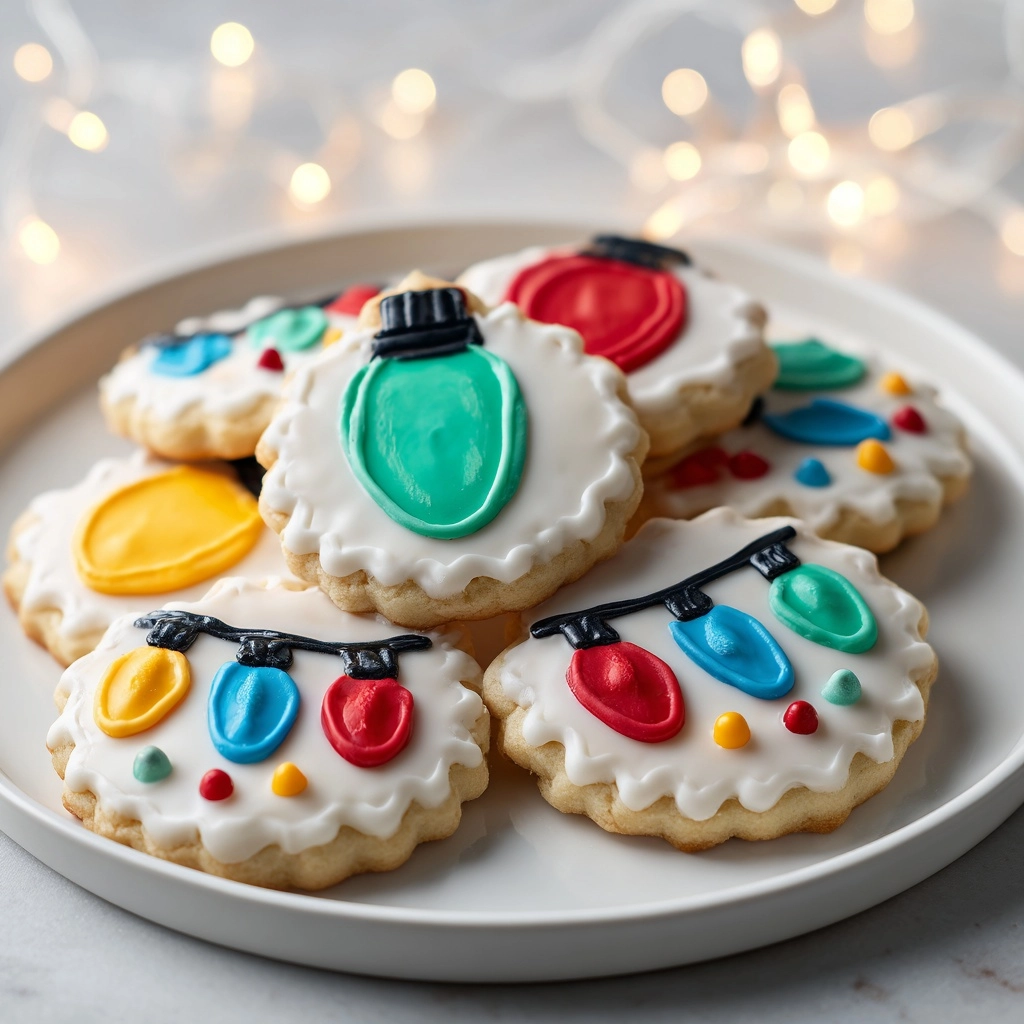
If you’re on the lookout for a show-stopping holiday treat that’s as much fun to make as it is to eat, these Christmas Lights Royal Icing Sugar Cookies are going to absolutely light up your dessert table! With a tender, buttery base and a festive royal icing design that looks like twinkling Christmas lights, these cookies are a joyful baking project for all ages. Whether you’re gifting, sharing at a cookie swap, or simply indulging with a mug of cocoa, every bite is a sweet celebration of the season.
Ingredients You’ll Need
Each ingredient in Christmas Lights Royal Icing Sugar Cookies has a starring role, coming together to create that perfect classic cookie bite that’s soft, yet sturdy enough for decorating. The royal icing and food coloring turn each cookie into an edible work of art, ideal for showing off your holiday spirit!
- All-purpose flour: Essential for structure—make sure to measure accurately to get perfectly tender cookies.
- Baking soda: Gives the cookies a gentle lift and softness.
- Baking powder: Helps ensure even rising for those picture-perfect cookies.
- Unsalted butter (softened): Provides that rich, melt-in-your-mouth texture and flavor—room temperature butter creams best!
- Granulated sugar: Sweetens the dough and creates a delicate crunch.
- Large egg: Binds everything together for a cohesive dough.
- Vanilla extract: Adds a lovely aromatic warmth to both the cookies and icing.
- Almond extract (optional): A little goes a long way—perfect for adding a subtle, festive note.
- Powdered sugar: For the royal icing, ensures a smooth finish that’s easy to pipe.
- Meringue powder: The secret to glossy, stable royal icing—don’t skip it for best results.
- Warm water: Helps bring the frosting together to the perfect consistency for spreading or piping.
- Gel food coloring (red, green, blue, yellow, black): Bolds hues that pop on your cookies—gel is best for vibrant colors that won’t thin your icing.
- Mini chocolate chips or black icing: These become adorable light “sockets” and help bring your cookie decorations to life.
How to Make Christmas Lights Royal Icing Sugar Cookies
Step 1: Prepare Your Cookie Dough
Start by preheating your oven to 375°F (190°C), giving it time to fully heat while you prepare the dough. In a medium mixing bowl, whisk together the flour, baking soda, and baking powder. In a separate large bowl, cream the butter and sugar with a mixer until light and fluffy—this takes about 2-3 minutes and ensures a perfectly tender cookie. Beat in the egg, vanilla, and almond extract. Gradually add the dry ingredients to the wet mixture, mixing just until a soft, workable dough forms. If it feels sticky, add a tiny sprinkle of flour so it’s easy to roll.
Step 2: Roll and Cut Cookies
Dust your counter or a large cutting board with flour, then roll the dough out to about 1/4 inch thickness. If you have a light bulb-shaped cookie cutter, now’s its moment to shine, but even classic rounds work beautifully for this design. Cut out your desired shapes and place each cookie on a parchment-lined baking sheet, leaving space between them for even baking.
Step 3: Bake to Golden Perfection
Bake your cut-out cookies for 8-10 minutes or until just the edges start to turn a gentle golden brown. Keep a close eye—overbaking can make sugar cookies hard! Let the cookies cool for a minute or two on the sheet, then transfer them to a wire rack to cool completely. Decorating while warm will melt your royal icing, so patience is key.
Step 4: Whip Up Your Festive Royal Icing
For that picture-perfect Christmas Lights Royal Icing Sugar Cookies finish, use a stand mixer to beat together the powdered sugar, meringue powder, and water on low until combined. Increase the speed and whip for about 5 minutes, until stiff peaks form. Portion the icing into small bowls and tint with your chosen gel food coloring—think red, green, blue, and yellow for lights, and black for the strings. If needed, add a few drops of additional water to achieve your ideal piping consistency.
Step 5: Decorate Like a Pro
Transfer your colored icing to piping bags or zip-top bags with the corner snipped off. Use black icing to pipe a curvy line across each cooled cookie, mimicking the string of holiday lights. Next, pipe little dots of colored icing along the string for light bulbs and add a mini chocolate chip or a dab of black icing as the “socket”. It’s like crafting with sugar—let your creativity go wild! Allow your beautifully decorated cookies to dry completely before enjoying or packing them up. For the best results, let the royal icing set overnight so each design is firm and glossy.
How to Serve Christmas Lights Royal Icing Sugar Cookies
Garnishes
Although these cookies are dazzling enough on their own, you can add a sprinkle of edible glitter or a dusting of powdered sugar for a magical, snow-kissed effect. For a more playful touch, tuck a few extra mini chocolate chips around the lights or gently press sparkling sugar crystals onto the wet icing for extra twinkle.
Side Dishes
Pair these festive Christmas Lights Royal Icing Sugar Cookies with mugs of hot chocolate, eggnog, or a simple vanilla milkshake for a heartwarming holiday treat. On a dessert tray, they shine alongside peppermint bark, chocolate fudge, or other holiday classics, making your dessert table the talk of the party.
Creative Ways to Present
Wrap your cookies in clear cellophane bags tied with festive ribbon for joyful edible gifts or fill a decorative tin for a sweet hostess present. For a cookie exchange, arrange them on a platter with sprigs of fresh holly or rosemary. You could even write guests’ names in icing for personalized edible place cards at your holiday dinner!
Make Ahead and Storage
Storing Leftovers
Once your cookies are thoroughly dried, keep them in an airtight container at room temperature. Separate layers with parchment to protect your icing artwork; properly stored, Christmas Lights Royal Icing Sugar Cookies stay delicious and fresh for up to a week!
Freezing
If you want to work ahead or save cookies for another celebration, they freeze beautifully—just be sure the royal icing has dried completely first. Layer between sheets of wax paper in a freezer-safe container and store for up to 3 months. To thaw, leave them out at room temperature in the container (still sealed) so condensation doesn’t spoil your designs.
Reheating
No reheating needed for these sweet treats! If your cookies have been in the freezer, simply let them come to room temperature in their container. They’ll taste as delicious as the day you decorated them, with all that gorgeous royal icing intact.
FAQs
Do I need meringue powder for the royal icing?
Meringue powder is the easiest way to make safe, stable royal icing that dries shiny and firm, but you can swap in pasteurized egg whites if needed—just follow the instructions on the egg white carton to get the right consistency.
Can I use regular food coloring instead of gel?
While you can use regular liquid food coloring, gel is strongly recommended for Christmas Lights Royal Icing Sugar Cookies because it gives you vivid color without making the icing too runny. If using liquid coloring, add it slowly and check your icing texture along the way.
How long does it take the royal icing to dry?
For the icing to set completely, especially for gifting or stacking, allow at least 6-8 hours at room temperature—overnight is best. The wait is worth it for those crisp designs and mess-free packaging!
Can kids help make these cookies?
Absolutely! Kids love rolling the dough, cutting shapes, and especially decorating with all the icing colors. It’s a creative family tradition in the making, and the slightly imperfect cookies are often the most charming!
My cookies are too hard. What happened?
This is usually from overbaking—even an extra minute or two past golden can dry out sugar cookies. Next time, pull them from the oven as soon as just the edges begin to turn golden and let them finish setting on the baking sheet out of the oven.
Final Thoughts
There’s something undeniably magical about baking a batch of Christmas Lights Royal Icing Sugar Cookies, especially when the kitchen is filled with laughter and the colors of the season. Whether you’re a decorating pro or a baking newbie, give this recipe a try and let your creativity shine! Your holiday table—and your loved ones—will thank you.
Print
Christmas Lights Royal Icing Sugar Cookies Recipe
- Prep Time: 30 minutes
- Cook Time: 10 minutes
- Total Time: 40 minutes
- Yield: 24 cookies
- Category: Dessert
- Method: Baking
- Cuisine: American
- Diet: Vegetarian
Description
These Christmas Lights Royal Icing Sugar Cookies are a festive and delicious treat perfect for the holiday season. The buttery sugar cookie base is topped with colorful royal icing ‘lights’ for a fun and eye-catching decoration.
Ingredients
Cookies:
- 2 ¾ cups all-purpose flour
- 1 teaspoon baking soda
- ½ teaspoon baking powder
- 1 cup unsalted butter (softened)
- 1 ½ cups granulated sugar
- 1 large egg
- 1 teaspoon vanilla extract
- ½ teaspoon almond extract (optional)
Royal Icing:
- 4 cups powdered sugar
- 3 tablespoons meringue powder
- 6 tablespoons warm water (plus more as needed)
- Gel food coloring (red, green, blue, yellow, black)
- Mini chocolate chips or black icing for light ‘sockets’
Instructions
- Preheat the oven: Preheat the oven to 375°F (190°C).
- Prepare the dough: In a medium bowl, whisk together flour, baking soda, and baking powder. In a large bowl, cream together butter and sugar until light and fluffy. Beat in egg, vanilla, and almond extract. Gradually mix in the dry ingredients until a soft dough forms.
- Roll and cut: Roll the dough out on a lightly floured surface to about ¼ inch thickness. Use a light bulb-shaped or standard round cookie cutter to cut out cookies.
- Bake: Place on a parchment-lined baking sheet and bake for 8–10 minutes or until edges are lightly golden. Let cool completely on a wire rack.
- Prepare the icing: For the royal icing, beat powdered sugar, meringue powder, and water together in a stand mixer on low until smooth, then increase speed and mix for about 5 minutes until stiff peaks form. Divide and tint icing with food coloring.
- Decorate: Use black icing to draw a line across each cookie to resemble a string. Pipe small colored lights along the string and let dry completely before serving or storing.
Notes
- If you don’t have meringue powder, pasteurized egg whites can be used according to royal icing recipe instructions.
- Let the icing dry overnight for best results.
- Store cookies in an airtight container at room temperature for up to 1 week.
Nutrition
- Serving Size: 1 cookie
- Calories: 160
- Sugar: 17g
- Sodium: 65mg
- Fat: 7g
- Saturated Fat: 4g
- Unsaturated Fat: 2g
- Trans Fat: 0g
- Carbohydrates: 23g
- Fiber: 0g
- Protein: 1g
- Cholesterol: 20mg


