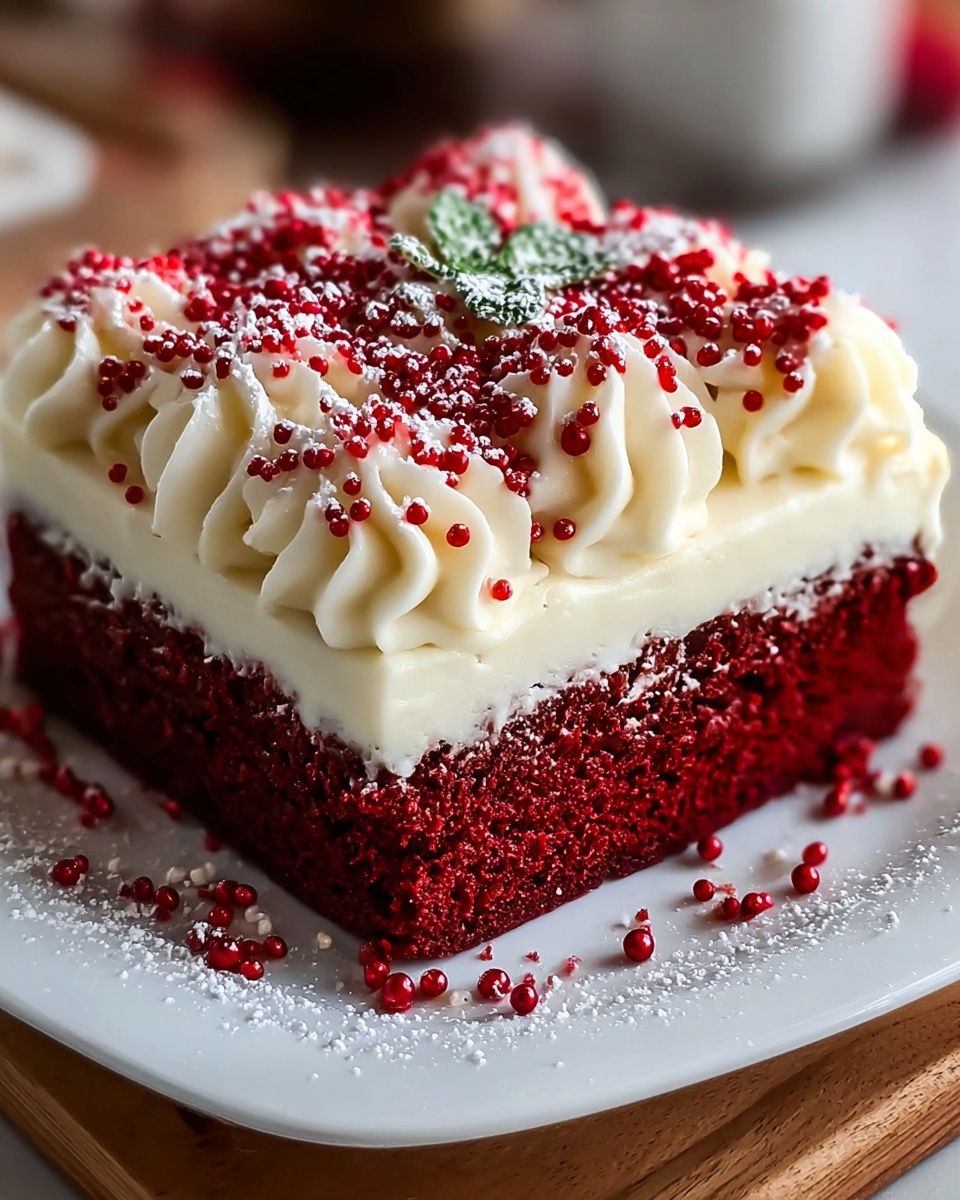
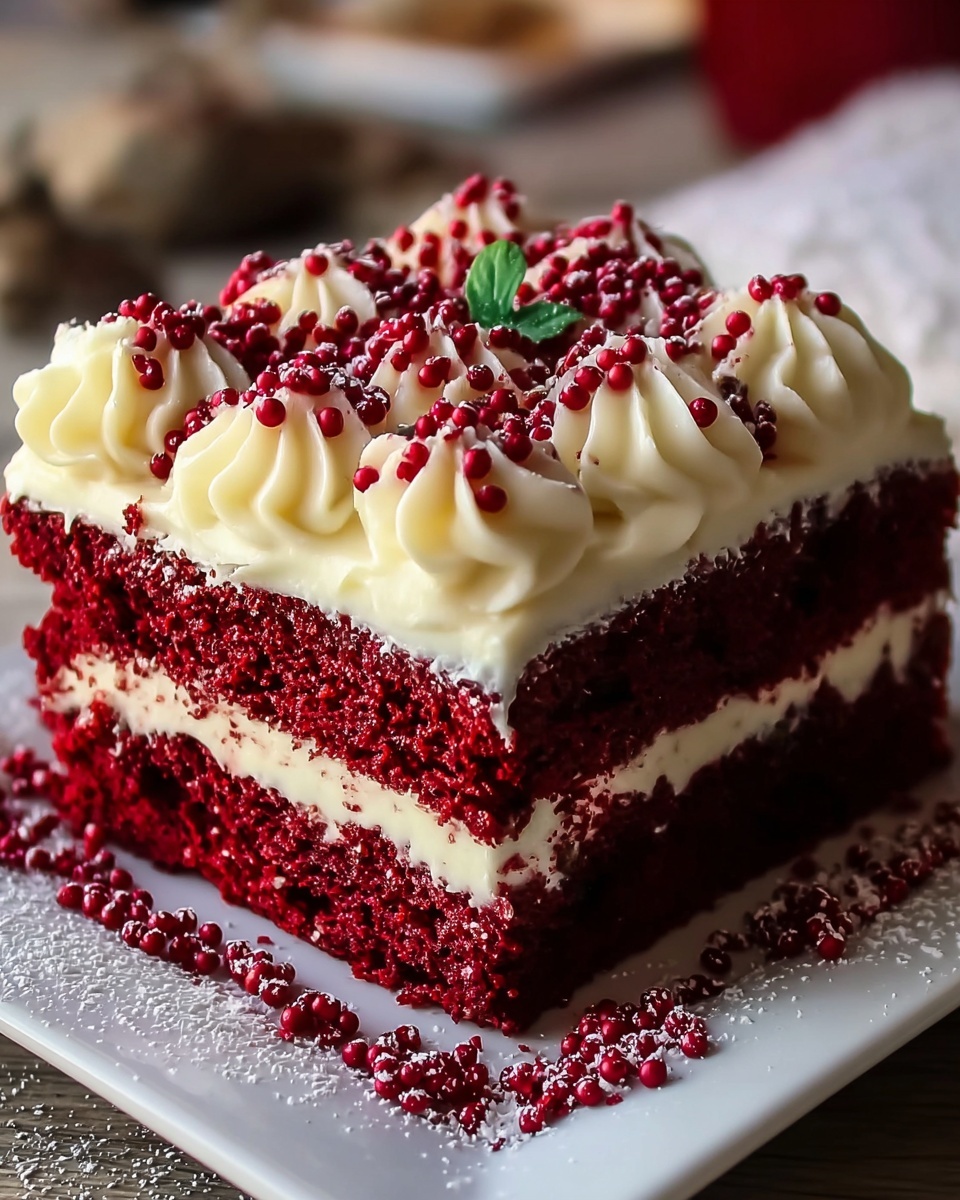
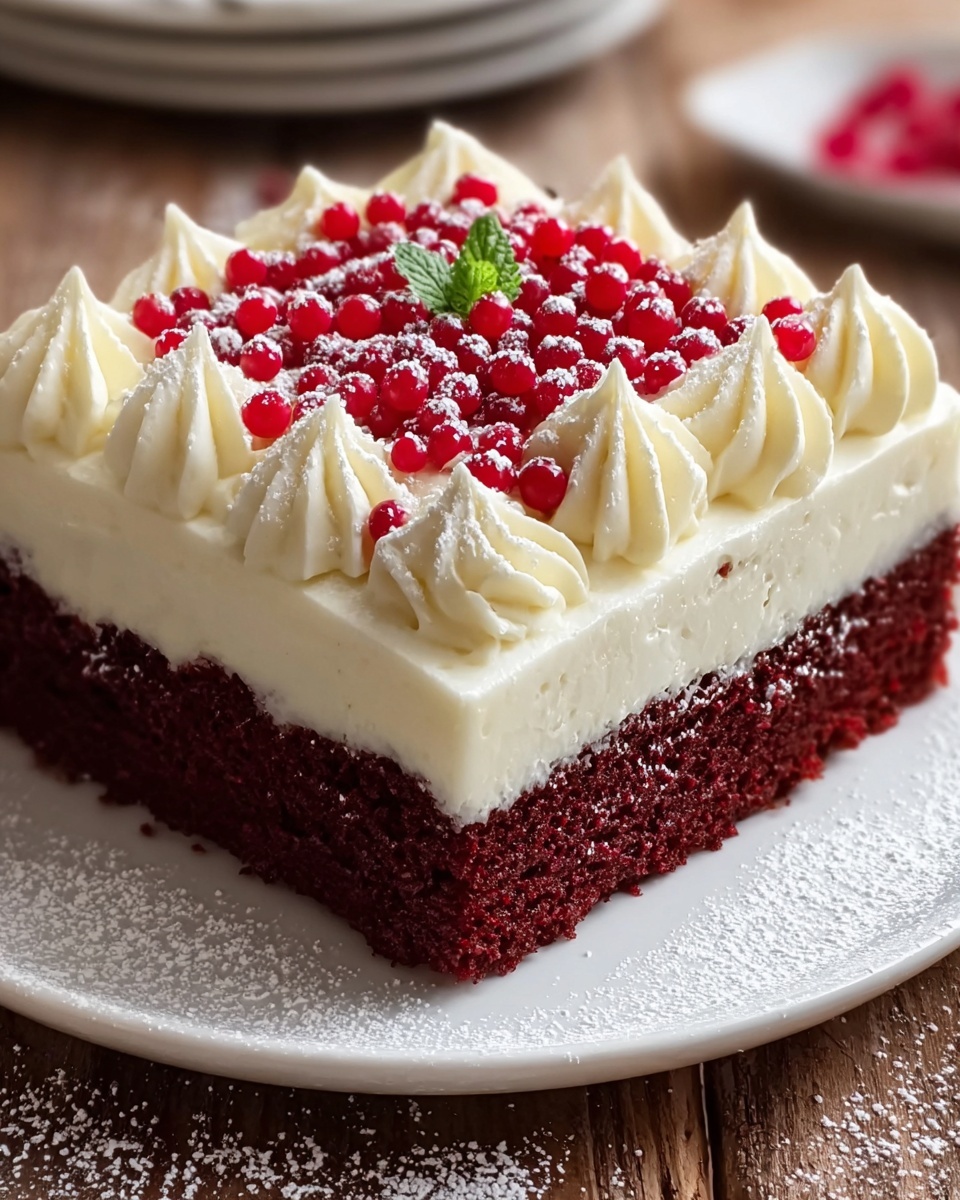
If you’re searching for a dessert that captures the magic of the season with every bite, this Christmas Red Velvet Poke Cake Recipe is your new best friend. It blends the classic charm of red velvet cake with a luscious, creamy filling that seeps into every nook thanks to the poke technique, resulting in a dessert that’s both visually stunning and impossibly moist. Whether you’re hosting a holiday party or simply craving a festive treat, this poke cake is the perfect way to spread joy and warmth around your table.
Ingredients You’ll Need
Gathering your ingredients is the first step toward creating this delightful Christmas Red Velvet Poke Cake Recipe. Each ingredient plays a vital role, from the rich red velvet cake base coloring your holiday with joy to the creamy layers that add sweetness and smoothness.
- 1 box red velvet cake mix: This forms the vibrant, tender cake foundation that’s easy to prepare and festive in color.
- Eggs, oil, and water: Typically listed on the cake mix box, these bring the batter together for perfect texture.
- 1 (14 oz) can sweetened condensed milk: Adds rich sweetness that seeps deep into the cake.
- 1 cup white chocolate chips, melted: Brings luscious creaminess and a hint of luxury.
- 1 (8 oz) package cream cheese, softened: Essential for the tangy and smooth frosting layer.
- 1 (8 oz) tub whipped topping, thawed: Lightens the frosting, making it fluffy and airy.
- 1 teaspoon vanilla extract: Enhances flavor complexity and warmth.
- ½ cup powdered sugar: Sweetens and stabilizes the cream cheese frosting.
- Festive sprinkles or holiday-themed decorations (optional): Add a merry touch with colors and sparkle perfect for the season.
How to Make Christmas Red Velvet Poke Cake Recipe
Step 1: Bake the Perfect Red Velvet Cake
Start by preheating your oven according to the red velvet cake mix instructions. Preparing the cake batter is straightforward—combine the mix with eggs, oil, and water as directed. Pour the silky batter into a greased 9×13-inch baking dish and bake until a toothpick comes out clean. This step guarantees you have a beautiful base with that signature tender crumb and deep red color, all set to soak up the delicious filling.
Step 2: Poke Holes for Maximum Flavor Infusion
Once your cake is out of the oven and has cooled for about 10 minutes, grab the handle of a wooden spoon and poke holes evenly all over the surface. This simple step is the secret magic of the poke cake, creating pockets that allow the sweetened condensed milk and white chocolate mix to sink in and infuse every bite with indulgence.
Step 3: Prepare and Pour the Sweet Filling
In a small bowl, combine the sweetened condensed milk with the melted white chocolate chips, stirring until smooth and combined. Pour this luscious mixture over the cake, ensuring it fills the holes you’ve created so the flavor distribution is absolute perfection. Let your cake sit for at least 30 minutes so the liquid can soak in fully, then allow it to cool completely, setting the stage for the creamy frosting to come.
Step 4: Whip Up the Creamiest Frosting
In a medium bowl, beat the softened cream cheese until velvety smooth. Add powdered sugar and vanilla extract, mixing until everything melds beautifully. The final flourish is folding in the thawed whipped topping gently, creating a frosting that’s delightfully light but wonderfully rich—exactly what you want crowning your poke cake.
Step 5: Frost and Decorate Your Cake
Spread the cream cheese mixture evenly over the cooled cake, smoothing it into a thick, inviting layer. This frosting not only tastes dreamy but also visually complements the festive spirit of the cake. Top with your choice of colorful sprinkles or holiday-themed decorations to add that extra sparkle and cheer that screams Christmas.
Step 6: Chill for Ultimate Flavor and Texture
Place your decorated cake in the refrigerator for at least 30 minutes before slicing and serving. This chill time lets the flavors meld beautifully and the frosting set perfectly so every slice holds together with luscious, creamy goodness.
How to Serve Christmas Red Velvet Poke Cake Recipe
Garnishes
Adding garnishes to your Christmas Red Velvet Poke Cake Recipe not only enhances its appearance but also complements its flavors beautifully. Consider using bright red and green sprinkles, edible glitter, or even finely chopped peppermint candy for a festive crunch that brightens every forkful.
Side Dishes
This cake pairs wonderfully with simple sides that won’t overpower it. Fresh holiday berries, a scoop of vanilla ice cream, or light whipped cream accompany the cake’s richness, balancing out the sweetness without stealing the spotlight.
Creative Ways to Present
Presentation makes any dessert feel extra special. Serve slices on pretty holiday plates, drizzle a little leftover melted white chocolate around the platter, or plate with a sprig of mint or cinnamon sticks. For a party, consider cutting the cake into small bite-sized squares and placing them on festive toothpicks for easy sharing.
Make Ahead and Storage
Storing Leftovers
Your Christmas Red Velvet Poke Cake Recipe can stay fresh in the fridge for up to 4 days if covered tightly to prevent drying out. Using an airtight container or wrapping it well in plastic wrap helps maintain the cake’s moisture and the frosting’s delicate texture.
Freezing
If you want to save slices for later, you can freeze individual pieces. Wrap them securely with plastic wrap and place in a freezer-safe container or bag. Frozen cake pieces can last up to 2 months, and when thawed slowly in the refrigerator, they’re nearly as delightful as freshly made.
Reheating
This sweet treat is best enjoyed cold or at room temperature, as reheating can disrupt the frosting’s texture. If you prefer it slightly warm, consider gently warming a small slice in the microwave for just a few seconds, but keep it light so the cream cheese topping doesn’t lose its charm.
FAQs
Can I use homemade red velvet cake instead of the boxed mix?
Absolutely! Feel free to use your favorite homemade red velvet cake recipe. Just make sure the cake has a tender crumb and is fully cooled before poking and adding the filling.
What can I substitute for the whipped topping?
If you’re not a fan of whipped topping, you can substitute homemade whipped cream or even a light buttercream frosting, but whipped topping keeps the frosting fluffy and light as intended in this poke cake recipe.
Can this Christmas Red Velvet Poke Cake Recipe be made gluten-free?
Yes, using a gluten-free red velvet cake mix will work perfectly. Just follow the same instructions, and you’ll still get that moist, flavorful poke cake that everyone will love.
How far in advance can I make this cake?
This cake can be prepared up to 2 days before your event. Just keep it refrigerated and covered, so all the flavors have time to meld wonderfully without losing freshness.
What is the purpose of poking holes in the cake?
Poking holes allows the sweetened condensed milk and melted white chocolate mixture to soak deep into the cake, creating moist pockets of flavor that elevate the texture and taste beyond an ordinary cake.
Final Thoughts
I can’t recommend this Christmas Red Velvet Poke Cake Recipe enough when you’re craving a dessert that’s both impressive and utterly delicious. It’s straightforward to make, irresistibly festive, and guaranteed to bring smiles at any holiday gathering. So why wait? Gather your ingredients, get baking, and treat yourself and your loved ones to this seasonal wonder that truly tastes like Christmas on a plate.
Print
Christmas Red Velvet Poke Cake Recipe
- Prep Time: 15 minutes
- Cook Time: 35 minutes
- Total Time: 1 hour 20 minutes
- Yield: 12 servings
- Category: Dessert
- Method: Baking
- Cuisine: American
- Diet: Vegetarian
Description
This festive Christmas Red Velvet Poke Cake is a delightful holiday dessert featuring moist red velvet cake infused with a luscious white chocolate and condensed milk mixture, topped with a smooth and fluffy cream cheese frosting. Perfect for celebrations, this easy-to-make poke cake combines rich flavors and a beautiful presentation with optional holiday-themed sprinkles for a joyful touch.
Ingredients
Cake
- 1 box red velvet cake mix (plus ingredients listed on the box, usually eggs, oil, and water)
Filling
- 1 (14 oz) can sweetened condensed milk
- 1 cup white chocolate chips, melted
Frosting
- 1 (8 oz) package cream cheese, softened
- 1 (8 oz) tub whipped topping (like Cool Whip), thawed
- 1 teaspoon vanilla extract
- ½ cup powdered sugar
Decoration
- Festive sprinkles or holiday-themed decorations (optional)
Instructions
- Preheat and Bake: Preheat your oven according to the red velvet cake mix instructions. Prepare the cake batter by mixing the cake mix with eggs, oil, and water as directed on the box. Pour batter into a greased 9×13-inch baking dish. Bake as indicated on the package. Once done, remove from oven and let cool for 10 minutes.
- Poke Holes: Use the handle of a wooden spoon to poke holes evenly all over the warm cake, ensuring the holes are spaced to allow filling to seep in.
- Add White Chocolate Mixture: In a small bowl, combine sweetened condensed milk and melted white chocolate chips, stirring until smooth. Pour this mixture evenly over the cake, filling the holes thoroughly. Let the cake absorb the mixture for at least 30 minutes, then allow it to cool completely.
- Prepare Frosting: In a medium bowl, beat softened cream cheese until smooth. Add powdered sugar and vanilla extract and continue beating until well combined. Gently fold in whipped topping until the mixture is light and fluffy.
- Frost the Cake: Spread the cream cheese frosting evenly over the cooled cake, covering it with a thick, smooth layer.
- Decorate and Chill: Top the frosted cake with festive holiday sprinkles or decorations such as red and green sprinkles or edible glitter. Chill in the refrigerator for at least 30 minutes before slicing and serving for best texture and flavor.
Notes
- Allowing the cake to absorb the condensed milk and white chocolate mixture ensures extra moistness and flavor.
- Use a wooden spoon handle or similar tool to poke evenly sized holes for consistent filling distribution.
- Chilling the cake before serving helps the frosting set and flavors meld together.
- Customize decorations to your holiday theme or occasion for variety.
- Make sure the cream cheese is softened to avoid lumps in the frosting.


