
Get ready to fall in love with Crispy Beef Chimichangas: The Ultimate Mexican Delight Recipe—a mouthwatering blend of seasoned ground beef, gooey cheese, and refried beans wrapped in a flour tortilla, then perfectly fried to crispy golden perfection. This dish captures the heart of classic Mexican flavors with a delightful crunch that will leave everyone at your table begging for more. Whether it’s a casual dinner or a special occasion, these chimichangas bring warmth, zest, and a satisfying crunch in every bite.
Ingredients You’ll Need
Each ingredient in this recipe plays a crucial role, bringing layers of flavor, texture, and color that make Crispy Beef Chimichangas: The Ultimate Mexican Delight Recipe so unforgettable. From the spices that give a gentle kick to the cheese that melts just right, here’s what you’ll want to gather.
- 1 pound ground beef: The hearty base that delivers savory richness and protein to this dish.
- 1 small onion, finely chopped: Adds a subtle sweetness and aromatic depth when sautéed.
- 2 cloves garlic, minced: Brings a warm, pungent flavor that elevates the beef beautifully.
- 1 teaspoon ground cumin: Gives a smoky earthiness essential to authentic Mexican seasoning.
- 1 teaspoon chili powder: Adds gentle heat and vibrant color to the filling.
- 1/2 teaspoon paprika: Offers a mild sweetness with a hint of smoky undertones.
- 1/2 teaspoon salt: Balances the flavors and enhances every ingredient’s natural taste.
- 1/4 teaspoon black pepper: Provides a subtle kick that complements the spices.
- 1 cup refried beans: Adds creamy texture and a traditional touch to the filling.
- 1 cup shredded cheddar cheese: Melts to create that irresistible gooey center.
- 1/2 cup salsa: Brings fresh, tangy brightness to each chimichanga.
- 4 large flour tortillas: The sturdy canvas that holds all of these delicious elements.
- Vegetable oil, for frying: Ensures you get that perfectly crispy, golden exterior.
- Optional toppings: Sour cream, guacamole, chopped cilantro, diced tomatoes, shredded lettuce for extra freshness and flavor.
How to Make Crispy Beef Chimichangas: The Ultimate Mexican Delight Recipe
Step 1: Brown the Beef
Start by heating a large skillet over medium heat and adding the ground beef. Cook the beef, breaking it apart with your spatula, until it’s fully browned, usually 5 to 7 minutes. This step sets the flavor foundation—getting a nice sear on the meat is key for that deep, savory taste.
Step 2: Drain the Excess Fat
Once your beef is browned, carefully drain the excess fat from the skillet. I find tilting the pan slightly and using a spoon works best to keep all that meaty goodness while getting rid of unwanted grease—this keeps the chimichangas delightfully crispy rather than greasy.
Step 3: Sauté Onions and Garlic
Add the chopped onion and minced garlic to the beef in the skillet. Let them cook for about 3 to 4 minutes until the onions become translucent and soften. This step adds sweetness and aromatic layers that balance the beef’s richness beautifully.
Step 4: Spice It Up
Sprinkle in the ground cumin, chili powder, paprika, salt, and black pepper. Stir everything together and cook for another minute to let the spices bloom and infuse the mixture with amazing flavor. This seasoning combo is what really makes these chimichangas a Mexican delight!
Step 5: Cool the Filling
Remove your skillet from heat and let the beef mixture cool slightly. This makes it easier to handle as you start assembling your chimichangas and helps prevent the tortillas from tearing.
Step 6: Assemble the Chimichangas
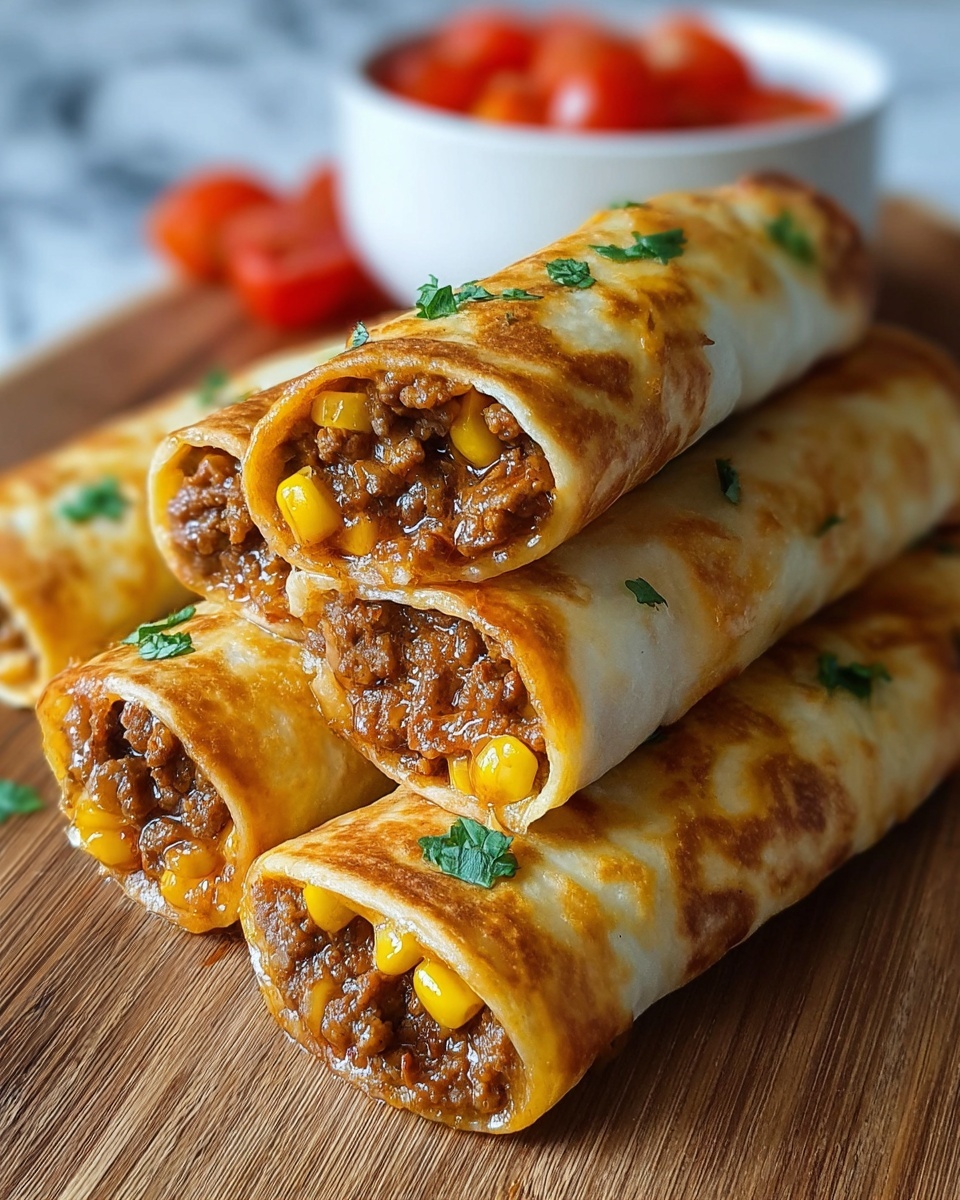
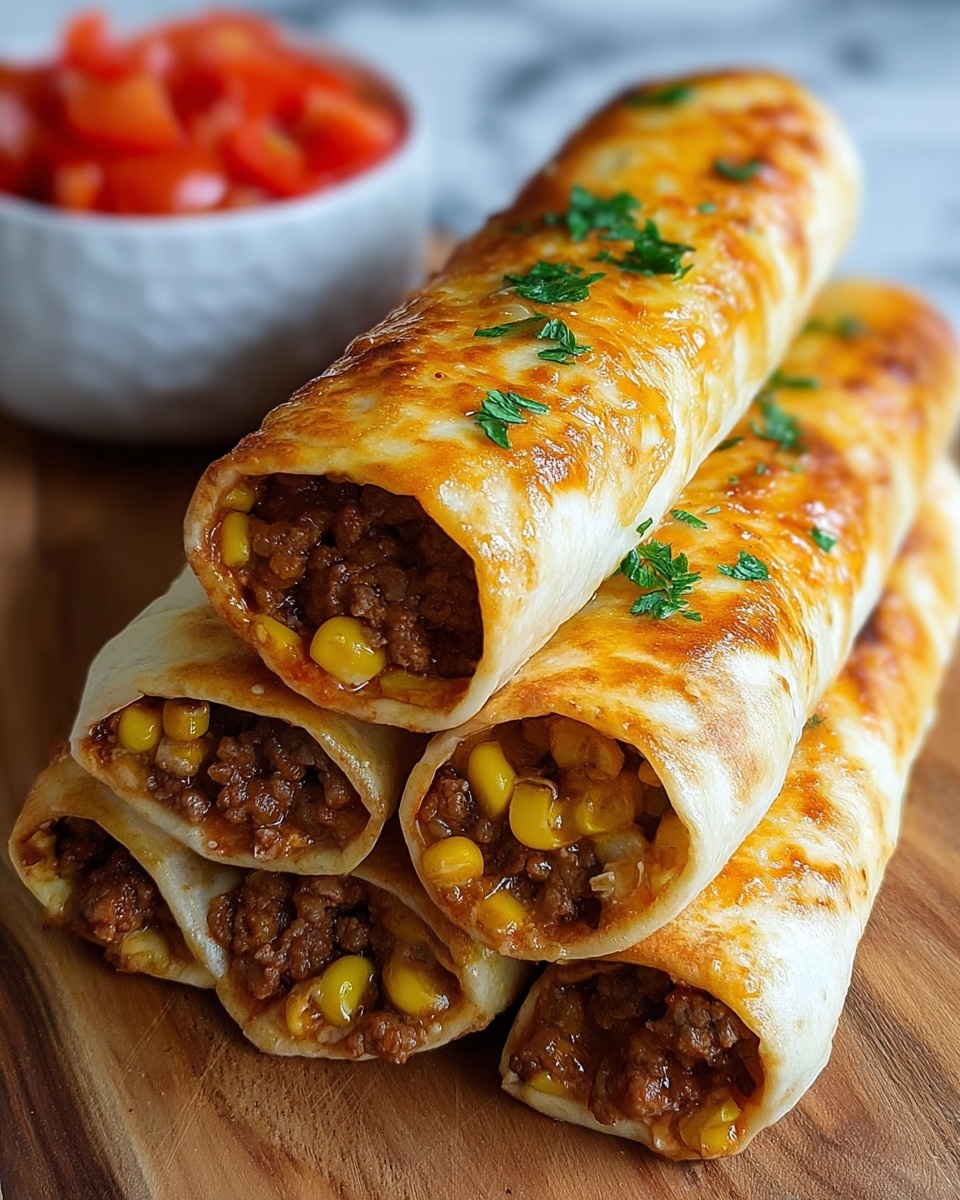
Lay a large flour tortilla flat on your clean surface. Spoon about a quarter of the beef filling into the center. Spread a couple of tablespoons of refried beans over the beef, then sprinkle with shredded cheddar and top with a spoonful of salsa. This combo creates a perfect balance of creamy, cheesy, and tangy flavors.
Step 7: Roll Them Up Tight
Fold the sides of the tortilla inward over the filling, then roll from the bottom up, tucking the filling in tightly as you go. Rolling snugly is crucial to keep all the delicious filling inside during cooking and to give your chimichangas that neat, compact shape.
Step 8: Fry Until Golden and Crispy
Heat vegetable oil in a deep skillet or pot to 350°F (175°C). Carefully place each chimichanga seam-side down into the hot oil. Fry for 3 to 4 minutes on each side until golden brown and crispy. Using tongs to gently turn them helps ensure an even, perfect crispness all around.
Step 9: Drain and Rest
Remove the chimichangas from the oil and place them on paper towels to drain excess oil. This keeps them wonderfully crispy and not greasy—just the way they should be.
How to Serve Crispy Beef Chimichangas: The Ultimate Mexican Delight Recipe
Garnishes
A beautiful chimichanga deserves some fresh, vibrant garnishes to complement its crispy richness. Sour cream adds a cool creaminess, guacamole brings a silky buttery texture, chopped cilantro brightens with herbaceous notes, diced tomatoes add juicy freshness, and shredded lettuce lends a crunchy crisp contrast. These toppings aren’t just decoration—they elevate the entire experience.
Side Dishes
Serve your Crispy Beef Chimichangas with Mexican rice or refried beans to round out the meal. A refreshing corn salad or a simple avocado lime salad pairs well to balance the richness, while pickled jalapeños give a perfect spicy kick for those who like a little extra heat.
Creative Ways to Present
If you want to impress your guests, slice the chimichangas in half diagonally and fan them out on a platter with colorful garnishes artistically scattered around. For a fun twist, serve mini chimichanga bites as appetizers. Either way, they look as incredible as they taste.
Make Ahead and Storage
Storing Leftovers
You can store any leftover Crispy Beef Chimichangas in an airtight container in the refrigerator for up to 3 days. Keep the toppings separate to avoid sogginess. When ready to eat, they’re easy to reheat and enjoy again.
Freezing
For longer storage, wrap each chimichanga tightly in plastic wrap and then foil before freezing. They’ll keep well for up to 2 months. When you’re ready to indulge again, you’ll have this ultimate Mexican delight at your fingertips.
Reheating
The best way to reheat your chimichangas while preserving crispiness is in a hot oven at 375°F (190°C) for about 15 to 20 minutes. Avoid microwaving if you can—it tends to make them soggy. A little oven time brings back that fresh-from-the-fryer crunch.
FAQs
Can I use ground turkey instead of beef?
Absolutely! Ground turkey is a leaner option and works well with all the seasoning in this recipe. Just be mindful that turkey cooks faster, so keep an eye to avoid drying it out.
What can I substitute for refried beans?
If you’re not a fan of refried beans, mashed black beans or even a creamy queso dip can be excellent alternatives to add creaminess inside the chimichangas.
Is it possible to bake instead of fry?
Yes! For a lighter option, bake your assembled chimichangas at 400°F (200°C) for 20 to 25 minutes, turning halfway, until golden and crispy. The texture won’t be quite the same, but they’ll still taste delicious.
How spicy is this recipe?
This recipe offers mild to moderate spiciness from the chili powder and salsa. You can easily adjust the heat by adding more chili powder or including diced jalapeños in the filling.
Can I prepare chimichangas in advance?
Definitely! You can assemble them a few hours beforehand and refrigerate them tightly wrapped. Just fry or bake right before serving to keep them crispy and fresh.
Final Thoughts
There’s something truly special about Crispy Beef Chimichangas: The Ultimate Mexican Delight Recipe that makes it an instant favorite in any kitchen. Its wonderfully crunchy exterior paired with a rich and flavorful filling is pure comfort food magic. Trust me—once you try this recipe, you’ll want to make it time and time again. So grab your ingredients, get frying, and enjoy every crispy, cheesy, beefy bite!
Print
Crispy Beef Chimichangas: The Ultimate Mexican Delight Recipe
- Prep Time: 15 minutes
- Cook Time: 25 minutes
- Total Time: 40 minutes
- Yield: 4 servings
- Category: Main Course
- Method: Frying
- Cuisine: Mexican
Description
This Crispy Beef Chimichangas recipe brings the ultimate Mexican delight to your table with flavorful ground beef, warm refried beans, melted cheddar cheese, and zesty salsa wrapped in a golden, crispy fried tortilla. Perfectly spiced and deep-fried for that irresistible crunch, these chimichangas are a crowd-pleaser ideal for a satisfying meal any day of the week.
Ingredients
Beef Filling
- 1 pound ground beef
- 1 small onion, finely chopped
- 2 cloves garlic, minced
- 1 teaspoon ground cumin
- 1 teaspoon chili powder
- 1/2 teaspoon paprika
- 1/2 teaspoon salt
- 1/4 teaspoon black pepper
Assembly
- 1 cup refried beans
- 1 cup shredded cheddar cheese
- 1/2 cup salsa
- 4 large flour tortillas
For Frying and Serving
- Vegetable oil, for frying
- Optional toppings: sour cream, guacamole, chopped cilantro, diced tomatoes, shredded lettuce
Instructions
- Brown the Beef: In a large skillet over medium heat, add the ground beef and cook it until browned, breaking it apart with a spatula. This should take about 5-7 minutes.
- Drain Excess Fat: Once the beef is browned, drain any excess fat from the skillet carefully to keep the beef flavorful without extra grease.
- Sauté Aromatics: Add the finely chopped onion and minced garlic to the skillet and sauté for about 3-4 minutes until the onion turns translucent and fragrant.
- Add Spices: Stir in ground cumin, chili powder, paprika, salt, and black pepper. Cook for another minute to let the spices bloom and infuse the meat with rich flavor.
- Cool the Mixture: Remove the skillet from heat and allow the beef mixture to cool slightly for easier handling when assembling.
- Assemble Chimichangas: Lay a large flour tortilla flat. Spoon about 1/4 of the beef mixture onto the center of the tortilla.
- Add Beans, Cheese, and Salsa: Spread a couple of tablespoons of refried beans over the beef, sprinkle shredded cheddar cheese on top, and add a spoonful of salsa.
- Fold the Tortilla: Fold the sides of the tortilla inwards over the filling, then roll the tortilla tightly from the bottom up, tucking in the filling to secure it well.
- Prepare Remaining Chimichangas: Repeat the assembly and folding with the remaining tortillas and filling to make four chimichangas total.
- Heat Oil: In a large, deep skillet or heavy-bottomed pot, pour vegetable oil to about 1 inch depth. Heat over medium-high heat until the oil reaches 350°F (175°C). Confirm by dropping a small piece of tortilla into the oil; it should sizzle immediately.
- Fry Chimichangas: Carefully place one chimichanga seam-side down into the hot oil. Fry for 3-4 minutes until golden brown and crispy, turning gently halfway through to ensure even browning.
- Drain and Repeat: Remove the chimichanga with tongs and place on paper towels to drain excess oil. Fry remaining chimichangas in batches, repeating the process until all are cooked.
Notes
- Make sure the oil is hot enough before frying to achieve a crispy texture without becoming greasy.
- Roll the tortillas tightly to prevent the filling from leaking during frying.
- You can customize the fillings by adding cooked rice, vegetables, or different cheeses.
- Serve chimichangas with optional toppings like sour cream, guacamole, fresh cilantro, diced tomatoes, or shredded lettuce for extra flavor and texture.
- Leftover chimichangas can be reheated in an oven or air fryer to maintain crispiness.


