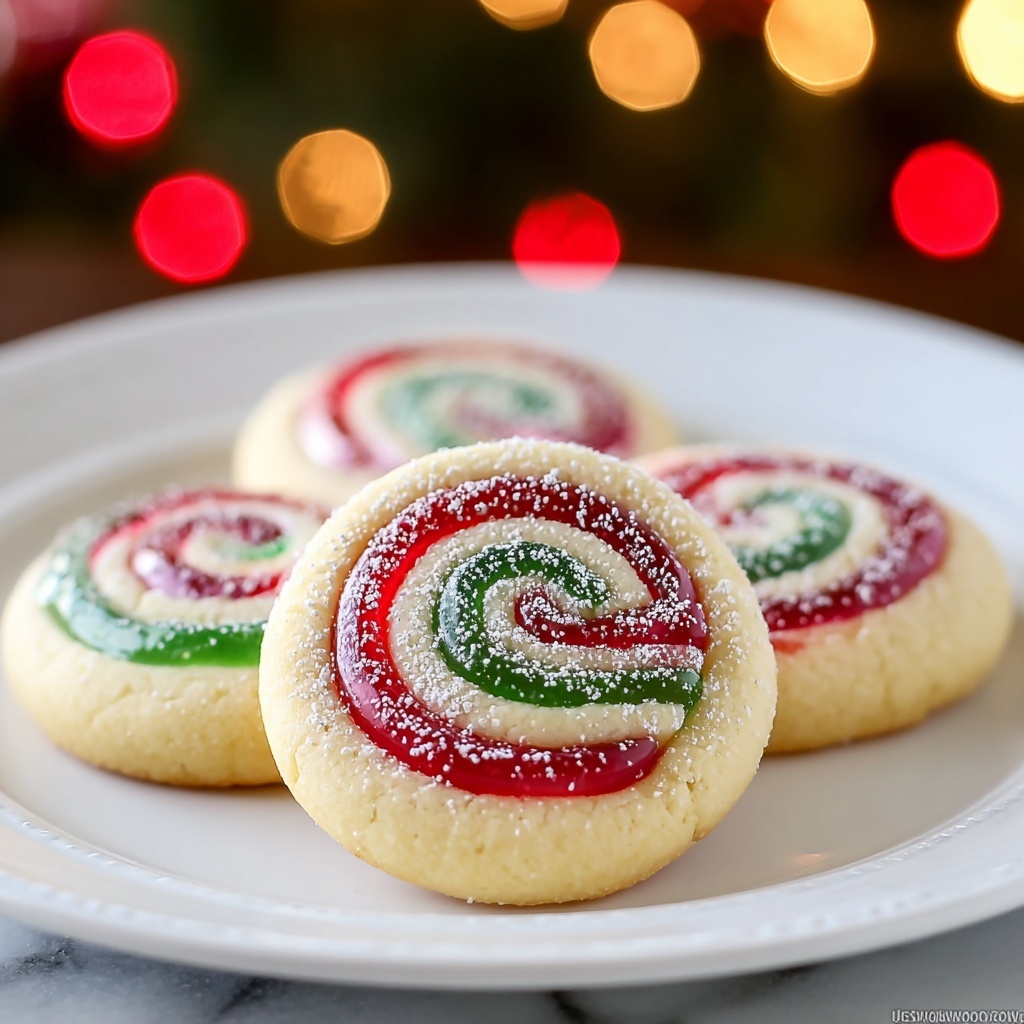
If you’re dreaming of festive treats that combine charm, color, and heavenly flavors, then this Deliciously Swirled Christmas Cookies for Your Holiday Cheer Recipe is exactly what you need. These cookies bring vibrant red and green swirls into tender, buttery rounds that melt in your mouth and spread holiday joy with every bite. Whether you’re baking for a crowd or just to enjoy a cozy night in, these swirled delights are guaranteed to brighten your season and satisfy that sweet tooth craving with their perfect texture and classic vanilla warmth.
Ingredients You’ll Need
Each ingredient in this recipe plays a crucial role, from giving structure to adding flavor and that beautiful holiday pop of color. These simple ingredients come together to make something truly special.
- 2 cups All-Purpose Flour: The foundation that gives your cookies structure and a perfect bite; gluten-free flour can be swapped here for dietary needs.
- 1 teaspoon Baking Powder: A gentle lift to keep your cookies soft and fluffy without too much rise.
- 1/4 teaspoon Salt: Enhances all the flavors and balances the sweetness, especially important if your butter is unsalted.
- 1 cup Unsalted Butter: Softened and creamy, butter adds richness and tenderness that no other fat can match.
- 1 cup Granulated Sugar: Adds just the right sweetness and helps create a lovely texture once creamed with butter.
- 1 large Egg: Acts as a binder while bringing moisture that keeps the cookies from being dry.
- 2 tablespoons Milk: Moisturizes the dough and helps everything blend perfectly while keeping it tender.
- 1 teaspoon Vanilla Extract: Brings that familiar, comforting warmth to each bite – feel free to try almond or peppermint for a festive twist.
- Red and Green Gel Food Coloring: Just a little bit adds those iconic Christmas swirls that make these cookies visually festive and fun.
- Sanding Sugar (red, green, or white): Optional, but this decorative sugar adds a sparkling crunch and extra holiday flair.
How to Make Deliciously Swirled Christmas Cookies for Your Holiday Cheer Recipe
Step 1: Mix Your Dry Ingredients
Start by whisking together the all-purpose flour, baking powder, and salt in a medium bowl until everything is evenly combined. This simple step ensures your cookies will have the right texture and that each bite is consistently buttery and tender.
Step 2: Cream Butter and Sugar
In a separate large mixing bowl, cream the softened unsalted butter with granulated sugar for 2 to 3 minutes until the mixture becomes light and fluffy. This is where the magic happens to develop that gorgeous cookie texture you’ll love.
Step 3: Add Wet Ingredients
Next, beat the egg, milk, and vanilla extract into the creamed butter and sugar. This adds moisture and binds the dough together, creating that perfect base for your swirled colors.
Step 4: Combine Wet and Dry
Gradually add the flour mixture to the wet ingredients, stirring gently until just combined. Be careful not to overmix because you want tender cookies, not tough ones!
Step 5: Divide and Color the Dough
Turn your dough out onto a clean surface and divide it into three equal parts. Leave one chunk plain, color one with red gel food coloring, and the last with green gel food coloring. This is where your cookies start to look like Christmas with those joyous hues.
Step 6: Roll and Chill
Roll each colored dough into 1/4-inch thick rectangles, placing parchment paper on top and bottom to prevent sticking. Chill all three slabs for 30 minutes so they firm up and are easier to work with in the next step.
Step 7: Layer and Roll Into a Log
Stack the plain dough on the bottom, red in the middle, and green on top. Roll the layered slabs tightly into a log shape and trim uneven edges to get a neat swirl. Refrigerate this log for at least 2 hours to ensure it’s firm enough to slice without losing its shape.
Step 8: Coat With Sanding Sugar
Once the log is chilled and firm, roll it evenly in your choice of sanding sugar. This adds a festive sparkle and delightful texture once baked.
Step 9: Slice and Bake
Preheat your oven to 350°F (175°C), line baking sheets with parchment paper, and slice the log into 1/4-inch thick rounds. Place them spaced evenly and bake for 9 to 11 minutes until the edges turn lightly golden, revealing that tender, buttery cookie you’ve been waiting for.
Step 10: Cool and Enjoy
Allow cookies to cool on the baking sheet for five minutes before moving them to a wire rack. This helps them set perfectly so every bite stays deliciously swirled and satisfying.
How to Serve Deliciously Swirled Christmas Cookies for Your Holiday Cheer Recipe
Garnishes
For an extra festive look, sprinkle some extra sanding sugar or edible glitter on your cookies right after baking. You can also drizzle white chocolate over them once cooled for a sweet finishing touch that’s bound to impress guests.
Side Dishes
These swirled Christmas cookies pair wonderfully with warm beverages like mulled cider, hot cocoa, or a simple cup of coffee. The buttery sweetness balances beautifully against a cozy drink, turning any snack moment into a holiday celebration.
Creative Ways to Present
Gift these cookies stacked in a clear cellophane bag tied with a red or green ribbon for a charming homemade present. Or arrange them on a festive platter alongside candy canes and Christmas ornaments for an eye-catching holiday dessert table centerpiece.
Make Ahead and Storage
Storing Leftovers
Keep your Deliciously Swirled Christmas Cookies for Your Holiday Cheer Recipe fresh by storing them in an airtight container at room temperature. They will stay soft and tasty for up to a week, making it easy to enjoy some festive sweetness whenever you like.
Freezing
If you want to bake ahead, freeze the sliced cookie rounds on baking sheets until firm, then transfer them to a freezer bag or container. They’ll keep well for up to three months and can be baked straight from frozen with a couple of extra minutes in the oven.
Reheating
To reheat, simply let the cookies come to room temperature or warm them gently in a low oven for a few minutes. This brings back that freshly baked softness and buttery aroma every time.
FAQs
Can I use a different food coloring instead of gel?
Gel food coloring is recommended because it doesn’t alter the dough’s consistency, but you can use liquid coloring as long as you slightly reduce the milk in the recipe to keep the dough firm.
Are these cookies gluten-free?
They can be! Substitute the all-purpose flour with a 1:1 gluten-free flour blend and ensure all other ingredients are gluten-free to keep your cookies safe and delicious.
Can I make these cookies vegan?
With some adjustments—like using vegan butter, a flax egg substitute, and non-dairy milk—you can enjoy a vegan version, though the texture and flavor might vary slightly from the original.
How long does the dough need to chill?
It’s best to chill the rolled dough slabs for 30 minutes and the completed log for at least 2 hours. This ensures easy slicing and helps the cookies keep their perfect swirl during baking.
Can I add flavors other than vanilla?
Absolutely! Feel free to experiment with almond, peppermint, or citrus extracts to add a personalized holiday twist that suits your taste.
Final Thoughts
There’s something truly heartwarming about baking cookies that look as joyful as they taste, and this Deliciously Swirled Christmas Cookies for Your Holiday Cheer Recipe delivers just that. Whether you’re creating tradition or sharing a new favorite, these cookies are a beautiful, delicious way to spread holiday cheer. Grab your apron and celebrate with colorful swirls of sweetness that everyone will adore!
Print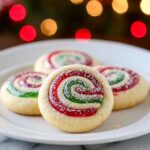
Deliciously Swirled Christmas Cookies for Your Holiday Cheer Recipe
- Prep Time: 40 minutes
- Cook Time: 11 minutes
- Total Time: 1 hour 11 minutes
- Yield: 24 servings
- Category: Baking
- Method: Baking
- Cuisine: American
- Diet: Gluten Free
Description
These Deliciously Swirled Christmas Cookies are a festive treat perfect for holiday celebrations. Featuring three vibrant dough colors—plain, red, and green—layered and rolled into a beautiful swirl, they are as pleasing to the eye as they are to the palate. Soft, buttery, and lightly sweetened, these cookies are finished with sanding sugar for a sparkling decorative touch. Ideal for sharing with family and friends during the Christmas season.
Ingredients
Dry Ingredients
- 2 cups All-Purpose Flour (or gluten-free 1:1 flour blend)
- 1 teaspoon Baking Powder
- 1/4 teaspoon Salt
Wet Ingredients
- 1 cup Unsalted Butter (softened, cool to touch but not melted)
- 1 cup Granulated Sugar
- 1 large Egg
- 2 tablespoons Milk
- 1 teaspoon Vanilla Extract
Coloring and Decoration
- Red Gel Food Coloring (as needed)
- Green Gel Food Coloring (as needed)
- Sanding Sugar (red, green, or white; optional but recommended)
Instructions
- Mix Dry Ingredients: In a medium bowl, whisk together the all-purpose flour, baking powder, and salt until evenly combined. This ensures your leavening agent and salt are distributed throughout the flour.
- Cream Butter and Sugar: In a large mixing bowl, beat the softened unsalted butter and granulated sugar together for 2-3 minutes until the mixture becomes light and fluffy. This creates a smooth base for your cookie dough.
- Add Wet Ingredients: Beat in the egg, milk, and vanilla extract to the creamed butter and sugar mixture until all ingredients are fully incorporated, resulting in a smooth batter.
- Combine Flour Mixture: Gradually add the flour mixture into the wet ingredients, stirring gently until just combined to avoid overmixing which can toughen the dough.
- Divide and Color the Dough: Turn the dough onto a clean surface and divide into three equal parts. Leave one part plain, tint the second with red gel food coloring, and the third with green gel food coloring, kneading each portion until the color is evenly distributed.
- Roll and Chill: Roll each colored dough portion into 1/4-inch thick rectangles between two sheets of parchment paper. Chill the dough rectangles in the refrigerator for 30 minutes to firm up for easier handling.
- Assemble the Swirl: Stack the chilled dough rectangles with the plain dough on the bottom, red dough in the middle, and green dough on top. Roll the stack tightly into a log shape, trimming any uneven edges for an even appearance.
- Chill the Log: Refrigerate the assembled dough log for at least 2 hours, or freeze for 30-45 minutes until firm. This step helps maintain the swirl shape during slicing and baking.
- Coat with Sanding Sugar: Roll the chilled log in your choice of sanding sugar until evenly coated for a sparkling finish.
- Preheat Oven and Prepare Baking Sheets: Preheat your oven to 350°F (175°C) and line baking sheets with parchment paper to prevent sticking and ensure even baking.
- Slice the Cookies: Using a sharp knife, slice the chilled dough log into 1/4-inch thick rounds. Place the cookies spaced evenly on the prepared baking sheets to allow room for slight spreading during baking.
- Bake and Cool: Bake the cookies for 9-11 minutes, or until edges are lightly golden. Allow cookies to cool on the baking sheet for 5 minutes to set before transferring to a wire rack to cool completely.
Notes
- You can substitute all-purpose flour with a 1:1 gluten-free flour blend to make the cookies gluten-free.
- If using salted butter, reduce the added salt to 1/8 teaspoon or omit entirely to avoid over-salting.
- Experiment with different gel food coloring flavors like peppermint or almond extracts to add a unique twist.
- For extra crunch and sparkle, use colored sanding sugar matching the dough colors.
- Ensure the butter is softened but not melted to achieve the best texture when creaming.
- Chilling the dough layers and assembled log is crucial for clean, defined swirls and easy slicing.
