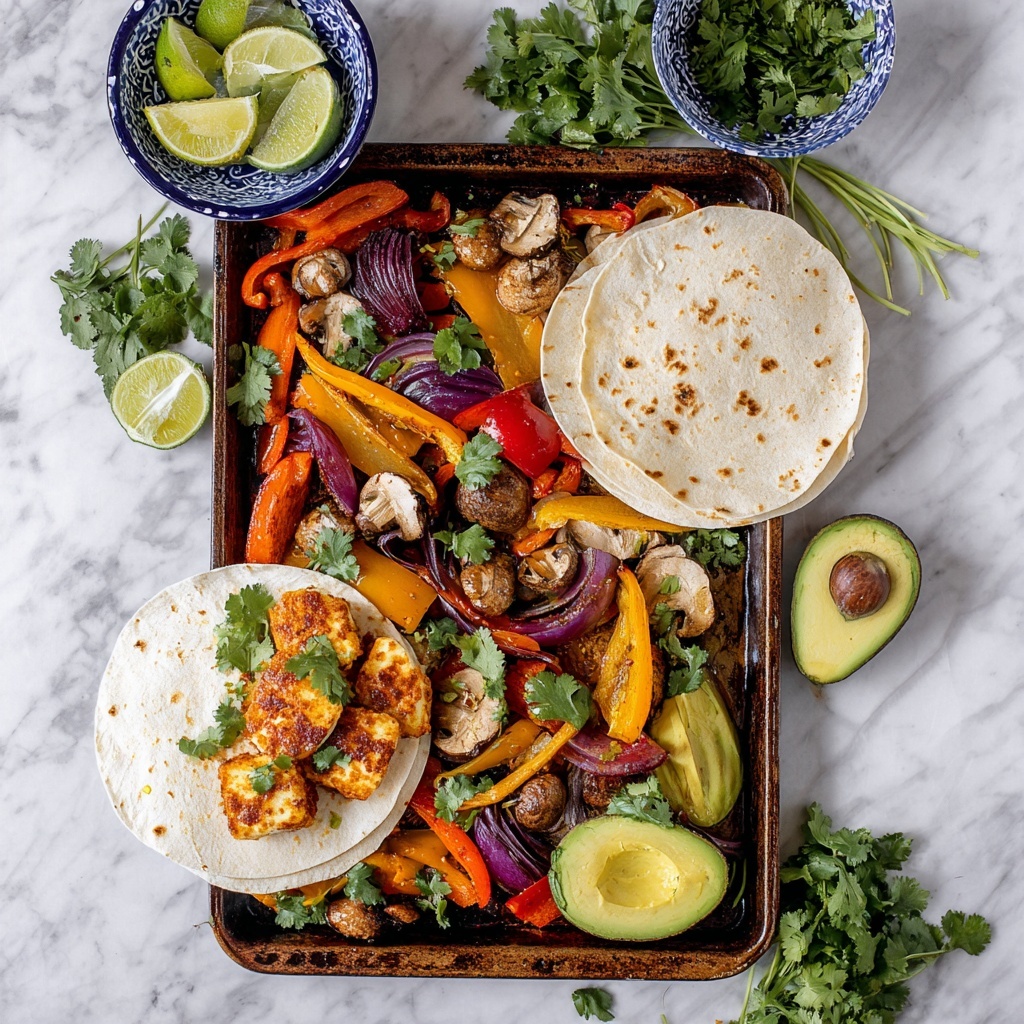
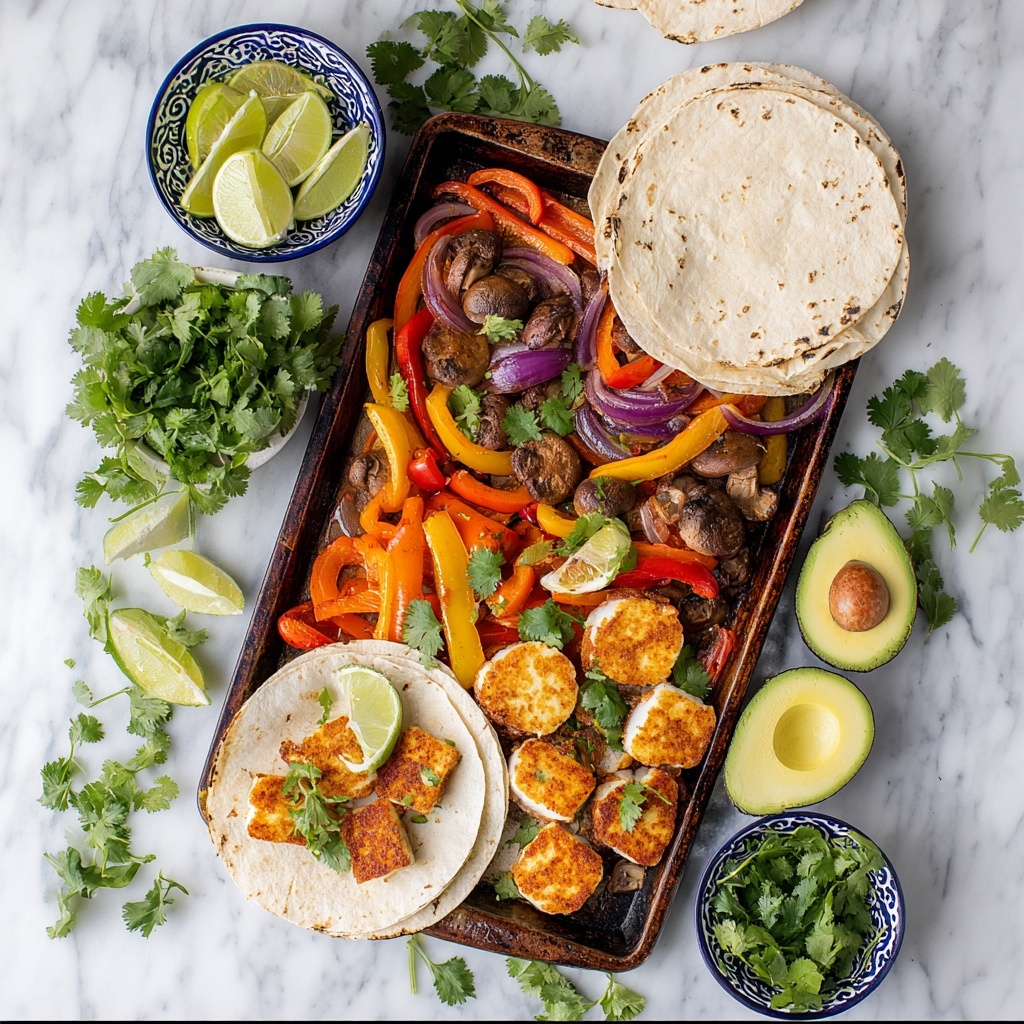
If you are craving a vibrant, flavorful, and satisfying meal that’s both veggie-packed and delightfully cheesy, then you are going to adore this Halloumi Fajitas Recipe. Imagine colorful bell peppers, sweet onions, earthy mushrooms, and tender carrots all tossed in warming fajita spices, paired with the salty, grill-marked goodness of halloumi cheese. It’s a fantastic twist on traditional fajitas that brings a Mediterranean flair and a taste sensation you’ll want to make again and again. This dish is perfect for weeknights, casual dinners, or when you simply want to impress with minimal fuss.
Ingredients You’ll Need
These simple ingredients come together in perfect harmony, each playing a crucial role in creating a fajita experience full of texture, color, and flavor.
- Red bell pepper: Adds sweet crunch and vibrant red color that brightens the dish.
- Yellow bell pepper: Brings a mellow sweetness and sunny hue for contrast.
- Large red onion: Provides a slightly sharp bite that mellows beautifully when cooked.
- Carrots: Offer subtle earthy sweetness and a firm texture to balance softer veggies.
- Portabella mushrooms (large or baby): Contribute a meaty, umami richness that complements the cheese.
- Fajita seasoning: The magic touch of spices that ties the veggies together with warmth and depth.
- Halloumi cheese (5 to 8 ounces): The star of the show, delivering a salty, squeaky texture that grills to golden perfection.
- Coconut or high heat oil (2 to 3 tablespoons): Ensures a perfect sear on veggies and cheese without burning.
- Corn tortillas: Soft, warm, and ready to cradle all those delicious fajita fillings.
How to Make Halloumi Fajitas Recipe
Step 1: Prep and Season the Veggies
Begin by slicing the red and yellow bell peppers, the red onion, carrots, and mushrooms very thinly. This helps them cook evenly, soften nicely, and get those beautiful charred edges. Toss all these sliced veggies into a large bowl and sprinkle on the fajita seasoning. Give everything a good stir so each piece gets coated with the spice blend. This step preps your veggies for maximum flavor impact once they hit the heat.
Step 2: Slice the Halloumi Cheese
While the veggies are marinating in spice, slice the halloumi cheese into manageable pieces. It’s best to keep pieces relatively even in size so they cook uniformly and develop that coveted golden crust without melting away.
Step 3: Heat the Skillet and Add Oil
Place a large skillet, ideally a cast iron one, over medium-high heat. Cast iron helps you get an even sear and those lovely grill marks on the halloumi. Drizzle in about 1 tablespoon of oil. Coconut oil is wonderful because of its high smoke point and subtle sweetness, but any high heat oil will work nicely here.
Step 4: Cook the Veggies
Add the seasoned veggie mixture to the hot skillet. Toss frequently for about 8 to 10 minutes or until the vegetables are slightly charred and have softened but still retain some bite. The occasional char adds smoky complexity and elevates the fajitas to another level. Once cooked, carefully transfer the veggies to a bowl or plate to keep warm.
Step 5: Sear the Halloumi
Add another tablespoon of oil to the skillet. Spread half of the halloumi slices out so they are not touching. Let them cook undisturbed for about 3 minutes until golden brown on one side. Flip and cook for another 2 to 3 minutes. The cheese should turn crispy on the outside while remaining squeaky and tender inside. Transfer these to a plate lined with paper towels to absorb any excess oil. Add more oil if needed and repeat with the remaining halloumi slices.
Step 6: Assemble and Serve
Now it’s time for the best part: bringing it all together. Warm your corn tortillas, then pile on the spicy veggies and golden halloumi. Garnish and serve immediately for the freshest, most flavorful experience.
How to Serve Halloumi Fajitas Recipe

Garnishes
Fresh garnishes make everything pop! Avocado slices add creaminess, lime wedges provide a zesty brightness, and a dollop of sour cream cools down the heat with a tangy creaminess that’s irresistible. These small extras amplify the layers of flavor in your Halloumi Fajitas Recipe beautifully.
Side Dishes
Complement your fajitas with simple sides like a fresh mixed greens salad, Mexican rice, or black beans. They balance the richness of halloumi and add heartiness to your meal. Even a light cucumber salad offers a refreshing contrast that invites you to dig back into that flavorful filling.
Creative Ways to Present
Think outside the tortilla shell! Try serving the seasoned veggies and grilled halloumi over a bed of quinoa or rice for a fajita bowl, or wrap everything in lettuce leaves for a low-carb option. You could also get playful by turning this into a fajita-inspired flatbread pizza using naan or pita as your base.
Make Ahead and Storage
Storing Leftovers
Bring halloumi fajitas into the future by storing your leftovers in an airtight container in the fridge for up to 3 days. Keep the halloumi slices and veggies together, but store your tortillas separately to prevent sogginess.
Freezing
While halloumi is best enjoyed fresh, you can freeze the cooked veggies in a freezer-safe container or bag for up to 1 month. Keep in mind that texture may soften slightly after thawing. It’s best to freeze without the cheese or tortillas, which don’t freeze as well.
Reheating
To reheat, gently warm the veggies in a skillet over medium heat just until heated through. For the halloumi, a quick pan sear helps bring back some crunch. Avoid microwaving if possible to keep textures intact. Warm tortillas in a dry pan or wrapped in foil in the oven.
FAQs
Can I use a different cheese instead of halloumi?
Halloumi’s unique ability to hold its shape when cooked makes it perfect for fajitas. If you can’t find halloumi, try paneer or a firm, grillable cheese, but the texture and flavor will differ.
Is this recipe suitable for vegetarians?
Yes! The Halloumi Fajitas Recipe is completely vegetarian and packed with flavorful vegetables and cheese, making it a hearty and satisfying meal.
Can I prepare the veggies or cheese ahead of time?
Definitely. You can slice and season your veggies a few hours ahead to save time, but it’s best to slice and cook the halloumi fresh to maintain its texture and flavor.
What type of fajita seasoning should I use?
Feel free to use your favorite pre-made fajita seasoning blend, or make your own with chili powder, cumin, paprika, garlic powder, and a pinch of salt for a fresh, customizable spice mix.
Are corn tortillas the only option?
Not at all! Flour tortillas, whole wheat wraps, or even lettuce leaves all work wonderfully depending on your preference or dietary needs.
Final Thoughts
This Halloumi Fajitas Recipe is a joyful celebration of bold tastes, fresh textures, and simple cooking that results in a truly memorable meal. It’s easy enough for a weeknight but special enough to serve to friends. Give it a go, and you just might find your new favorite way to enjoy fajitas with a delicious twist!
Print
Halloumi Fajitas Recipe
- Prep Time: 8 minutes
- Cook Time: 22 minutes
- Total Time: 30 minutes
- Yield: 4 servings
- Category: Main Dish
- Method: Frying
- Cuisine: Tex-Mex
- Diet: Vegetarian
Description
This Halloumi Fajitas recipe features a vibrant mix of seasoned bell peppers, onions, carrots, and mushrooms, pan-cooked to a tender char, paired with perfectly seared halloumi cheese. Served with warm corn tortillas and optional garnishes like avocado, lime wedges, and sour cream, it’s a delightful vegetarian twist on a classic Tex-Mex favorite.
Ingredients
Vegetables
- 1 red bell pepper, thinly sliced
- 1 yellow bell pepper, thinly sliced
- 1 large red onion, thinly sliced
- 2 carrots, thinly sliced
- 2 large or 4 small/baby portabella mushrooms, thinly sliced
Seasoning & Cheese
- 1 tablespoon fajita seasoning
- 5 to 8 ounces halloumi cheese, sliced
Other
- 2 to 3 tablespoons coconut oil or other high heat oil
- Corn tortillas, for serving
- Optional garnishes: avocado slices, lime wedges, sour cream
Instructions
- Prepare Veggies: Slice the bell peppers, onion, carrots, and mushrooms thinly and place them into a large bowl. Add 1 tablespoon of fajita seasoning and toss well to evenly coat the vegetables.
- Slice Cheese: Slice the halloumi cheese into even pieces and set aside for cooking.
- Heat Skillet: Place a large skillet, preferably cast iron, over medium-high heat and add 1 tablespoon of oil. Allow the oil to heat until shimmering.
- Cook Vegetables: Add the seasoned vegetables to the hot skillet and cook, tossing often, for 8 to 10 minutes or until the vegetables are slightly charred and softened. Carefully remove the cooked vegetables from the skillet and place onto a bowl or plate.
- Cook Halloumi: Add another tablespoon of oil to the skillet. Lay half the halloumi slices in a single layer, making sure the pieces do not touch. Cook for about 3 minutes until golden brown, then flip and cook an additional 2 to 3 minutes. Transfer the cooked halloumi to a paper towel–lined plate to drain excess oil. If needed, add the remaining tablespoon of oil to the skillet and repeat the process with the second batch of halloumi.
- Serve: Serve immediately with warm corn tortillas and optional garnishes such as avocado slices, lime wedges, and sour cream for a tasty and satisfying meal.
Notes
- You can substitute halloumi with paneer or firm tofu if desired.
- Adjust fajita seasoning amount based on your spice preference.
- Use any high heat oil suitable for frying if coconut oil is unavailable.
- For a gluten-free meal, ensure tortillas are gluten-free corn tortillas.
- Serve immediately to enjoy halloumi’s crispy texture.


