
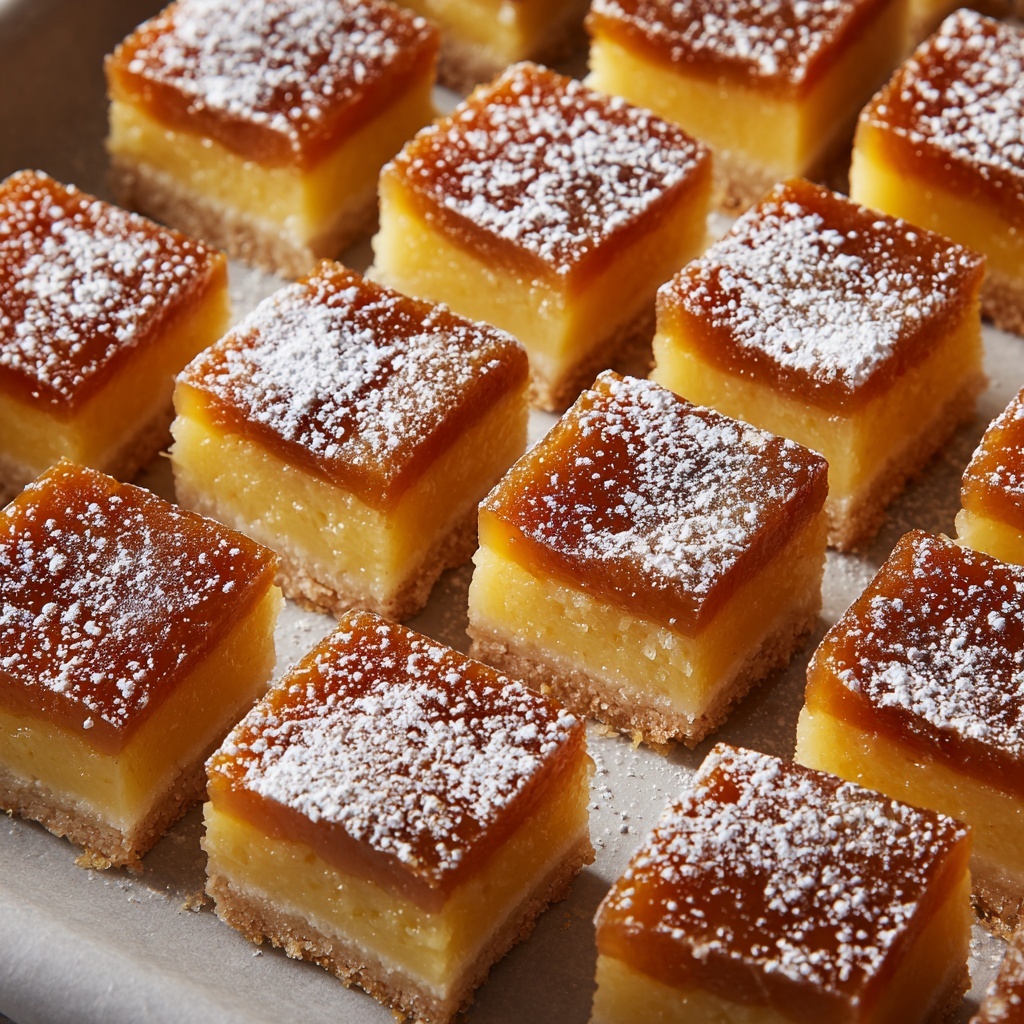
If you have a soft spot for chewy, sweet treats that feel like a warm hug in every bite, then you are absolutely going to adore this Hawaiian Butter Mochi Recipe. This delightful dessert blends the tropical richness of coconut milk with the uniquely satisfying texture of mochiko flour, resulting in a luscious, buttery cake that’s both gluten-free and irresistibly comforting. Whether you’re new to Hawaiian sweets or a longtime fan, this recipe will quickly become one of your favorites for its simplicity, flavor, and that perfect balance of gooey and firm that makes mochi so special.
Ingredients You’ll Need
Gathering simple ingredients is the first step to creating an unforgettable dessert. Each one plays a crucial role: mochiko flour gives the mochi its signature chewy texture, sugar adds sweetness, and the combination of coconut and whole milk brings a creamy, tropical note. Butter introduces richness, while eggs help with structure, ensuring every bite is just right.
- Mochiko sweet rice flour (16 ounces): This gluten-free flour is essential for that classic chewy mochi texture.
- Granulated sugar (2 cups): Balances the flavors with just the right amount of sweetness.
- Baking powder (2 teaspoons): Helps the batter rise slightly for a tender yet chewy crumb.
- Salt (1/2 teaspoon): Enhances and balances the overall flavor.
- Large eggs (4): Bind the mixture and add a lightness to the mochi.
- Vanilla extract (2 teaspoons): Adds warmth and depth to the flavor profile.
- Coconut milk (13.5 ounces can): Infuses the mochi with a rich, tropical creaminess.
- Whole milk (1 cup): Combines with the coconut milk for perfect moisture and tenderness.
- Unsalted butter, melted and slightly cooled (1/2 cup): Adds that irresistible buttery richness essential to this dessert.
How to Make Hawaiian Butter Mochi Recipe
Step 1: Prepare Your Oven and Baking Dish
Start by preheating your oven to 350°F (175°C) and lightly greasing a 9×13-inch baking dish. This ensures your mochi bakes evenly and releases easily after baking, giving you those beautiful squares for serving.
Step 2: Combine Dry Ingredients
In a large bowl, whisk together mochiko sweet rice flour, granulated sugar, baking powder, and salt. This dry mixture forms the foundation of your mochi’s texture and flavor, so whisk well to keep everything evenly distributed.
Step 3: Mix the Wet Ingredients
In a separate bowl, beat the eggs until smooth, then add the vanilla extract, coconut milk, whole milk, and melted butter. Whisk these together thoroughly so that the rich, tropical flavors are perfectly combined before adding to the dry mix.
Step 4: Combine Wet and Dry Mixtures
Gradually pour the wet ingredients into the dry ingredients, whisking continuously to form a smooth and lump-free batter. This step ensures an even consistency that will bake perfectly chewy and tender.
Step 5: Bake Your Mochi
Pour the batter into the greased baking dish and spread it out evenly. Bake for approximately 60 minutes or until the top turns a beautiful golden brown and the center feels set when gently touched. The scent alone will have you eagerly waiting!
Step 6: Cool and Slice
Let the butter mochi cool completely in the pan before slicing into squares. Cooling helps the mochi firm up just enough to be easily cut without losing that delightful chewy texture.
How to Serve Hawaiian Butter Mochi Recipe

Garnishes
Sprinkling shredded coconut on top before baking adds a lovely toasted flavor and texture, enhancing the visual appeal and tropical vibe. You can also dust lightly with powdered sugar or drizzle with a touch of honey for an extra special finish.
Side Dishes
This mochi pairs wonderfully with a scoop of vanilla ice cream or fresh tropical fruits like mango, pineapple, and kiwi. The coolness of ice cream balances the warm, dense mochi beautifully, making it an ideal dessert for gatherings or special occasions.
Creative Ways to Present
Try cutting the mochi into bite-sized cubes and serving on skewers with fresh fruit for a fun party appetizer. Alternatively, layer mochi squares with whipped cream and berries to create a mochi trifle — a show-stopping twist your guests will adore.
Make Ahead and Storage
Storing Leftovers
You can keep your leftover Hawaiian Butter Mochi Recipe squares at room temperature for up to three days in an airtight container, or refrigerate them for up to one week. This allows you to enjoy your dessert over several days without sacrificing freshness.
Freezing
For longer storage, wrap individual squares tightly in plastic wrap and place them in a resealable freezer bag. Frozen mochi keeps well for up to two months and can be thawed overnight in the refrigerator when you’re ready to enjoy it again.
Reheating
To revive the soft, chewy texture after refrigeration or freezing, warm mochi gently in the microwave for about 15 to 20 seconds or until just soft. Alternatively, reheat in a low oven (around 300°F) briefly to bring back that fresh-baked goodness.
FAQs
What makes this Hawaiian Butter Mochi Recipe gluten-free?
The recipe uses mochiko sweet rice flour instead of wheat flour, which naturally contains no gluten. This allows anyone avoiding gluten to enjoy this delicious dessert safely without sacrificing texture or flavor.
Can I use light coconut milk instead of full-fat?
While light coconut milk will work in a pinch, full-fat coconut milk offers the richest, creamiest flavor and contributes to the moist and tender texture that makes this butter mochi so special.
Is it necessary to melt the butter first?
Yes, melting the butter helps evenly distribute the fat throughout the batter, ensuring that every bite is wonderfully tender and buttery. Just be sure to let it cool slightly so it doesn’t cook the eggs when mixed.
Can I add flavors or mix-ins to the mochi?
Absolutely! Consider folding in shredded coconut, macadamia nuts, or even mini chocolate chips before baking for a delicious twist. Just be mindful of adding too many heavy mix-ins that might affect the texture.
How do I know when the mochi is fully baked?
The mochi is done when the top is a lovely golden color and the center feels set but still slightly springy to the touch. Insert a toothpick—if it comes out mostly clean with a few moist crumbs, it’s perfect!
Final Thoughts
There’s something truly magical about making and sharing this Hawaiian Butter Mochi Recipe. It’s the kind of dessert that feels both nostalgic and exotic, comforting and exciting all at once. I hope you find as much joy in baking it as you do in eating it. Trust me, once you’ve made this delicious treat, it will quickly become a beloved staple in your dessert rotation!
Print
Hawaiian Butter Mochi Recipe
- Prep Time: 10 minutes
- Cook Time: 60 minutes
- Total Time: 1 hour 10 minutes
- Yield: 24 squares
- Category: Dessert
- Method: Baking
- Cuisine: Hawaiian
- Diet: Gluten Free
Description
Hawaiian Butter Mochi is a chewy, sweet rice cake dessert made with mochiko sweet rice flour and enriched with coconut milk and butter. This classic Hawaiian treat is soft, dense, and packed with a rich coconut flavor, perfect for a comforting dessert or snack.
Ingredients
Dry Ingredients
- 1 box (16 ounces) mochiko sweet rice flour
- 2 cups granulated sugar
- 2 teaspoons baking powder
- 1/2 teaspoon salt
Wet Ingredients
- 4 large eggs
- 2 teaspoons vanilla extract
- 1 can (13.5 ounces) coconut milk
- 1 cup whole milk
- 1/2 cup unsalted butter, melted and slightly cooled
Instructions
- Preheat the Oven: Preheat your oven to 350°F (175°C) and lightly grease a 9×13-inch baking dish to prevent sticking.
- Mix Dry Ingredients: In a large bowl, whisk together mochiko sweet rice flour, granulated sugar, baking powder, and salt until evenly combined.
- Combine Wet Ingredients: In a separate bowl, beat the eggs thoroughly. Then add in the vanilla extract, coconut milk, whole milk, and melted butter, mixing well to blend all wet ingredients.
- Make the Batter: Gradually pour the wet mixture into the dry ingredients while whisking continuously to create a smooth, lump-free batter.
- Pour and Bake: Pour the batter evenly into the prepared baking dish. Bake in the preheated oven for 60 minutes or until the top develops a golden color and the center is set.
- Cool and Serve: Allow the butter mochi to cool completely in the pan before cutting into 24 squares and serving for the best texture and flavor.
Notes
- For extra flavor and texture, sprinkle shredded coconut on top of the batter before baking.
- Butter mochi can be stored at room temperature for up to 3 days or refrigerated for up to a week.
- Ensure the mochi cools completely before slicing to maintain its chewy consistency.


