
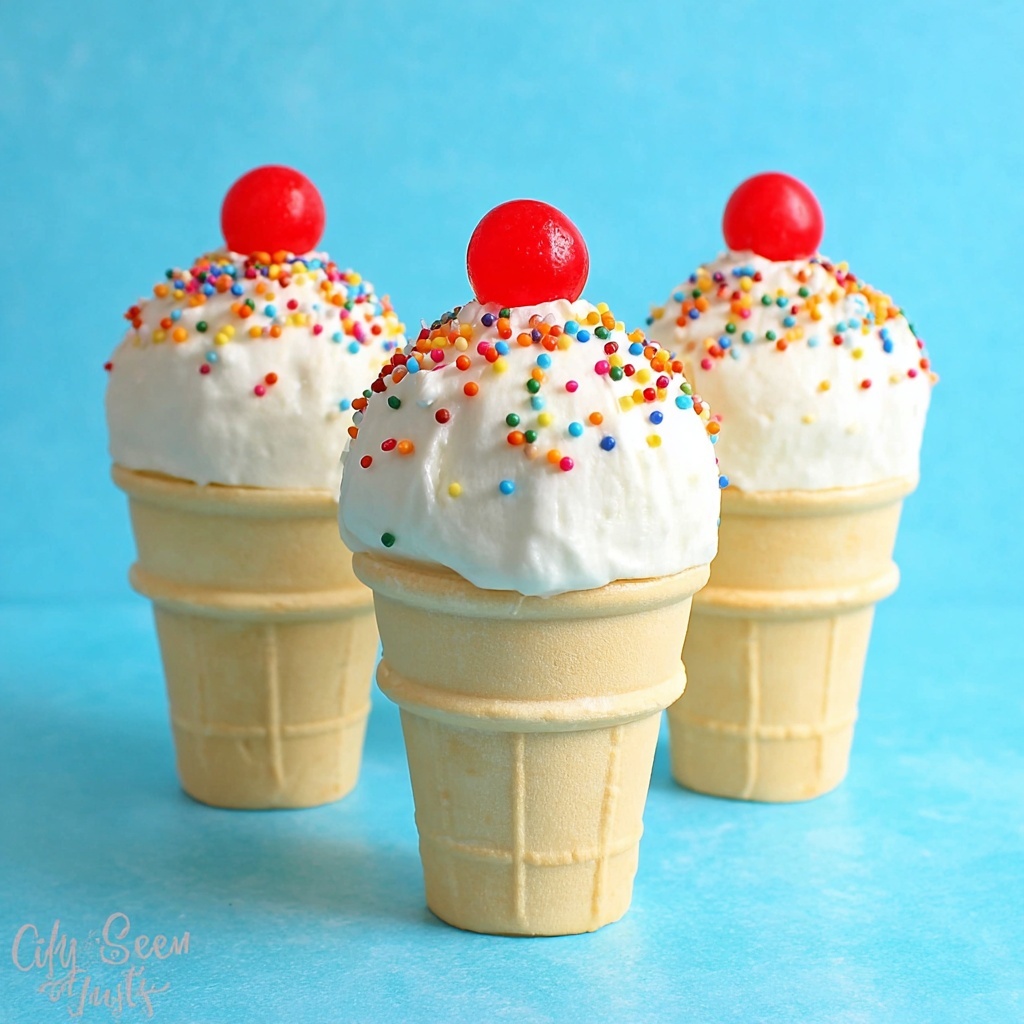
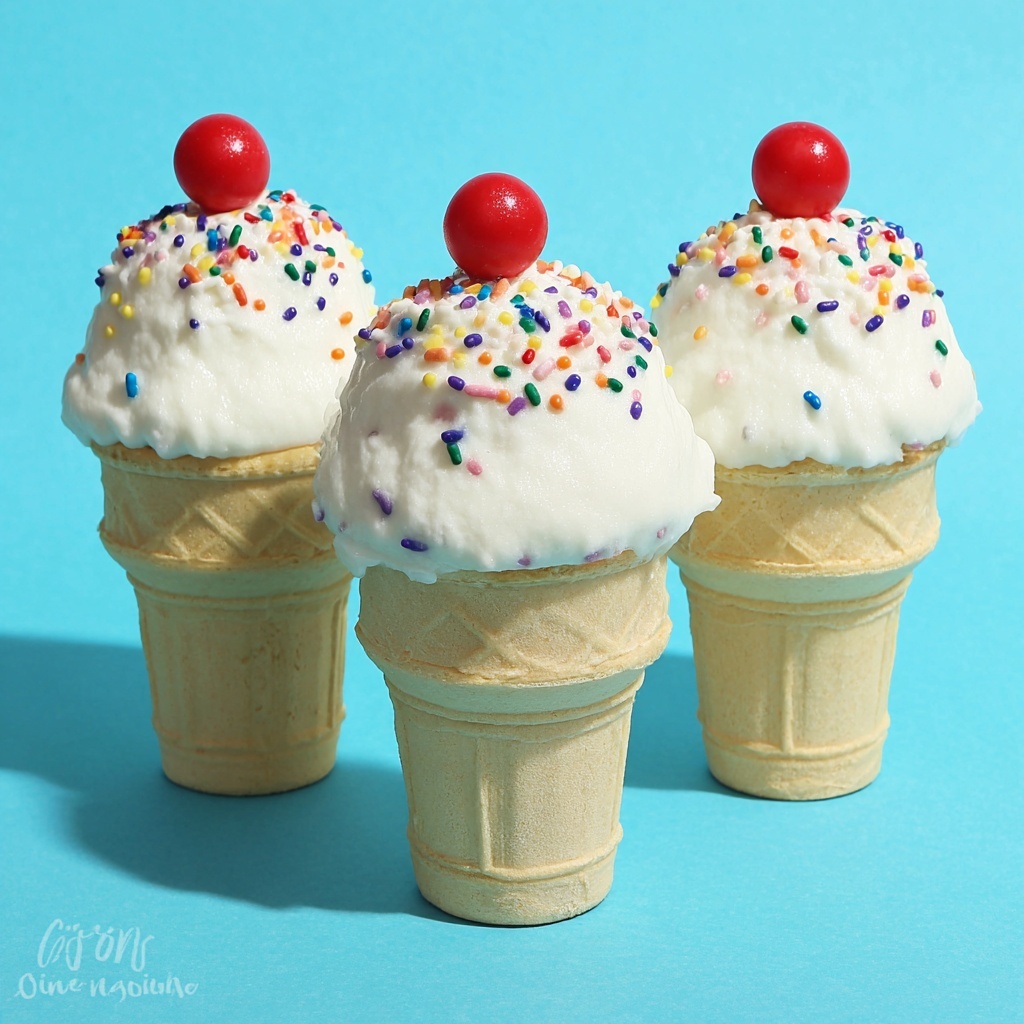
Get ready to delight your taste buds with the fun and whimsical Ice Cream Cake Pop Cones Recipe! This treat combines the soft, moist crumb of cake with the creamy richness of frosting, all nestled inside an ice cream cone and topped with a candy-coated crown. With texture contrasts and sweet decorations, these cake pop cones are perfect for parties, family treats, or simply indulging in a playful dessert. Once you learn this recipe, you’ll find yourself reaching for it whenever you want something cute, delicious, and downright joyful.
Ingredients You’ll Need
Simple ingredients come together in this recipe to create a wonderful mix of flavors and textures. Each one plays a role in building these irresistible Ice Cream Cake Pop Cones Recipe delights.
- Cake Mix: Use your favorite flavor or a classic box mix for a moist and easy base.
- Frosting: About 1 can, any flavor you love, to bind the cake crumbs and add creamy richness.
- Ice Cream Cones: These provide a crunchy, fun vessel for the cake mixture.
- White Candy Coating: Melts smoothly to secure toppings and add a sweet shell.
- Sprinkles: For that pop of color and festive charm.
- Red Sixlets: Little candy dots to top off each cone with a cheerful finishing touch.
How to Make Ice Cream Cake Pop Cones Recipe
Step 1: Bake and Crumble the Cake
Start by following the instructions on your cake mix, baking it in a 9×13 pan. Once it’s completely cooled, break the cake into crumbs using a fork—this step is so fun that kids especially love helping out! The crumbly texture is the perfect base for the next step.
Step 2: Mix Cake Crumbs and Frosting
Take about three-quarters of your frosting can and blend it gently with the cake crumbs. This mixture should hold together well but remain soft and moist, creating the perfect consistency to shape and mold.
Step 3: Dip Cone Tops in White Candy Coating
Melt your white candy coating according to package instructions. Carefully dip the top edge of each ice cream cone into the melted candy to create a sticky rim. This sets the stage for securing the cake mixture on top and adds a smooth, sweet touch.
Step 4: Assemble the Cake Pop Cones
Put a small amount of the cake mixture inside each cone, making sure not to press it down. Then, scoop about a tablespoon of mixture, flatten it into a disk, and roll a ball from a separate portion of the mixture. Press the ball onto the disk and place this “cake pop” on top of the dipped cone. Let the candy coating harden for roughly 5 minutes to hold it all together.
Step 5: Decorate and Finalize
Once the candy coating is firm, spoon more melted white candy coating over the top of the cake mixture while holding the cone on its side to help it spread evenly. Before the coating sets, decorate with colorful sprinkles and press a red Sixlets candy on top for a cheerful finish.
How to Serve Ice Cream Cake Pop Cones Recipe
Garnishes
Sprinkles and candy toppings not only bring visual appeal but add a delightful crunch and burst of sweetness. Feel free to customize with your favorite sprinkles, edible glitter, or even small chocolate chips to tailor the experience for your crowd.
Side Dishes
Serve alongside fresh fruit or a light, fruity sorbet to balance the rich sweetness of the cones. A cold glass of milk or a cup of warm coffee also pairs beautifully, making these cones a perfect after-dinner treat.
Creative Ways to Present
Arrange your Ice Cream Cake Pop Cones Recipe in a decorative vase or stand them upright in a foam block draped with colorful wrapping paper for an eye-catching dessert display. Wrapping each cone in a little cellophane with a ribbon adds a lovely touch for gifting or party favors.
Make Ahead and Storage
Storing Leftovers
If you have any leftovers or want to prepare in advance, store the cake pop cones in an airtight container in the refrigerator. This keeps them fresh and helps the frosting and candy coating stay firm for up to 3 days.
Freezing
You can freeze the assembled cones by wrapping each tightly in plastic wrap and placing them in a freezer-friendly container. Thaw in the refrigerator when ready to enjoy; this is a great way to make this treat ahead of time.
Reheating
Since these are cold treats, reheating is not necessary or recommended. Serving them chilled preserves their texture and flavor perfectly, so just grab one straight from the fridge or let it sit at room temperature for 10 minutes before serving.
FAQs
Can I use homemade cake for this recipe?
Absolutely! Homemade cake works wonderfully and can add a personal touch, whether it’s vanilla, chocolate, or any flavor you prefer for your Ice Cream Cake Pop Cones Recipe.
What types of frosting work best?
Buttercream, cream cheese frosting, or even store-bought flavors all work well as long as they’re thick enough to bind the cake crumbs without making the mixture too wet or runny.
Can I substitute the candy coating?
Yes, you can use chocolate melts or white chocolate chips as an alternative. Just be sure to melt them carefully to avoid burning and maintain a smooth coating.
Do the cones stay crunchy after assembly?
If stored properly in the refrigerator and eaten within a few days, the cones maintain their crunch nicely. Avoid storing in humid environments where they might soften.
Is this recipe kid-friendly to make?
Definitely! Kids love mixing the crumbs and frosting, dipping the cones, and decorating. It’s a fun and easy project to do together for parties or special occasions.
Final Thoughts
This Ice Cream Cake Pop Cones Recipe is such a fun way to enjoy cake and frosting in a playful, handheld form that brings smiles every time. Whether you’re making it for a celebration or just because you want to treat yourself, these cones are sure to impress with their look and taste. Go ahead and make a batch—you’ll cherish this sweet little creation as much as I do!
Print
Ice Cream Cake Pop Cones Recipe
- Prep Time: 15 minutes
- Cook Time: 25 minutes
- Total Time: 40 minutes
- Yield: 12 cake pop cones
- Category: Dessert
- Method: Baking
- Cuisine: American
Description
Delightful and fun-to-make Ice Cream Cake Pop Cones that combine moist cake crumbs mixed with creamy frosting, shaped into cake pops, and placed atop crunchy ice cream cones. Coated in smooth white candy chocolate and decorated with colorful sprinkles and red Sixlets, these treat cones are perfect for parties or a playful dessert.
Ingredients
Cake and Frosting
- 1 box cake mix (flavor of choice)
- 1 can frosting (any flavor, chocolate recommended)
Assembly
- 12 ice cream cones
- White candy coating (amount as needed for dipping and topping)
- Sprinkles (for decoration)
- Red Sixlets (12 pieces, for topping)
Instructions
- Prepare the cake: Bake the cake in a 9×13 inch pan according to the package instructions. Allow the cake to cool completely, then break it up into fine crumbs using a fork or your hands.
- Mix cake crumbs with frosting: In a large bowl, combine the cake crumbs with 3/4 of the can of frosting. Mix thoroughly until the mixture is moist and holds together well. This will be your cake pop mixture.
- Melt the candy coating and prepare cones: Melt the white candy coating following the package directions. Dip the top edge of each ice cream cone into the melted candy coating, coating just the rim, and set aside to let it harden. This will help the cake pop stick securely to the cone.
- Form and attach the cake pop: Add a small amount of the cake mixture inside the cone without pressing it down. Then scoop about one tablespoon of cake mixture, flatten it into a disk, roll another ball, and press the ball onto the flattened piece to create a rounded cake pop. Place the cake pop on top of the coated cone rim and allow the candy coating to harden and set for about 5 minutes.
- Coat and decorate: Once the candy coating has hardened securing the cake pop, spoon additional melted white candy coating over the top of the cake pop while holding the cone on its side, allowing it to drip and coat the surface. Before the coating hardens, sprinkle colorful sprinkles over the top and press a red Sixlet candy on the center as a finishing touch.
Notes
- You can choose any flavor of cake mix and frosting to personalize your cake pop cones.
- Be careful not to press the cake mixture inside the cone too tightly to keep a light texture.
- If the melted candy coating becomes too thick, gently reheat it to maintain a smooth dipping consistency.
- Let the candy coating harden fully before serving or wrapping to retain the shape and decoration.
- These cake pop cones are best enjoyed the same day but can be stored in the refrigerator for up to 2 days.


