
If you have a soft spot for pixelated adventures and a sweet tooth to match, this Minecraft Cake Recipe is about to become your new favorite! It’s a playful, colorful cake that brings the much-loved Minecraft world right to your dessert table. Combining classic chocolate cake mixes with fun candy decorations and clever frosting techniques, this treat is as delightful to look at as it is to eat. Whether you’re planning a birthday party for a Minecraft fan or just want a unique cake that sparks joy, this recipe will guide you through creating an edible version of that iconic pixelated landscape.
Ingredients You’ll Need
Though the ingredients list may seem a bit eclectic at first glance, each one plays a crucial role in perfecting the look and taste of your Minecraft Cake Recipe. From the simple boxed cake mixes laying the base to the candies adding vibrant colors and textures, every item has an important job here.
- 2 Chocolate Boxed Cake Mixes: These provide a rich, moist base that’s both easy to prepare and delicious.
- White Frosting: A neutral canvas perfect for adding color and attaching decorations.
- Green Food Coloring: Transforms plain frosting into the Minecraft grass blocks we all recognize.
- 8 Rice Krispies Treats: Ideal for building terrain elements like sand and trees, thanks to their shape and texture.
- Blue Gel Icing: Mimics water perfectly, giving your cake that authentic Minecraft biome feel.
- 1 Kit-Kat Bar: Acts as structural support and forms the “tree trunk” pieces.
- Green Color Mist: Adds an extra layer of green shading to your Rice Krispies “trees” for realism.
- Assorted Candies (Starburst, Tootsie Rolls, Caramels): These candies are versatile for creating characters and details, each bringing unique shapes and colors.
- 2 Marshmallows: Soft and fluffy, perfect for shaping creatures like sheep.
- Chocolate Cookie Icing: Used for fine details like faces and hair, bonding elements, and adding contrast.
How to Make Minecraft Cake Recipe
Step 1: Bake Your Chocolate Base
Begin by preparing two 9 x 13-inch cakes using your boxed chocolate cake mixes. Line your pans with foil for easy removal later, and follow the package instructions closely. Once baked, allow them to cool completely—a warm cake won’t hold up to the decorating stage.
Step 2: Cut and Arrange Cake Pieces
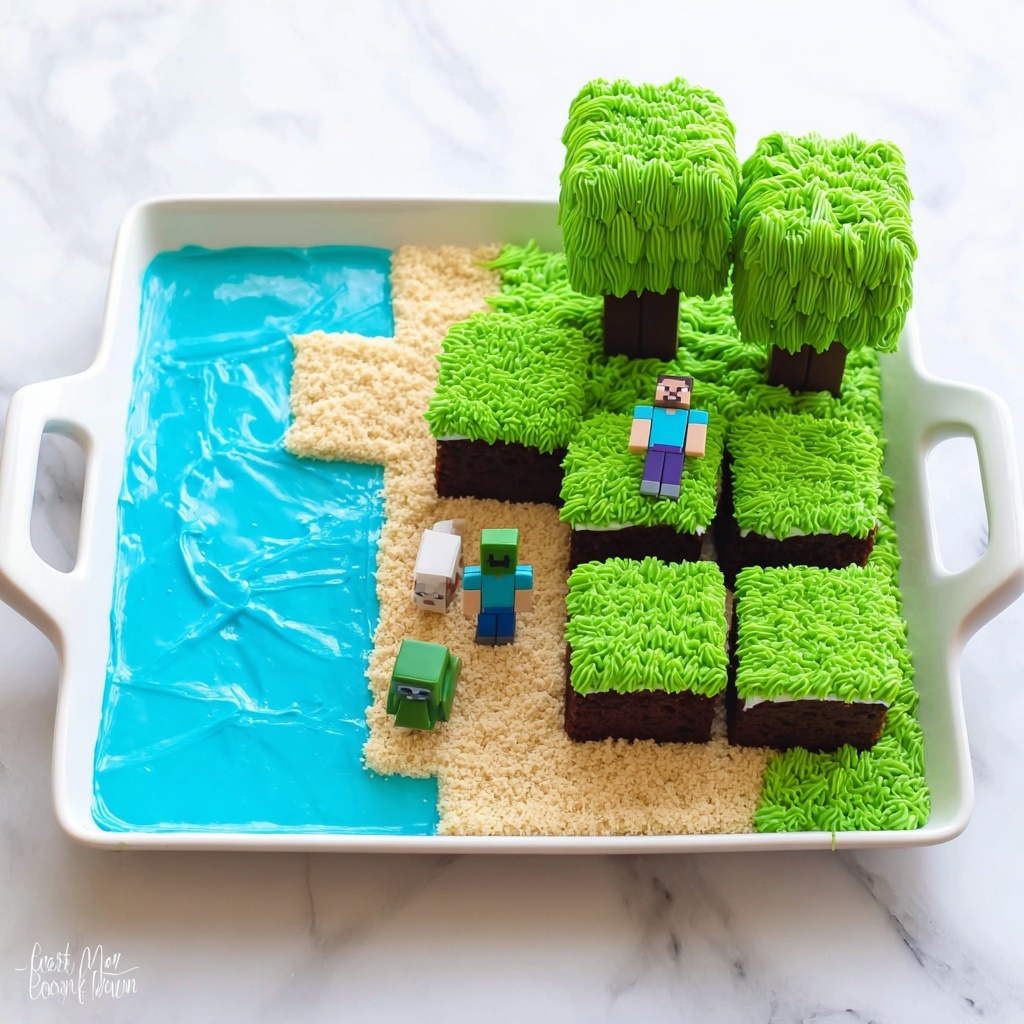
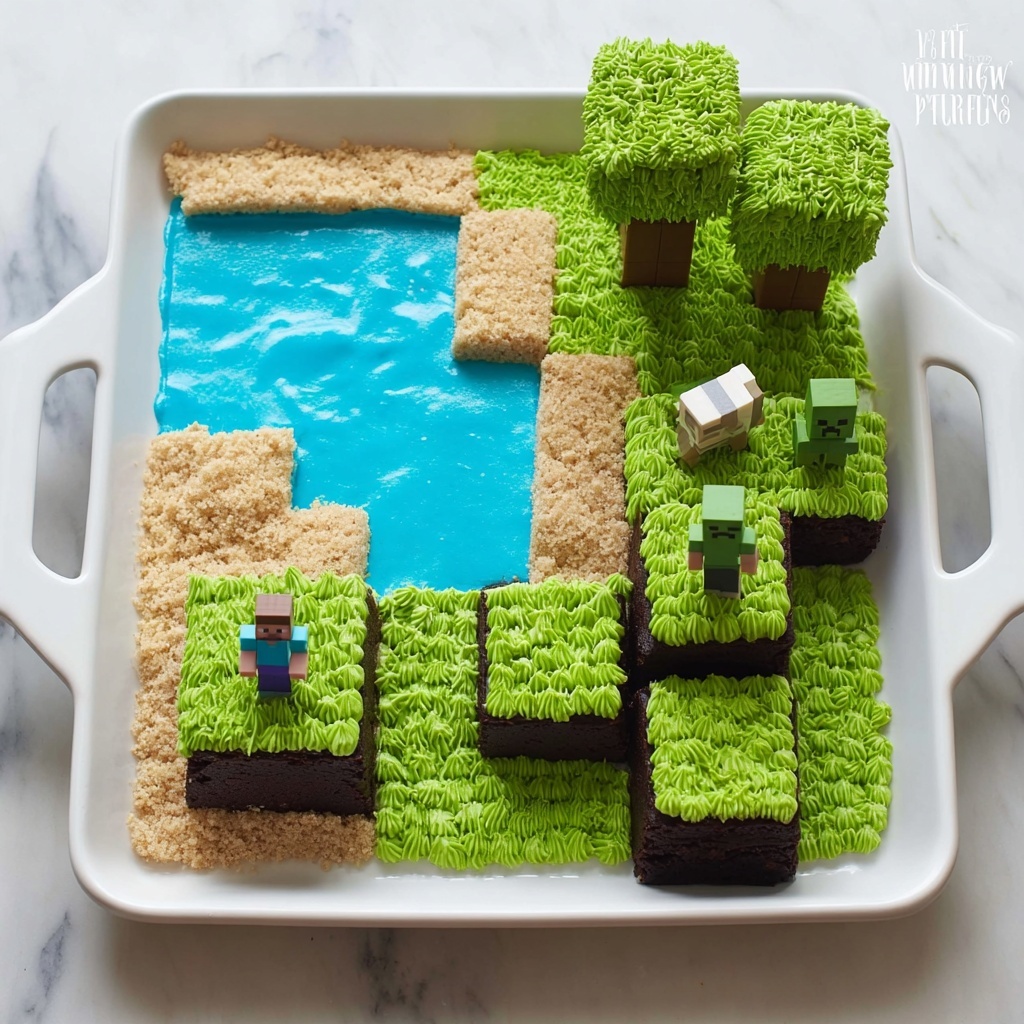
Remove your cooled cakes from the pans and cut them into shapes to fit your serving platter. This patchwork approach will help recreate the blocky Minecraft landscape. Stack the corners to start building height and depth, setting the stage for your edible world.
Step 3: Frost with Colored Green Goodness
Mix green food coloring into your white frosting until you reach that perfect vibrant grass green. Spread this frosted layer generously over the cake’s top surfaces. This is your grassy plains, and it’s what brings the cake to life visually.
Step 4: Create the Sand Edges
Cut your Rice Krispies Treats in half to create sandy edges around your cake. Place these treats strategically on the ends of the cake base to mimic Minecraft’s sandy biomes. They add both texture and depth to your scene.
Step 5: Add the Water Features
Using the blue gel icing, fill in the middle section between your “sand” edges. This simulates water perfectly—whether a pond or river in the Minecraft world. Its glossy, vibrant color contrasts beautifully with the green and sand tones.
Step 6: Craft the Characters from Candy
Transform your assorted candies into Minecraft-inspired characters and details. Shape pieces carefully, then use chocolate cookie icing to attach smaller details like eyes and hair. This step is where your cake really starts to tell a story.
Step 7: Build the Trees
Cut additional Rice Krispies Treats to form tree shapes. Spray them with green color mist for a natural, leafy appearance. Attach these “trees” to a Kit-Kat bar trunk with chocolate icing, giving your cake added dimension and a whimsical forest feel.
Step 8: Assemble Minecraft Characters
Create your primary figures by combining various candies: use caramel and blue Starburst with chocolate icing for hair and facial features, shape green Tootsie Rolls for a Creeper, marshmallows and caramel for a fluffy sheep face, and pink Starburst pieces for a pig. These adorable characters bring personality and charm, cementing this as a true Minecraft Cake Recipe.
How to Serve Minecraft Cake Recipe
Garnishes
Consider sprinkling edible confetti or using more colored frosting to create mini “grass patches” around the edges. Plastic Minecraft-themed toppers can also add flair if serving at a party. These little finishing touches make the cake feel extra special.
Side Dishes
Pair your cake with simple treats that match the Minecraft theme, such as popcorn “cobblestones” or green Jell-O cups for extra “biome” vibes. Fresh fruit skewers are also a great way to balance sweetness with natural flavors.
Creative Ways to Present
Serve your Minecraft Cake Recipe on a platter decorated to look like a Minecraft inventory or crafting table using printed paper mats beneath the cake. You could even place it inside a clear box with pixelated confetti to amplify the game’s digital atmosphere during presentation.
Make Ahead and Storage
Storing Leftovers
Once decorated, your cake can be stored in an airtight container at room temperature for up to 2 days if the environment is cool. Beyond that, refrigeration is recommended, but be aware that some candies may harden slightly in the fridge.
Freezing
For longer storage, you can freeze your undecorated cake layers tightly wrapped in plastic wrap and foil for up to 2 months. Decorate after thawing completely to maintain texture and appearance, especially with delicate candy decorations.
Reheating
This cake is best enjoyed chilled or at room temperature. If you prefer it slightly warm, let it sit out for a few hours after refrigeration rather than applying heat directly, which might melt the decorations or alter the frosting’s texture.
FAQs
Can I use homemade cake batter instead of boxed mixes?
Absolutely! Homemade batter works wonderfully and can add a personal touch. Just ensure the cake is firm enough to hold the stacked design for the Minecraft Cake Recipe.
What candies work best for Minecraft character details?
Chewy and moldable candies like Starburst, Tootsie Rolls, and caramels are ideal because they can be cut and shaped easily while holding their form.
How do I make the green frosting vibrant?
Start with a white frosting base and gradually add green food coloring until you achieve a rich color. Gel food coloring often produces more intense shades without altering the frosting texture.
Can I make this cake vegan or gluten-free?
With some ingredient swaps—like using vegan cake mixes and dairy-free frosting—yes! Just be mindful to choose candies that fit dietary restrictions or replace them with suitable alternatives.
What’s the best way to transport this cake?
Transport the cake on a sturdy flat surface, ideally in a box that allows for height clearance to protect the candy decorations. Chilling the cake beforehand helps maintain stability during transit.
Final Thoughts
There is something truly magical about bringing a world as beloved as Minecraft into an edible form, and this Minecraft Cake Recipe does just that in the most fun and delicious way. It’s a treat that invites creativity and celebration, perfect for sharing with friends and family. So go ahead, give it a try—you might just find yourself crafting even more edible worlds after this!
Print
Minecraft Cake Recipe
- Prep Time: 30 minutes
- Cook Time: 30 minutes
- Total Time: 1 hour
- Yield: 12 servings
- Category: Dessert
- Method: Baking
- Cuisine: American
Description
This fun and creative Minecraft Cake replicates the iconic pixelated game using boxed chocolate cakes, colorful frosting, Rice Krispies treats, and assorted candies to craft edible game characters and scenery. Perfect for Minecraft fans and themed parties, this cake combines simple baking with playful decorating techniques.
Ingredients
Cake
- 2 Chocolate Boxed Cake Mixes
- White Frosting
- Green Food Coloring
Decorations
- 8 Rice Krispies Treats
- Blue Gel Icing
- 1 Kit-Kat Bar
- Green Color Mist
- Assorted Candies (Starburst, Tootsie Rolls, Caramels)
- 2 Marshmallows
- Chocolate Cookie Icing
Instructions
- Prepare the cakes: Start by making your cakes using the 2 chocolate boxed cake mixes in two 9 x 13-inch pans lined with foil. Bake according to the package instructions until done, usually about 30 minutes.
- Cut the cake: Once baked and cooled, pull out the cakes and cut pieces to fit onto your serving platter as building blocks to resemble Minecraft terrain.
- Frost the cake: Add green food coloring to the white frosting to create a grassy green color. Frost the tops of the cut cake pieces to simulate grass blocks.
- Add Rice Krispies treats: Cut the Rice Krispies treats in half and place them on the ends of the cake arrangement. These represent sandy areas.
- Apply blue gel icing: Add blue gel icing in the middle area between the cake and Rice Krispies treats to mimic water.
- Create candy characters: Cut and shape assorted candies to resemble Minecraft characters and objects.
- Make Rice Krispies trees: Cut Rice Krispies treats to form tree shapes, spray them with green color mist for foliage, and attach them to a Kit-Kat bar using chocolate cookie icing as glue.
- Assemble the character: Use a caramel and a blue Starburst combined with chocolate icing for hair and facial features to form a character figure.
- Build the Creeper: Form the Creeper figure from green Tootsie Rolls and use chocolate icing for detailing.
- Create the sheep: Use marshmallows for the sheep’s body and a small caramel piece for the face.
- Make the pig: Form the pig by using two pink Starburst candies placed together.
Notes
- Line cake pans with foil for easy removal and shaping of cake blocks.
- Use green food coloring sparingly to get the perfect grass color for the frosting.
- Green color mist can be found in cake decorating supply stores or online.
- Assemble candy characters carefully with chocolate icing acting as edible glue.
- Let the cake set for a short time after assembling before serving to allow decorations to stabilize.
- Store the cake in a cool room to maintain the shape and freshness of the candy decorations.

