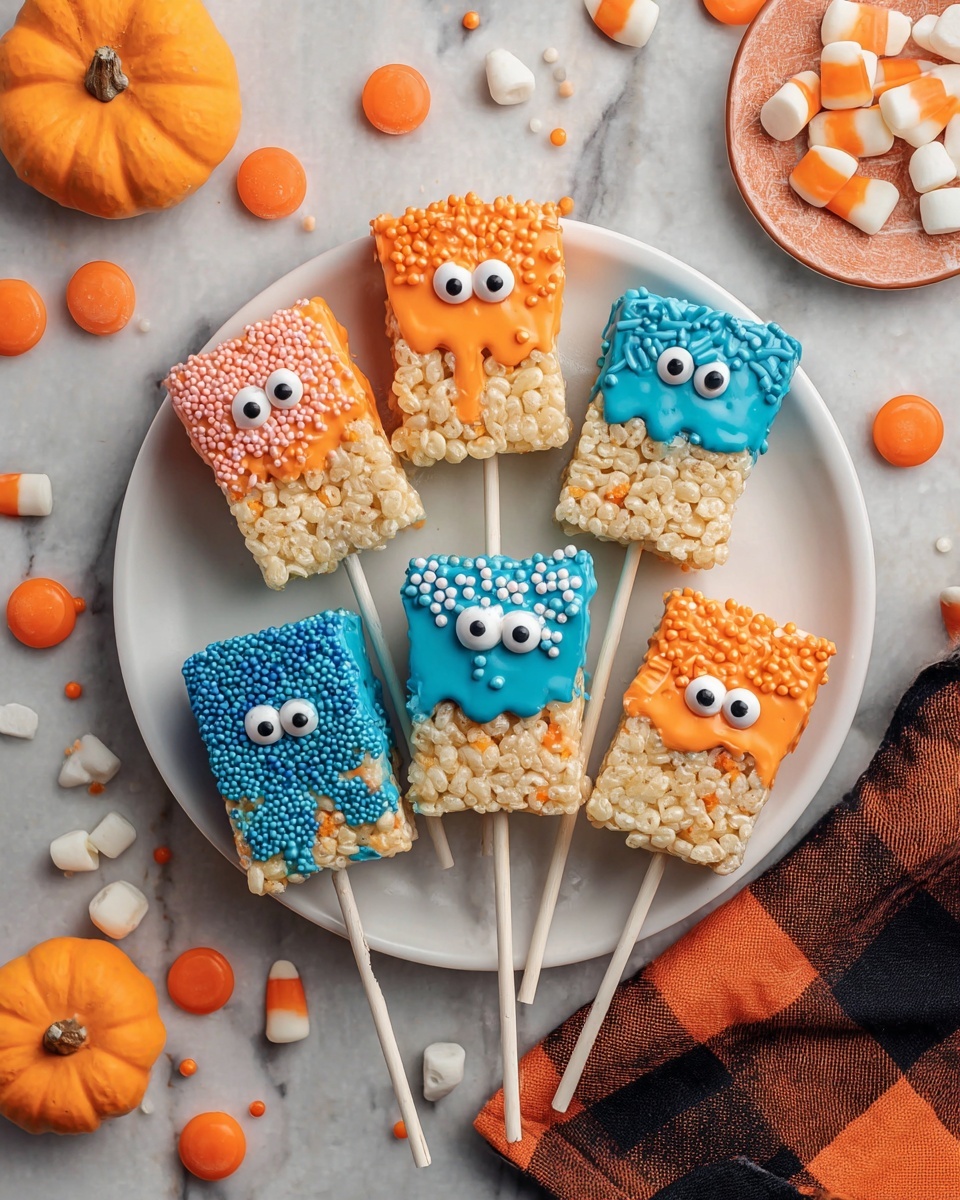
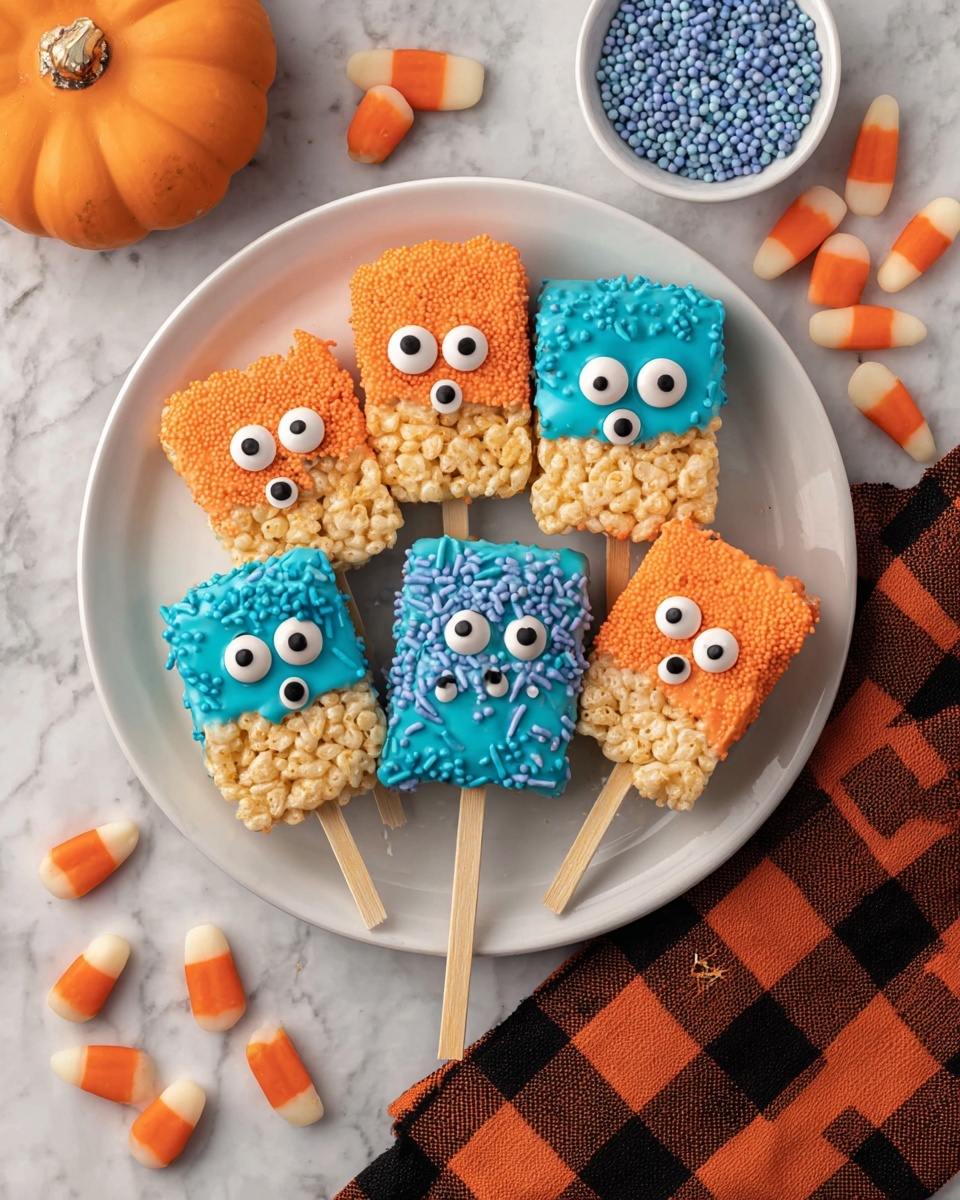
If you love fun, whimsical treats that bring smiles at any gathering, you have to try the Monster Pops Rice Krispie Treats Recipe. These colorful, eye-catching goodies take classic Rice Krispie treats to the next level by transforming them into playful monster pops coated in vibrant candy melts and sprinkled with fun decorations. It’s an absolute joy to make and even more delightful to snack on, perfect for parties, kids, or just brightening up an ordinary day with a little bit of creative sweetness.
Ingredients You’ll Need
The magic of this Monster Pops Rice Krispie Treats Recipe lies in its simplicity. Each ingredient is carefully chosen to build texture, add vivid color, or bring that perfect sugary crunch that makes these pops irresistible.
- 20 premade Rice Krispies Treats: The chewy and crispy base that’s already perfectly sweet and ready to be transformed.
- 12 oz. package of orange candy melting wafers: These give a smooth, rich coating with a bright pop of orange color.
- 12 oz. package of blue candy melting wafers: A second color option to create a fun, two-toned monster collection.
- 1/3 cup orange sprinkles: Adds texture and extra sweetness, plus a festive look that complements the orange coating.
- 1/3 cup blue sprinkles: Matches the blue candy melts and provides a nice crunchy finish to the treats.
- Candy eyes (2 different sizes): These bring the monsters to life with personality and charm, allowing for creative placements.
- Cake pop sticks: Essential for turning the treats into easy-to-hold Monster Pops that are perfect for any party.
How to Make Monster Pops Rice Krispie Treats Recipe
Step 1: Prep Your Workspace
Begin by lining your baking sheet or counter space with parchment paper. This is a lifesaver for keeping your work surface clean and allowing the treats to dry without sticking. Planning space for all 20 treats ensures a smooth, efficient process, so you’re not juggling batches.
Step 2: Insert the Sticks
Unwrap each Rice Krispies treat carefully, then gently insert a cake pop stick into the short end, pushing about halfway through. This step is key because the stick will be your handle while dipping and decorating, so make sure it’s secure but doesn’t poke all the way through.
Step 3: Set Up Your Sprinkles
Pour your orange and blue sprinkles into separate bowls and set them nearby your parchment-prepped area. Having everything laid out beforehand keeps the decorating stage flowing easily and prevents any spills or mix-ups.
Step 4: Melt Your Candy Wafers
Transfer the orange and blue candy melting wafers into separate microwave-safe bowls. Work with one color at a time to avoid the chocolate drying out. Microwave on high for 30 seconds, then stir. Continue with 15-second bursts, stirring between each until the wafers are smooth and fully melted. This method keeps the coating silky and perfect for dipping.
Step 5: Dip the Treats
Hold each Rice Krispies treat by the stick and dip about two-thirds of it into the melted candy coating. Let excess drip back into the bowl for about 5 seconds. If you’re running low on melted candy, a spoon can help cover any bare spots, ensuring each Monster Pop looks flawless.
Step 6: Add Sprinkles
Immediately after dipping, and while the coating is still wet, dip the tops of the treats into the matching color sprinkles. This adds both flavor and texture, plus gives each treat a fun, festive monster look.
Step 7: Place the Candy Eyes
Before the coating dries, press the candy eyes onto the Monster Pops. Feel free to get creative here—some monsters might have just one giant eye while others could have several to look extra spooky and adorable. The eyes bring personality and set these treats apart from any other snack on the table.
Step 8: Let Them Dry
Allow the treats to sit for 10 to 15 minutes so the chocolate coating hardens fully. Patience here ensures that your Monster Pops don’t lose their shape or decorations when moved or packaged.
How to Serve Monster Pops Rice Krispie Treats Recipe

Garnishes
Consider finishing with additional edible glitter, mini chocolate chips, or even small edible pearls to add extra sparkle and texture to your Monster Pops. These simple touches can elevate the look and make them worthy centerpieces.
Side Dishes
If you’re serving these at a party, pair them with fruit skewers or a colorful candy bar for a fun and varied dessert table. Their sweetness and crunch pair well with fresh fruits like strawberries or grapes, balancing the flavors perfectly.
Creative Ways to Present
Display your Monster Pops upright in a decorated foam block draped with bright tissue paper for a delightful presentation. You can also arrange them in a festive jar or vase lined with colored shredded paper for a centerpiece that’s as eye-catching as these treats.
Make Ahead and Storage
Storing Leftovers
Store your Monster Pops in an airtight container or a resealable zipper bag at room temperature. This keeps them fresh and crunchy for up to 3 or 4 days, ideal if you’re making them in advance of a party or want to savor the fun a little longer.
Freezing
You can freeze Monster Pops to extend their shelf life. Wrap each treat individually in plastic wrap, then place them in a freezer-safe bag or container. When you’re ready to eat, thaw them at room temperature for a few hours to maintain their perfect texture.
Reheating
While these treats are best enjoyed as is, if you prefer a slightly softer texture, you can warm a Monster Pop in the microwave for 5 to 7 seconds. Just be careful not to melt the candy coating too much or the decorations may shift.
FAQs
Can I use other colors besides orange and blue for the candy melts?
Absolutely! Feel free to customize your Monster Pops Rice Krispie Treats Recipe with any colors you love or that match your party theme. Candy melts come in a rainbow of possibilities!
What kind of eyes work best for decorating Monster Pops?
Candy eyes in various sizes add the most charm and fun. You can find them in most craft or baking aisles, and sticking with two sizes lets you create unique “faces” for each treat.
Do I have to use premade Rice Krispies Treats, or can I make them from scratch?
Premade treats save time and make this recipe super quick, but if you prefer, homemade Rice Krispies treats work just as well. Just let them cool and firm up completely before dipping.
How do I keep the candy coating smooth and glossy?
Melting the wafers slowly in short microwave bursts and stirring between each helps keep the coating silky. Also, avoid overheating to prevent thick or grainy texture.
Can I make these Monster Pops in advance for a party?
Definitely! The Monster Pops Rice Krispie Treats Recipe can be made a day or two ahead and stored well, making party prep stress-free and fun.
Final Thoughts
This Monster Pops Rice Krispie Treats Recipe is a total game-changer for anyone looking to add a creative and fun twist to classic treats. Whether it’s for a birthday party, Halloween, or just a playful snack, these monster pops bring color, texture, and smiles to all who try them. I can’t wait for you to make and enjoy these – they’re just as joyful to craft as they are to munch on!
Print
Monster Pops Rice Krispie Treats Recipe
- Prep Time: 15 minutes
- Cook Time: 0 minutes
- Total Time: 15 minutes
- Yield: 20 treats
- Category: Dessert
- Method: No-Cook
- Cuisine: American
Description
These Monster Pops Rice Krispie Treats are a fun and spooky twist on the classic rice krispie snack, perfect for Halloween or any monster-themed party. Coated in colorful candy melts, decorated with sprinkles and candy eyes, these easy no-bake treats are sure to delight kids and adults alike.
Ingredients
Main Ingredients
- 20 premade Rice Krispies Treats
- 12 oz. package of orange candy melting wafers (or colored white dipping chocolate)
- 12 oz. package of blue candy melting wafers (or colored white dipping chocolate)
- 1/3 cup orange sprinkles
- 1/3 cup blue sprinkles
- Candy eyes (2 different sizes)
- Cake pop sticks
Instructions
- Prepare workspace: Line a baking sheet, countertop, or table with parchment paper to set the treats as they dry. Ensure enough space to lay out all 20 treats at once or plan to work in batches, allowing each batch to dry fully before moving them.
- Insert sticks: Unwrap each Rice Krispies Treat. Skewer each treat by pressing a cake pop stick about halfway into the short end of the treat, ensuring it is secure for dipping.
- Set sprinkles: Pour orange sprinkles into one bowl and blue sprinkles into another. Place these near the prepared work area for easy access when decorating.
- Melt candy wafers: Place each color of candy melting wafers in separate microwave-safe bowls. Microwave on high for 30 seconds, then stir. Continue microwaving in 15-second increments, stirring each time until wafers are thoroughly melted and smooth.
- Dip treats: Working with one color at a time, dip half of the treats into the melted candy coating. Submerge about two-thirds of the treat while holding it upside down by the stick. Let excess candy melt drip off for about 5 seconds. Use a spoon to help coat treats if the melted candy runs low.
- Add sprinkles: Immediately after dipping, dip the top portion of each treat into the matching color of sprinkles, then lay the treats on the parchment paper.
- Decorate with eyes: Before the coating hardens, place candy eyes onto each treat creatively—some can be cyclops with one eye, others can have multiple eyes for a fun monster effect.
- Allow drying: Let the coated treats dry for 10-15 minutes at room temperature. Once fully set, store them in an airtight container or resealable bag to maintain freshness.
Notes
- Work quickly when dipping to prevent candy melts from hardening before coating all treats.
- If needed, reheat candy melts in short increments to keep them smooth.
- Store treats at room temperature in an airtight container; they are best enjoyed within 3-4 days.
- Use parchment paper or silicone mats to prevent sticking during drying.


