
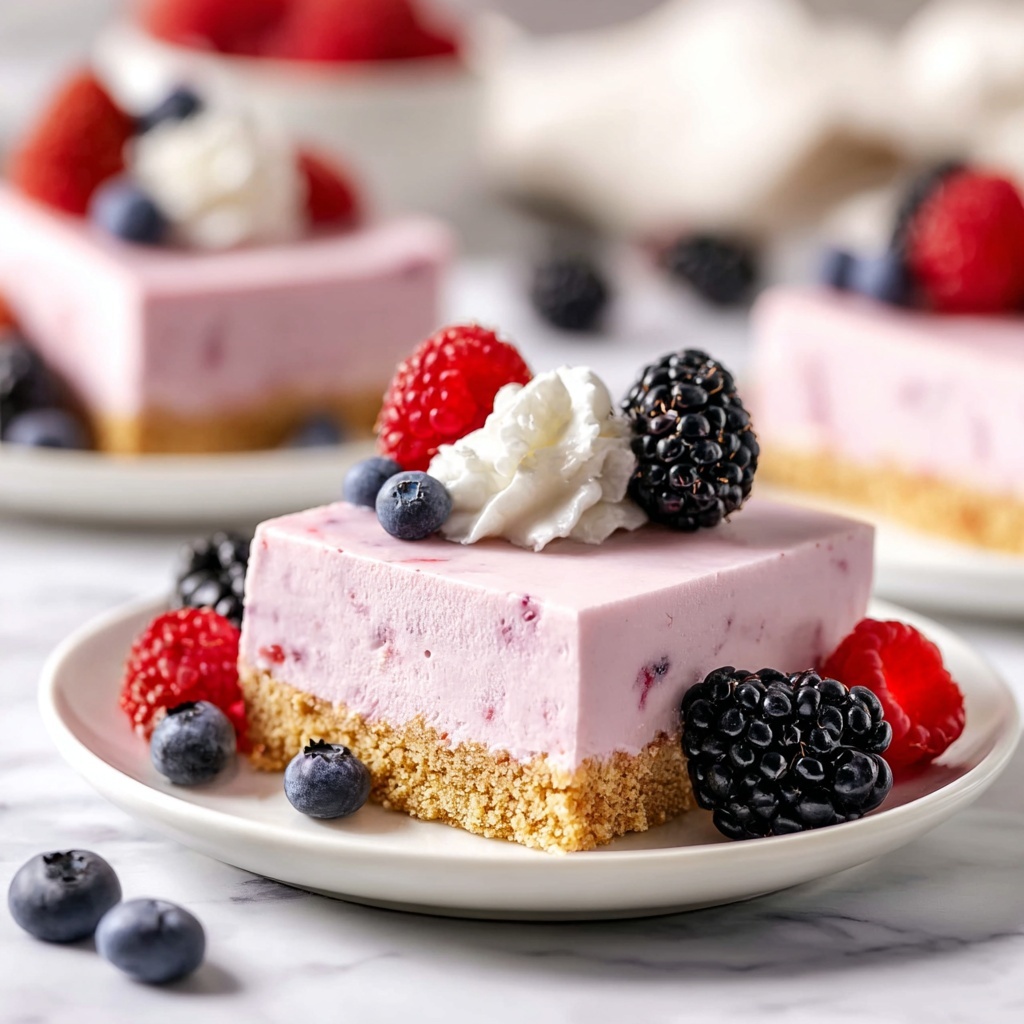
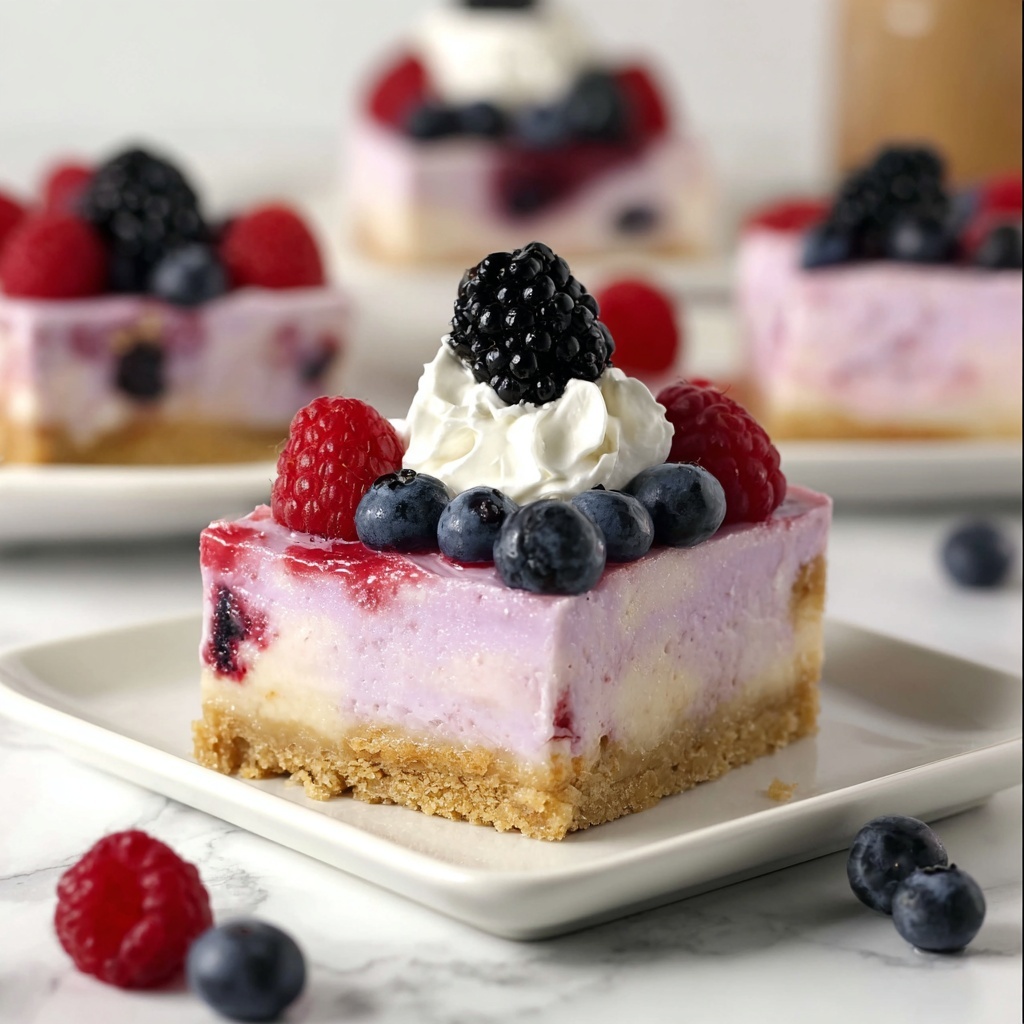
If you ever crave a dessert that’s creamy, fruity, and effortlessly impressive, this No-Bake Berry Cheesecake Recipe is exactly what your taste buds need. It’s a delightful combination of a buttery, crumbly graham cracker crust layered with luscious, light cream cheese filling, all topped with a vibrant medley of fresh berries. Perfectly creamy without the need to fire up your oven, this cheesecake delivers on taste and presentation, making it an absolute showstopper for any gathering or simple treat at home.
Ingredients You’ll Need
This No-Bake Berry Cheesecake Recipe shines because of its simple, quality ingredients. Each one plays a crucial role in creating that creamy texture, sweet flavor, and stunning color contrast that will make your dessert unforgettable.
- 2 Cups Low Fat Graham Cracker Crumbs: Provides the perfect crunchy, slightly sweet base that holds the cheesecake together.
- 6 Tbsp. Butter, melted: Binds the graham cracker crumbs while adding richness to the crust.
- 3 Tbsp. Sugar: Sweetens the crust ever so slightly, balancing the tangy cream cheese.
- 4 Pkg. (8 oz. each) Philadelphia 1/3 Less Fat Cream Cheese (Neufchatel), softened: The star of the filling, delivering rich creaminess with reduced fat for a lighter bite.
- 1 Cup Sugar: Sweetens the cream cheese layer, ensuring a perfectly balanced flavor.
- 3 Cups Fresh Berries (blackberries, raspberries, blueberries, and chopped strawberries): A colorful, juicy topping that bursts with freshness.
- 1 Tub (8 oz.) Cool Whip, thawed: Adds light, fluffy texture to the filling and makes the cheesecake irresistibly smooth.
How to Make No-Bake Berry Cheesecake Recipe
Step 1: Prepare the Crust
Start by mixing the graham cracker crumbs, melted butter, and sugar in a bowl until everything is evenly combined and resembles wet sand. Press this mixture firmly into the bottom of a 9×13-inch pan to form a sturdy, delicious crust that holds the whole cheesecake together.
Step 2: Make the Cream Cheese Filling
Beat the softened cream cheese in a large bowl until it’s completely smooth. Gradually add in the sugar, continuing to mix until creamy and well combined. Then gently fold in the thawed Cool Whip, making sure to keep the texture light and airy without overmixing.
Step 3: Assemble the Cheesecake
Spread the creamy filling evenly over the prepared crust, smoothing it out with a spatula for a flawless finish. This step sets the stage for those gorgeous berries on top!
Step 4: Add the Berry Topping
Generously sprinkle the fresh mixed berries over the cream cheese layer. The variety of berries adds bursts of sweetness and tartness, not to mention vibrant color that’s sure to catch everyone’s eye.
Step 5: Chill and Set
Cover your cheesecake and refrigerate for at least 4 hours or preferably overnight. This chilling time allows the flavors to meld and the filling to firm up, resulting in the perfect sliceable No-Bake Berry Cheesecake Recipe.
How to Serve No-Bake Berry Cheesecake Recipe
Garnishes
Elevate your presentation by lightly dusting powdered sugar over the berries or adding a few fresh mint leaves on top. These small touches not only enhance the visual appeal but also introduce refreshing notes that complement the fruity richness of the cheesecake.
Side Dishes
This cheesecake pairs wonderfully with a cup of freshly brewed coffee or a light herbal tea that cuts through the sweetness. For a bit of extra indulgence, a drizzle of raspberry coulis or a dollop of vanilla yogurt on the side works beautifully as well.
Creative Ways to Present
Instead of one big pan, you can portion the filling and crust into individual mason jars or clear glasses, topping each with berries. This makes for stunning single servings perfect for parties or picnics. Another fun idea is to layer the berries with the cream cheese filling to create a parfait style dessert.
Make Ahead and Storage
Storing Leftovers
Keep your leftover No-Bake Berry Cheesecake Recipe covered tightly with plastic wrap or in an airtight container in the fridge. It will stay fresh and delicious for up to 3 days, making it a perfect make-ahead dessert for busy days.
Freezing
If you’d like to freeze it, wrap the cheesecake securely in plastic wrap and then in aluminum foil before placing it in the freezer. This helps protect against freezer burn. When ready, thaw it overnight in the fridge for a creamy texture just like freshly made.
Reheating
Since this is a no-bake cheesecake, reheating is not necessary or recommended. It’s best enjoyed chilled to keep its perfect creamy consistency and berry freshness intact.
FAQs
Can I use frozen berries instead of fresh?
While fresh berries are ideal for the best texture and flavor, you can use frozen berries if you thaw and drain them well to avoid excess moisture that can affect the cheesecake’s consistency.
Is it possible to make this recipe dairy-free?
You can try substituting cream cheese and Cool Whip with vegan alternatives made from coconut or almond milk, but the texture and flavor will vary slightly from the traditional recipe.
How thick should I make the crust layer?
A crust about 1/2 inch thick works perfectly for this recipe — thick enough to hold the filling and provide satisfying crunch without overpowering the creamy layer.
Can I add flavors to the cream cheese filling?
Absolutely! A splash of vanilla extract or a teaspoon of lemon zest can brighten the filling and add an extra dimension of flavor to your No-Bake Berry Cheesecake Recipe.
What’s the best way to slice the cheesecake?
Use a sharp knife dipped in warm water and wiped dry before each cut. This helps achieve clean slices and prevents the filling from sticking to the knife.
Final Thoughts
This No-Bake Berry Cheesecake Recipe is a total keeper, combining ease and elegance in every bite. It’s genuinely one of those desserts that feel like a special treat but come together without fuss. I hope you give it a try and see how effortlessly you can wow your family and friends with this bright, creamy, and berry-licious delight!
Print
No-Bake Berry Cheesecake Recipe
- Prep Time: 15 minutes
- Cook Time: 0 minutes
- Total Time: 4 hours 15 minutes
- Yield: 16 servings
- Category: Dessert
- Method: No-Cook
- Cuisine: American
- Diet: Low Fat
Description
This No-Bake Berry Cheesecake is a delightful, creamy dessert combining a buttery graham cracker crust with a smooth, low-fat cream cheese filling, topped generously with a medley of fresh berries. Perfect for warm days or when you want an easy, crowd-pleasing treat without heating up the kitchen.
Ingredients
Crust
- 2 Cups Low Fat Graham Cracker Crumbs
- 6 Tbsp. Butter, melted
- 3 Tbsp. Sugar
Filling
- 4 Pkg. (8 oz. each) Philadelphia 1/3 Less Fat Cream Cheese (Neufchatel), softened
- 1 Cup Sugar
- 1 Tub (8 oz.) Cool Whip, thawed
Topping
- 3 Cups Fresh Berries (blackberries, raspberries, blueberries, and chopped strawberries)
Instructions
- Prepare the crust: In a mixing bowl, combine the low-fat graham cracker crumbs, melted butter, and sugar. Stir together until the mixture resembles wet sand.
- Form the crust base: Press the crumb mixture evenly into the bottom of a 9-inch springform pan or similar dish to create a firm and uniform crust. Place in the refrigerator to set for about 15 minutes.
- Make the filling: In a large mixing bowl, beat the softened cream cheese with the sugar until smooth and creamy using an electric mixer on medium speed.
- Incorporate whipped topping: Gently fold the thawed Cool Whip into the sweetened cream cheese mixture until thoroughly combined and fluffy.
- Assemble the cheesecake: Spoon the cream cheese and Cool Whip mixture over the chilled crust, spreading evenly with a spatula.
- Chill the cheesecake: Cover the cheesecake with plastic wrap and refrigerate for at least 4 hours or until well set.
- Add fresh berries: Just before serving, evenly distribute the fresh mixed berries on top of the set cheesecake for a colorful and flavorful topping.
- Serve: Slice the cheesecake into 16 servings and enjoy this light, refreshing dessert.
Notes
- You can substitute Cool Whip with homemade whipped cream if preferred.
- For extra flavor, add a teaspoon of vanilla extract to the cream cheese mixture.
- Make sure to fully soften the cream cheese for smooth blending without lumps.
- The crust can be made with regular or gluten-free graham crackers based on dietary needs.
- Cover and refrigerate leftovers for up to 2 days to maintain freshness.


