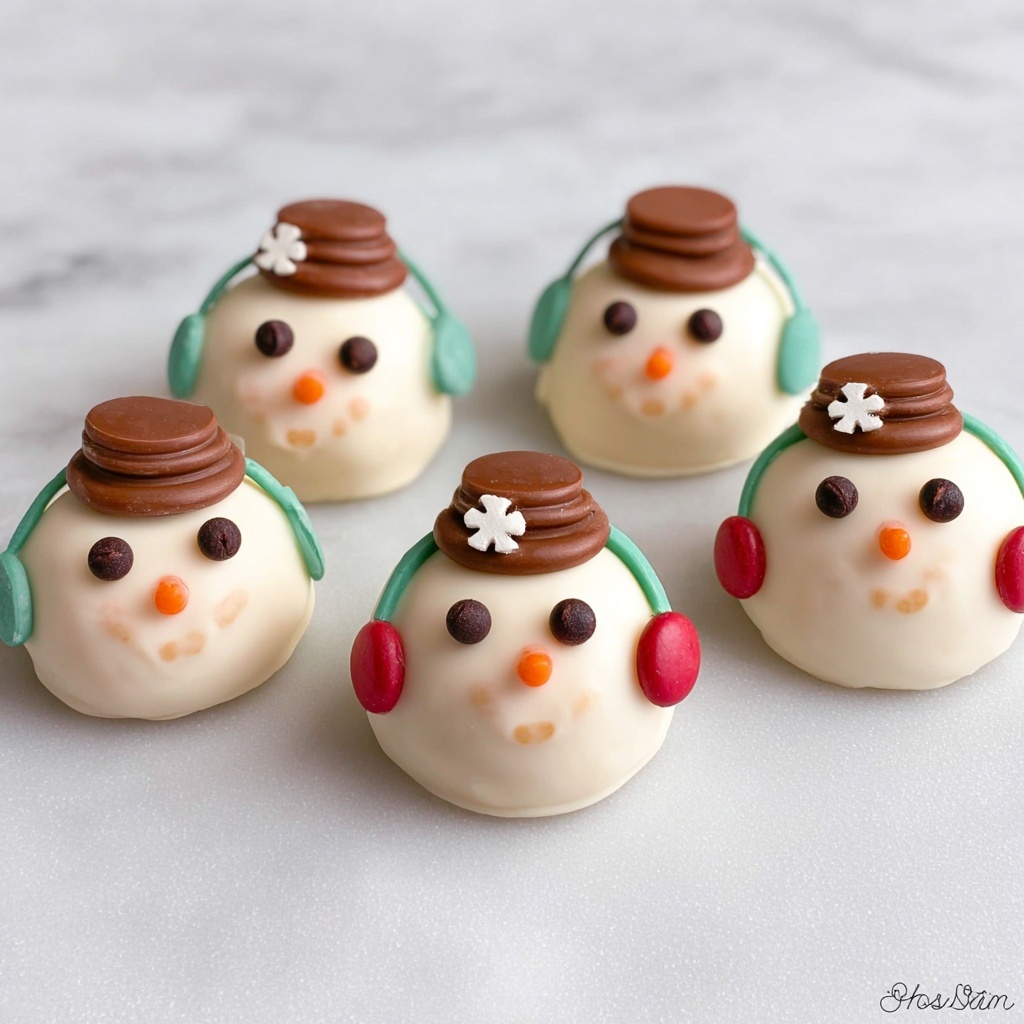
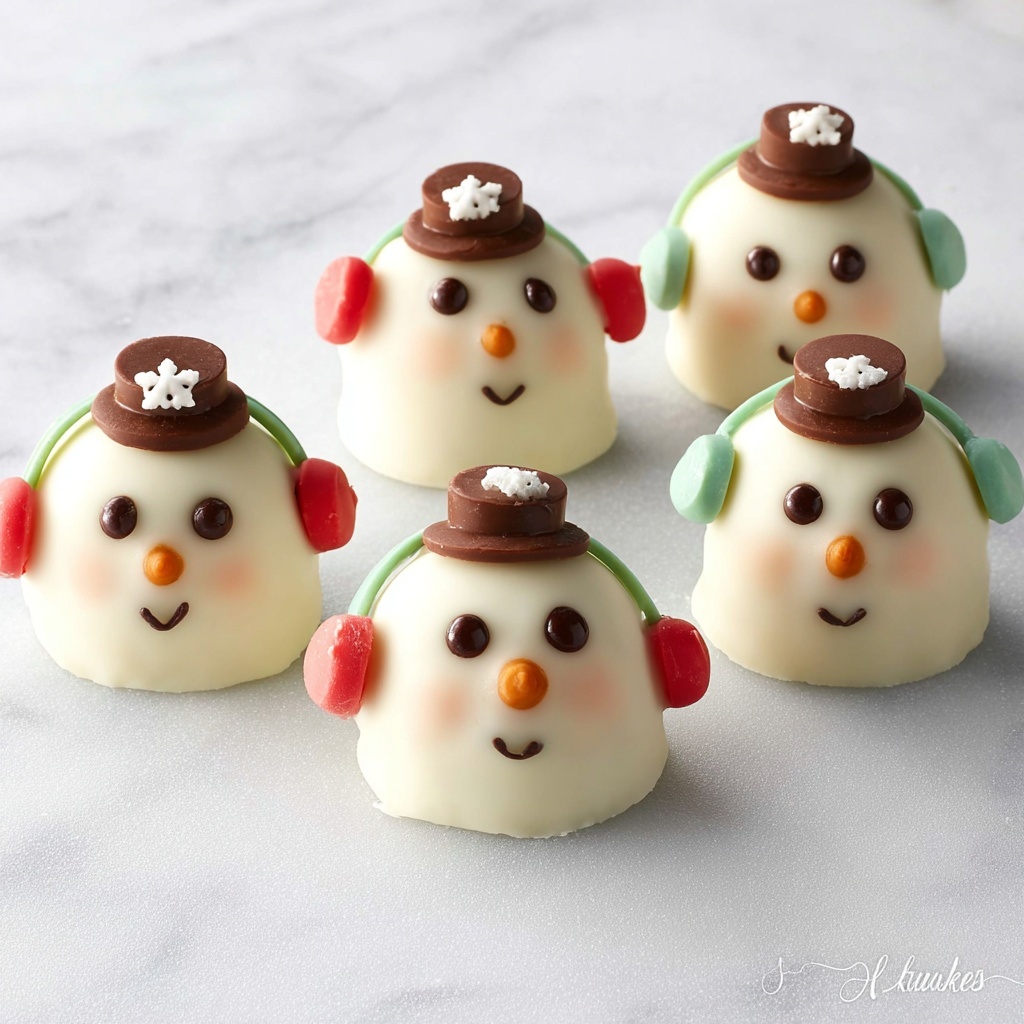
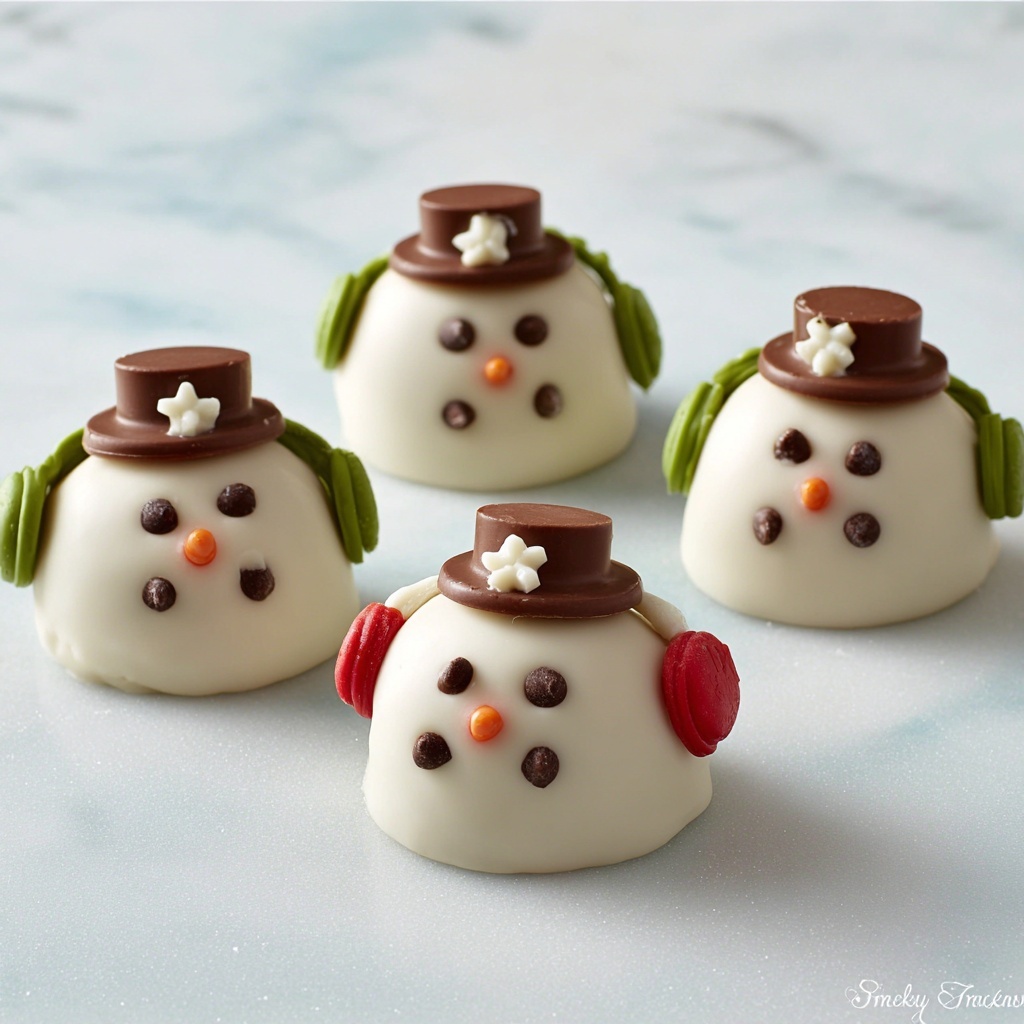
If you are looking for a festive, fun, and utterly delicious treat to brighten up your holiday gatherings, the Snowman Oreo Cookie Balls Recipe is an absolute must-try. These adorable little snowmen are made from crushed Oreo cookies and cream cheese, dipped in smooth vanilla chocolate, and decorated to resemble cheerful winter buddies. Easy to make but impressive in appearance, these cookie balls bring together rich, creamy, and chocolatey flavors with a delightful crunch, making them the perfect holiday treat everyone will adore.
Ingredients You’ll Need
Creating these charming Snowman Oreo Cookie Balls is easy and requires a handful of ingredients that each play a crucial role. From the creamy tang of cream cheese to the sweet crunch of Oreos and the colorful decorations, every item helps bring this dessert to life in taste and appearance.
- 8 ounces cream cheese (softened): Acts as a rich, creamy binder that balances the cookies’ sweetness.
- 36 Oreo Cookies (regular size): The classic chocolate sandwich cookies provide the perfect crunch and flavor base.
- 1 package Vanilla Chocolate Candy Coating: For coating the cookie balls, giving them a smooth, glossy finish and sweet vanilla taste.
- Hershey Kisses: Used as the adorable hats for the snowmen, adding a chocolatey touch.
- 1 package Wilton Chocolate Candy Melts: Perfect for dipping and creating decorative features like eyes and noses.
- Green cookie icing: Adds vibrant color and detail to accessories like scarves and earmuffs.
- M&M’s: Provide pops of color and fun, especially for cute earmuff accents.
- Sprinkles: Use snowflake or festive sprinkles to add a magical touch.
How to Make Snowman Oreo Cookie Balls Recipe
Step 1: Crush the Oreos
Start by placing all 36 Oreo cookies into a large zip-top bag. Using a rolling pin, crush the cookies until they turn into fine crumbs. This will be the flavorful base for your snowman centers, blending perfectly with the cream cheese.
Step 2: Soften the Cream Cheese
Make sure your cream cheese is softened to room temperature. Place it into a mixing bowl so it’s ready to blend nicely with the crushed Oreo crumbs.
Step 3: Mix Cookies and Cream Cheese
Pour the crushed Oreo crumbs into the bowl with the softened cream cheese. Mix thoroughly until you achieve a consistent, chocolatey dough that holds together well.
Step 4: Form the Snowman Balls
Take portions of the mixture and roll them into about 1-inch diameter balls. This size is perfect for creating small, bite-sized treats that everyone can enjoy.
Step 5: Dip in Vanilla Chocolate Coating
Melt the vanilla chocolate candy coating according to the package instructions. Using a fork or dipping tool, cover each Oreo ball completely with the melted chocolate. Place them onto wax paper or a silicone mat to set. This coating will form the “snow” shell over your snowman treats.
Step 6: Prepare and Attach the Hats
Carefully cut the tip off the bottom of each Hershey Kiss to create a flat base. Dab a small dot of green cookie icing on the tip and press it onto the chocolate-coated ball to resemble a cute snowman hat.
Step 7: Decorate the Faces
Use mini chocolate chips to place the snowman’s eyes and nose. For a charming twist, swap the noses with orange chocolate chips to mimic a carrot nose. Attach these details securely with small dots of melted candy coating or icing.
Step 8: Add Accessories and Final Touches
Use green cookie icing to draw scarves, earmuffs, or other festive accessories on your snowmen. Place red M&M’s on the sides as earmuffs for an extra cute look. Finally, add snowflake sprinkles to the front or around the dessert platter for a magical winter vibe.
How to Serve Snowman Oreo Cookie Balls Recipe
Garnishes
Presentation is everything, especially at holiday parties. Sprinkle extra snowflake decorations or edible glitter around your serving tray. Consider adding thin strips of colored icing or small candy accents to enhance the festive cheer.
Side Dishes
Complement these sweet treats with hot beverages like peppermint hot chocolate or warm spiced cider. Their rich flavors balance the creamy cookie balls beautifully and create a cozy atmosphere.
Creative Ways to Present
Arrange the snowmen standing in a circle on a platter to create a winter wonderland effect. You can even display them on a bed of crushed ice or shredded coconut dyed light blue to mimic snow. Wrapping individual treats in clear cellophane with festive ribbons makes for delightful gifts or take-home party favors.
Make Ahead and Storage
Storing Leftovers
If you have any leftovers (and you might, because they’re so good), store them in an airtight container in the refrigerator. They’ll keep well for up to a week, maintaining their creamy texture and fresh flavor.
Freezing
Snowman Oreo Cookie Balls freeze beautifully. Place them in a single layer on a tray until firm, then transfer to a freezer-safe container, separating layers with parchment paper. They can be frozen for up to two months, perfect for making ahead for parties or gifts.
Reheating
Snowman Oreo Cookie Balls are best served chilled or at room temperature, so no reheating is necessary. If they’ve been frozen, simply thaw them in the refrigerator for several hours or overnight before serving.
FAQs
Can I use a different type of cookie instead of Oreos?
Absolutely! While classic Oreos work perfectly for this recipe, you can experiment with other chocolate sandwich cookies or even flavored ones for a unique twist. Just make sure they crumble well and pair nicely with cream cheese.
Is it possible to make these dairy-free or vegan?
To make a dairy-free version, use a vegan cream cheese alternative and check that the chocolate coatings and candy melts are vegan-friendly. The recipe should still work well with these substitutions.
How do I prevent chocolate from melting in warm weather?
Keep the finished Snowman Oreo Cookie Balls refrigerated until serving. If the room is particularly warm, consider serving them chilled or on ice to maintain their shape and prevent melting.
Can I make the decorations ahead of time?
Yes, many decorations like the hats and icing details can be prepared a day in advance and stored in an airtight container. Assemble everything shortly before serving for the best appearance.
What’s the best way to transport these treats to a party?
Use a sturdy container with layers separated by parchment or wax paper. Keep the container cool during transport to avoid melting or smudging of the decorations.
Final Thoughts
Making the Snowman Oreo Cookie Balls Recipe is a delightful experience that combines creativity and simple ingredients into a festive treat everyone will enjoy. Whether you’re baking for a holiday party, a school event, or just because, these charming snowmen will spread smiles and brighten your day. I hope you give this recipe a try and have as much fun making and sharing these sweet winter friends as I do!
Print
Snowman Oreo Cookie Balls Recipe
- Prep Time: 30 minutes
- Cook Time: 0 minutes
- Total Time: 30 minutes
- Yield: 16 Oreo cookie balls
- Category: Dessert
- Method: No-Cook
- Cuisine: American
Description
These adorable Snowman Oreo Cookie Balls are a festive and fun no-bake treat perfect for holiday celebrations. Made with crushed Oreo cookies mixed with cream cheese, dipped in vanilla chocolate candy coating, and decorated with Hershey Kisses, candy melts, icing, and colorful sprinkles, these sweet bites combine creamy, crunchy, and chocolaty flavors with charming snowman decorations.
Ingredients
Base Mixture
- 36 regular size OREO Cookies
- 8 ounces cream cheese, softened
Coating
- 1 package Vanilla Chocolate Candy Coating
Decorations
- Hershey Kisses
- 1 package Wilton Chocolate Candy Melts
- Green cookie icing
- Red M&M’s
- Sprinkles (snowflake-shaped recommended)
- Mini chocolate chips (for eyes and nose)
- Orange chocolate chips (for nose)
Instructions
- Crush the Oreos: Place the Oreo cookies in a large zip lock bag and crush them finely using a rolling pin, ensuring there are no large chunks remaining.
- Prepare the cream cheese: Soften the cream cheese and place it in a mixing bowl to make blending easier.
- Mix ingredients: Add the crushed Oreo cookies to the softened cream cheese and mix thoroughly until the mixture is evenly blended into a thick dough-like consistency.
- Shape into balls: Form the cookie mixture into approximately 1-inch diameter balls, ensuring they are smooth and compact for dipping.
- Melt the chocolate: Following the package directions, melt the vanilla chocolate candy coating thoroughly and dip each Oreo ball into the melted chocolate until fully coated. Place coated balls on wax paper or a silicone mat to set firmly.
- Prepare the snowman hat: Using a knife, carefully cut the tip off each Hershey Kiss. Apply a dot of green cookie icing to the cut end and attach the Kiss onto the chocolate-coated cookie ball to resemble a hat.
- Decorate the snowman face: Place a snowflake sprinkle on the front of each ball and use mini chocolate chips to create eyes and a nose. For a traditional orange carrot nose, use orange chocolate chips strategically positioned.
- Add finishing touches: Use green cookie icing to add details such as a scarf or earmuffs, and attach red M&M’s on the sides as earmuffs to complete the festive look.
Notes
- Make sure cream cheese is fully softened for easier blending.
- Use wax paper or silicone mats to prevent sticking when candy coating sets.
- Customize decorations with different colored icing and sprinkles to match your holiday theme.
- Store the finished Oreo balls in an airtight container in the refrigerator to maintain freshness.
- These treats do not require baking and are perfect for making with kids.


