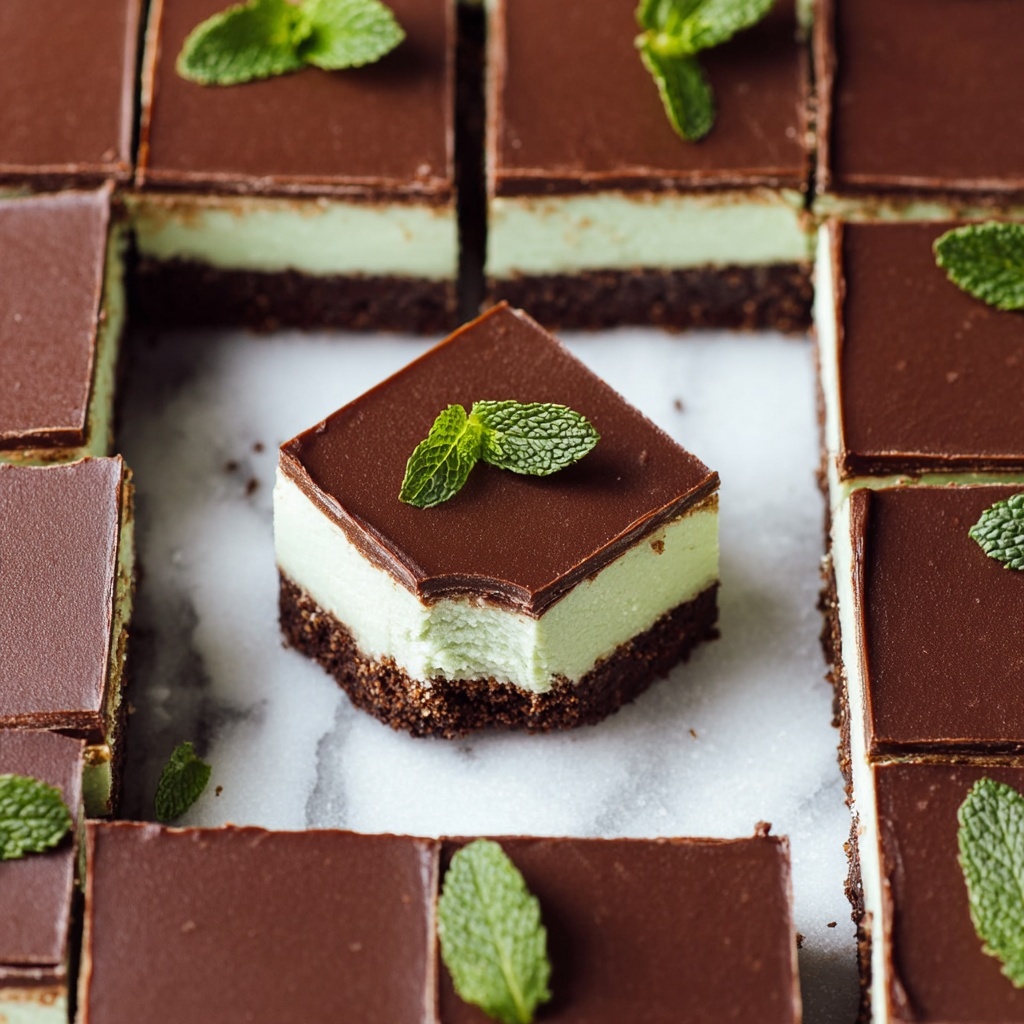
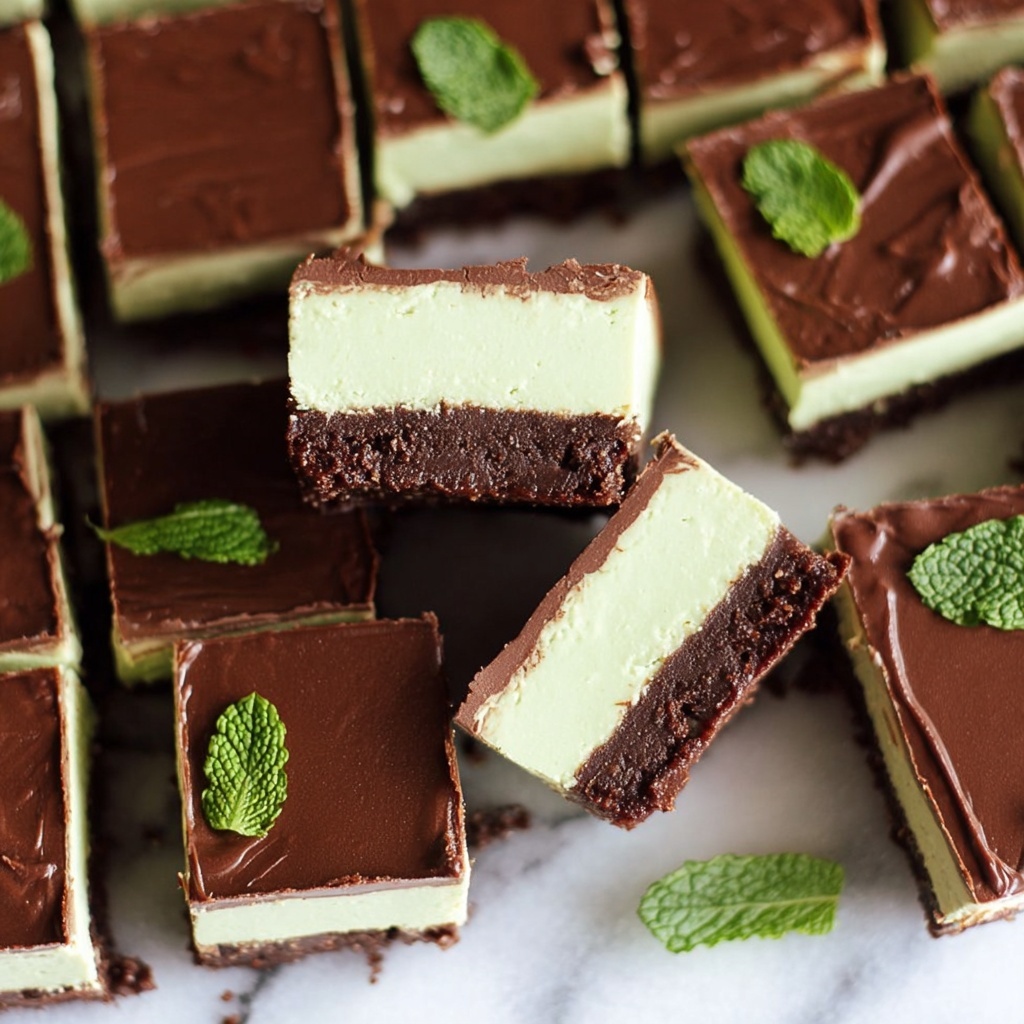
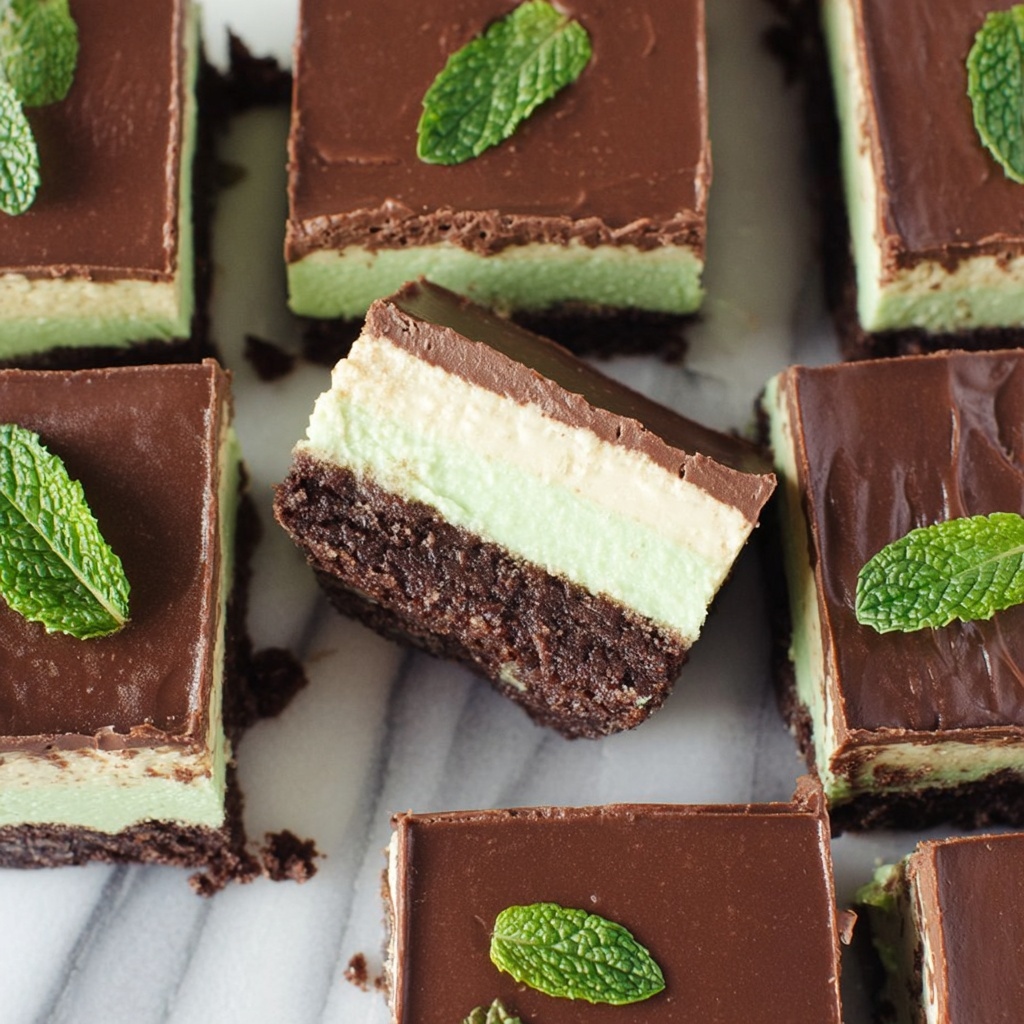
If you have a thing for dreamy dessert combos, you are going to fall head over heels for this Vegan Mint Chocolate Slice Recipe. It’s a luscious layered treat showcasing a crumbly almond and cacao base, a silky mint-infused coconut cream filling, and a glossy dark chocolate topping that melts in your mouth. Each bite is bursting with fresh mint brightness perfectly balanced by deep, velvety chocolate notes, making it a showstopper for any occasion. Plus, it’s completely plant-based yet richly satisfying, proving that vegan baking can be just as indulgent and enchanting.
Ingredients You’ll Need
Gathering the right ingredients may seem like the first step, but these essentials work together beautifully to create the perfect texture, flavor, and color contrast in the Vegan Mint Chocolate Slice Recipe. From the buttery almond base to the fresh mint filling and glossy chocolate finish, each ingredient plays an irreplaceable role.
- 2 cups ground almonds: Provides a naturally sweet, crumbly base with a nutty depth.
- ½ cup cacao powder: Adds rich chocolate intensity and deep color to the crust.
- ½ teaspoon flaky salt: A touch of salt to enhance sweetness and balance flavors.
- 4 tablespoons vegan butter (or solid coconut oil): Binds the crust and adds creaminess with a subtle richness.
- 2 tablespoons pure maple syrup: Offers natural sweetness and a hint of caramel complexity.
- 5.5 oz cacao butter (melted): Gives the mint filling a silky mouthfeel and glossy finish.
- ½ cup fresh mint leaves: Delivers vibrant freshness that truly defines the slice.
- 1 ½ cups coconut cream: Creates a rich, creamy texture in the mint layer with tropical undertones.
- 3 ½ tablespoons coconut butter: Enhances the filling’s firmness and buttery flavor.
- 6 tablespoons pure maple syrup: Sweetens the filling gently without overpowering the mint.
- 7 oz vegan dark chocolate (finely chopped): Forms the decadent glossy topping with deep chocolate flavor.
- 1 tablespoon vegan butter (or solid coconut oil): Helps give the chocolate topping a smooth, glossy texture.
How to Make Vegan Mint Chocolate Slice Recipe
Step 1: Preparing the Base
Start by preheating your oven to 175°C (350°F). Lightly grease an 8-inch square pan and line it with parchment paper to help the slice release easily after baking. In a food processor, combine the ground almonds, cacao powder, flaky salt, vegan butter or coconut oil, and maple syrup. Pulse until the mixture comes together as a sticky dough. Press the dough evenly across the base of your prepared pan and smooth it out with a spatula or the bottom of a flat glass. Prick the surface a few times with a fork to help it bake evenly. Pop it in the oven for 15 to 18 minutes until it’s lightly golden around the edges. Let it cool completely so the base sets perfectly.
Step 2: Crafting the Mint Filling
While the crust is cooling, melt the cacao butter gently over a double boiler—this will give your filling a silky texture and subtle chocolate undertone. Transfer the melted cacao butter, fresh mint leaves, coconut cream, coconut butter, and maple syrup into a high-powered blender. Blend until completely smooth and creamy. To get a velvety finish free of any mint leaf bits, strain the mixture through a fine sieve. Pour this luscious mint cream evenly over the cooled crust and level the surface with a spatula. Place the pan in the freezer for 2 to 3 hours to allow the filling to firm up properly. For best results, you can freeze it overnight.
Step 3: Adding the Chocolate Topping
For the final layer, melt about two-thirds of the chopped vegan dark chocolate in a double boiler. Once melted, remove from heat and stir in the remaining chocolate pieces along with the tablespoon of vegan butter or coconut oil. Keep stirring until all the chocolate is fully melted and the mixture is smooth and shiny. Spread this decadent chocolate evenly over the set mint filling. Pop the tray in the fridge for about 15 minutes to help the topping solidify into a glossy, firm shell.
Step 4: Slicing with Precision
When you’re ready to serve, warm a sharp knife by placing it in boiling water for a few seconds and then drying it off. This simple technique ensures smooth, clean cuts by softening the chocolate as you slice. Cut the slice into 16 pieces and enjoy the beautiful layers of mint and chocolate in every bite.
How to Serve Vegan Mint Chocolate Slice Recipe
Garnishes
Elevate your Vegan Mint Chocolate Slice Recipe with light garnishes that complement the fresh mint and chocolate flavors. Consider topping each slice with a small sprig of fresh mint or sprinkling a few crushed cacao nibs for a lovely crunch. A dusting of powdered sugar or a few fresh raspberries can add a pop of color and a subtly sweet contrast.
Side Dishes
This slice pairs wonderfully with a dollop of coconut whipped cream or a scoop of dairy-free vanilla ice cream to balance the refreshing mint and rich chocolate. For a cozy touch, serve alongside a cup of hot peppermint tea or a rich, earthy coffee. These pairings bring out the best in the flavors and make your dessert experience feel extra special.
Creative Ways to Present
If you want to impress at your next gathering, consider serving this slice on a rustic wooden board with a few whole mint leaves and edible flowers scattered around for a natural, elegant display. Another fun idea is cutting the slice into small bite-sized squares and skewering them on decorative picks for an effortless party treat. Every method makes this Vegan Mint Chocolate Slice Recipe shine in delightful style.
Make Ahead and Storage
Storing Leftovers
Your Vegan Mint Chocolate Slice Recipe keeps beautifully in the fridge inside an airtight container for up to one week. The flavors actually deepen and meld over time, so leftovers can be even more delicious than on day one.
Freezing
For longer storage, freeze individual slices wrapped tightly in parchment paper and placed in a freezer-safe container or bag. Frozen slices stay fresh for up to three months and thaw quickly in the fridge or at room temperature for a perfect minty indulgence whenever the craving strikes.
Reheating
This slice is best enjoyed chilled to preserve the creamy filling and firm chocolate topping, so avoid reheating in a conventional sense. If preferred, you can let slices sit at room temperature for 10-15 minutes to soften slightly before serving for a richer texture.
FAQs
Can I use a different nut flour instead of ground almonds?
Yes, though ground almonds add a subtle sweetness and moisture that support the texture of the crust exceptionally well. If using another nut flour, consider how it might alter flavor and be prepared for slight changes in consistency.
Is it necessary to strain the mint filling?
Straining helps achieve a perfectly smooth, silky texture by removing the small bits of mint leaves. If you prefer a more rustic feel with visible mint, you can skip this step, but the result will be less refined.
Can I use fresh mint extract instead of fresh leaves?
Fresh mint leaves provide the vibrant, natural flavor and a subtle herbal freshness that mint extract cannot fully replicate. If you only have mint extract, start with a small amount and adjust to taste, but the slice may lack the same depth.
What type of vegan dark chocolate is best for the topping?
Choose a high-quality vegan dark chocolate with at least 70% cacao for rich flavor and good melting properties. Avoid chocolates with added dairy or unnecessary fillers for the best texture and taste.
How do I make sure the slice is firm enough to cut?
Freezing the slice for a minimum of 2-3 hours ensures the mint filling sets properly. Chilling the chocolate layer in the fridge before slicing also helps maintain clean edges and prevents melting while cutting.
Final Thoughts
If you’re craving a dessert that delivers fresh, rich flavors with a lush, creamy texture all while being completely plant-based, this Vegan Mint Chocolate Slice Recipe is your new best friend. It’s a fantastic treat to impress friends or simply enjoy as a special self-care indulgence. Give it a go—you’ll love how this classic flavor combo shines in a wholesome, vibrant way!
Print
Vegan Mint Chocolate Slice Recipe
- Prep Time: 30 minutes
- Cook Time: 18 minutes
- Total Time: 2 hours 48 minutes
- Yield: 16 servings
- Category: Dessert
- Method: Baking
- Cuisine: Vegan
- Diet: Vegan
Description
This Vegan Mint Chocolate Slice is a decadent, refreshing dessert perfect for any occasion. Featuring a crunchy almond and cacao shortbread base topped with a smooth, creamy mint filling and a rich dark chocolate ganache, it is a delightful treat that combines vibrant mint flavor with luscious chocolate texture. Entirely plant-based and free from dairy, it caters to vegan diets while delivering indulgent taste and satisfying texture.
Ingredients
Crust
- 2 cups ground almonds
- ½ cup cacao powder
- ½ teaspoon flaky salt
- 4 tablespoons vegan butter (or solid coconut oil)
- 2 tablespoons pure maple syrup
Mint Filling
- 5.5 oz cacao butter (melted)
- ½ cup fresh mint leaves
- 1 ½ cups coconut cream
- 3 ½ tablespoons coconut butter
- 6 tablespoons pure maple syrup
Chocolate Topping
- 7 oz vegan dark chocolate (finely chopped)
- 1 tablespoon vegan butter (or solid coconut oil)
Instructions
- Preheat and Prepare Pan: Preheat your oven to 175°C (350°F). Lightly grease the base and sides of a square 8-inch pan with some oil or vegan butter, then line it with parchment paper to prevent sticking.
- Make the Crust: In a food processor, combine ground almonds, cacao powder, flaky salt, coconut oil (or vegan butter), and maple syrup. Blend until the mixture sticks together forming a dough.
- Press and Bake the Crust: Evenly press the dough into the base of the prepared pan using a spatula or a flat-bottomed glass. Prick the dough several times gently with a fork to prevent bubbling. Bake in the preheated oven for 15-18 minutes until slightly browned. Remove and let cool to room temperature.
- Prepare the Mint Filling: Melt cacao butter in a double boiler. In a high-speed blender, combine melted cacao butter, fresh mint leaves, coconut cream, coconut butter, and maple syrup. Blend until smooth and creamy. Pass the mixture through a fine sieve to remove any pieces of mint leaves for a smooth texture. Pour the filling evenly over the cooled crust in the pan. Place the pan in the freezer to set for 2-3 hours, or refrigerate overnight for best results.
- Make the Chocolate Topping: Melt about two-thirds of the vegan dark chocolate over a double boiler. Remove from heat and stir in the remaining chopped chocolate pieces and vegan butter or coconut oil until everything melts together into a smooth ganache. Spread this evenly over the set mint filling with a spatula.
- Set the Topping: Place the pan in the fridge and chill for 15 minutes until the chocolate topping is firm and set.
- Slice and Serve: To cut neat slices, heat a sharp knife in boiling water, wipe it dry, then slice the dessert gently allowing the warmth to glide through the chocolate layers cleanly.
- Storage: Store slices in an airtight container in the refrigerator for up to one week. You can also freeze portions and defrost them as needed to enjoy later.
Notes
- For best results, use a high-speed blender to achieve a smooth mint filling.
- Allow the crust to cool completely before adding the mint filling to prevent melting.
- Heating the knife before slicing ensures clean, neat pieces without cracking the chocolate topping.
- You can substitute vegan butter with solid coconut oil throughout the recipe as needed.
- This dessert tastes best when chilled, so allow ample time in the freezer and fridge for setting.


