
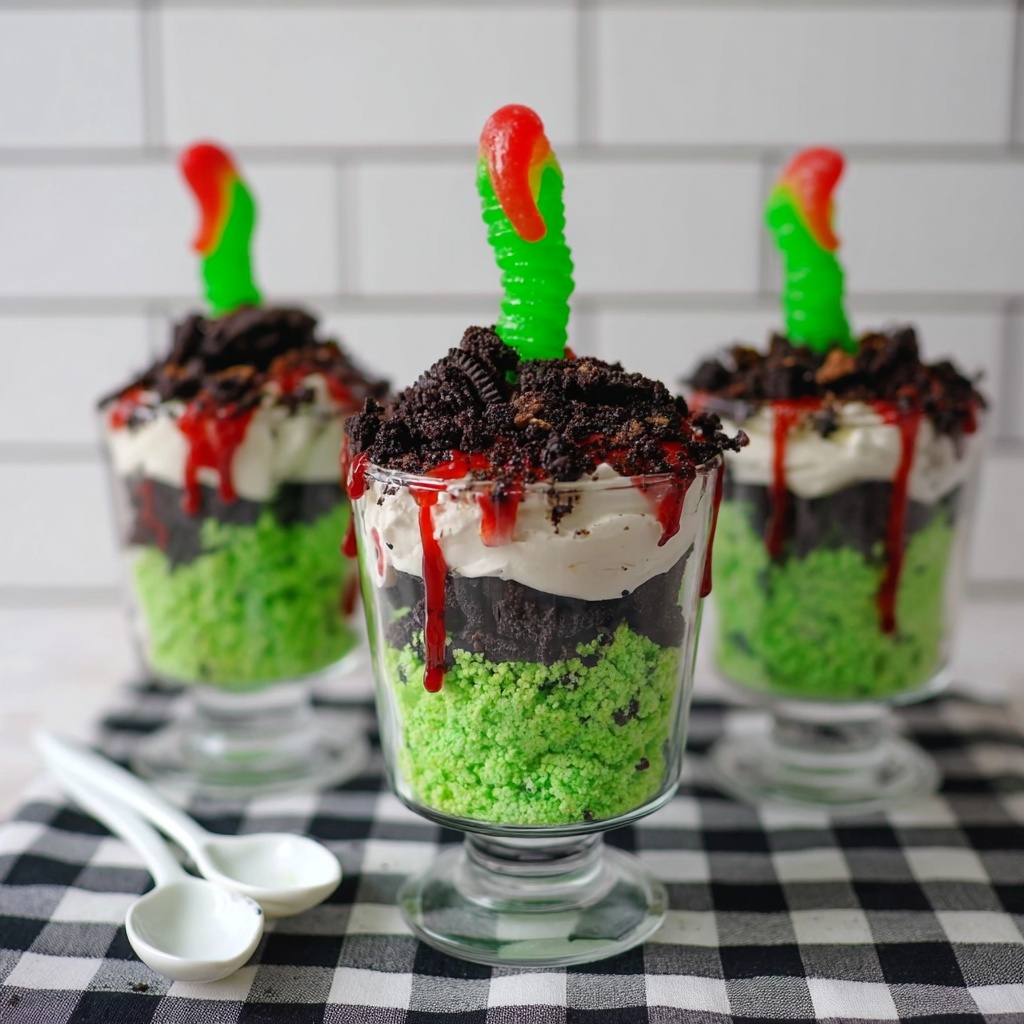
If you love a fun and spooky treat that’s as visually delightful as it is delicious, then you are going to adore this Zombie Cake Cups Recipe. These vibrant green cake cups layered with creamy frostings, chocolate sprinkles, and crumbled Oreo cookies create a perfect balance of flavor and texture that’s not just tasty but also screams Halloween party vibes or any fun get-together where you want to impress your friends with a playful twist. The Zombie Cake Cups Recipe is not only a feast for the eyes but also an absolute treat for anyone who enjoys a moist, flavorful cake combined with rich frostings and a little bit of crunchy magic on top.
Ingredients You’ll Need
Ingredients You’ll Need
This recipe thrives on a handful of essential ingredients that come together to create that perfect spooky look and mouthwatering taste. Each component is simple, yet it plays an important role—from the soft butter that ensures moistness, to the neon lime green food coloring that gives the zombie vibe, and the Oreo cookies that add irresistible crunch and chocolate flavor.
- Butter (1/2 cup, softened): Provides the rich, creamy base that keeps your cake tender.
- Sugar (3/4 cup): Sweetens and enhances the overall flavor.
- Eggs (2): Binds ingredients and adds structure.
- Vanilla (1 teaspoon): Brings warmth and depth to the cake.
- Milk (1/2 cup): Keeps the batter moist and smooth.
- Flour (1 1/4 cups): The foundation that gives body to the cake.
- Baking Powder (1 1/4 teaspoons): Ensures your cake rises beautifully.
- Salt (1/3 teaspoon): Balances sweetness and enhances flavor.
- Neon Lime Green Food Coloring Gel: Creates the signature zombie green color that makes these cups pop visually.
- Oreo Cookies (1 package, about 16 cookies, crushed): Adds a delightful crunch and chocolatey surprise.
- Vanilla Frosting (1 package, prepared in a piping bag): Softens and sweetens the layers with smooth creaminess.
- Chocolate Frosting (1 package, prepared in a piping bag): Adds richness and complements the Oreo crunch.
- Chocolate Sprinkles/Jimmies (1 package): Adds both texture and a pretty decorative touch.
- Zombie Finger Suckers (1 package): The whimsical, creepy garnish that finishes off the zombie look.
How to Make Zombie Cake Cups Recipe
Step 1: Prepare the Batter
Start by mixing the softened butter, sugar, eggs, vanilla, and milk in your stand mixer bowl until the mixture is luxuriously creamy. This combination is the foundation of your cake’s moist texture and rich flavor, so make sure you beat it well!
Step 2: Incorporate Dry Ingredients
In a separate bowl, whisk together the flour, baking powder, and salt to evenly distribute the leavening and seasoning before adding it to your wet mixture. Slowly mix on low speed until just blended, then scrape down the bowl for the next step.
Step 3: Color Your Batter
Turn your mixer to high and whip the batter until it is totally smooth and creamy. Now it’s time to add that spooky neon lime green food coloring gel. Start by dropping in three drops, then mix well, adding more if you want an even brighter green. This vibrant color is what really brings the Zombie Cake Cups Recipe to life.
Step 4: Bake the Cake
Pour your delightfully green batter into a greased and floured 8×8 dish or a 9-inch cake pan. Bake at 350 degrees Fahrenheit for about 20 to 25 minutes. The cake is ready when a toothpick inserted into the center comes out clean. Once baked, allow the cake to cool on a wire rack completely before moving on to assembling your zombie masterpiece.
Step 5: Crumble the Cake Bottom Layer
Once cool, break the cake into crumbles and spoon a layer at the bottom of your serving dishes. This will form the base that soaks up the creamy frostings and holds all the layers together in perfect harmony.
Step 6: Layer with Frostings, Sprinkles, Oreos, and More
Swirl a layer of vanilla frosting over the cake crumbs, then sprinkle a generous handful of chocolate sprinkles. Add a second layer of cake crumbs on top, followed by a swirl of chocolate frosting and another sprinkle of those chocolatey jimmies. Finish by piling on the crushed Oreo cookies for that extra crunch and flavor burst that makes every bite amazing.
Step 7: Add the Spooky Garnishes
For the final touch, gently tuck two Zombie Finger Suckers into the top of each cake cup, making sure the fingertips stick up just enough to create that classic spooky vibe. This is where your Zombie Cake Cups Recipe really shines, turning from a delicious dessert into an eerie and fun statement piece.
How to Serve Zombie Cake Cups Recipe
Garnishes
The Zombie Finger Suckers are the prime garnish to highlight here, adding that creepy yet charming look that nobody can resist. Feel free to add extra chocolate sprinkles or a few mini gummy worms for a twist on the zombie theme. Fresh mint leaves could add a fun “overgrown” vibe too.
Side Dishes
To balance the rich sweetness of Zombie Cake Cups, consider pairing them with some fresh fruit like tart raspberries or a scoop of vanilla ice cream. This gives your guests a refreshing contrast that elevates the whole experience from simple dessert to unforgettable celebration treat.
Creative Ways to Present
Serve your Zombie Cake Cups in clear glass cups or mini terracotta pots to emphasize the layered effect and spooky garden theme. Placing each cup on a small plate decorated with edible “dirt” made from crushed chocolate cookies and green coconut flakes will truly wow your guests and make your Zombie Cake Cups Recipe the star of the table.
Make Ahead and Storage
Storing Leftovers
Leftover Zombie Cake Cups should be covered tightly with plastic wrap or stored in an airtight container and kept refrigerated for up to three days. The frostings hold up well, and the cake remains moist, making it easy to enjoy later without sacrificing taste or texture.
Freezing
You can freeze the assembled cake cups in airtight containers for up to two months. To avoid frosting damage, flash freeze the cups uncovered until firm, then wrap them individually before placing them in your freezer container. Thaw in the fridge overnight before serving.
Reheating
Since the Zombie Cake Cups are best served chilled or at room temperature, reheating is generally not recommended. If you prefer the frosting softer, the cups can sit out for about 30 minutes to lose some chill or be warmed slightly in the microwave for 5-10 seconds but be careful not to melt your frosting decorations!
FAQs
Can I use a different food coloring than neon lime green?
Absolutely! While neon lime green is perfect for the spooky effect, you can experiment with other colors like bright orange or purple to fit different themes or personal preferences.
What other cookies can I use instead of Oreos?
If Oreo cookies aren’t your thing, try crushed chocolate chip cookies, graham crackers, or even peanut butter cookies for a different flavor profile with great texture.
Can I make these cake cups gluten-free?
Yes, substitute the all-purpose flour with a gluten-free flour blend suitable for baking. Just keep an eye on the texture as gluten-free flours sometimes require slight adjustments in liquid content.
Do I need special piping bags for the frosting?
Not necessarily. Store-bought frostings typically come pre-packaged in piping bags which are convenient, but you can also use a zip-top bag with a corner snipped off for easy frosting swirl application.
How far in advance can I prepare Zombie Cake Cups Recipe?
You can bake the cake and assemble the cups a day ahead of your event. Store them in the refrigerator until ready to serve for the best taste and freshness.
Final Thoughts
There’s a reason why the Zombie Cake Cups Recipe has quickly become one of my favorite go-to recipes for any festive occasion. It’s playful, easy to make, and utterly delicious with layers of flavor and fun textures. Whether you’re prepping for Halloween, a themed party, or just want to surprise your friends with something unique, these cake cups are sure to delight and impress. So don’t hesitate—grab your ingredients and dive into the joyful process of making your very own Zombie Cake Cups Recipe today!
Print
Zombie Cake Cups Recipe
- Prep Time: 35 minutes
- Cook Time: 25 minutes
- Total Time: 60 minutes
- Yield: 8 individual cake cups
- Category: Dessert
- Method: Baking
- Cuisine: American
Description
These Zombie Cake Cups are a fun and spooky dessert perfect for Halloween or any themed party. Featuring bright neon lime green cake layers, rich vanilla and chocolate frostings, crumbled Oreo cookies, and creepy zombie finger suckers on top, these individual cake cups combine vibrant colors and playful textures to delight both kids and adults alike.
Ingredients
Cake Batter
- 1/2 cup Butter (softened)
- 3/4 cup Sugar
- 2 Eggs
- 1 teaspoon Vanilla Extract
- 1/2 cup Milk
- 1 1/4 cups All-Purpose Flour
- 1 1/4 teaspoons Baking Powder
- 1/3 teaspoon Salt
- Neon Lime Green Food Coloring Gel (start with 3 drops, add more as needed)
Toppings & Decoration
- 1 package Oreo Cookies (about 16 cookies, crushed or crumbled)
- 1 package Vanilla Frosting (prepared in a piping bag, e.g., Pillsbury Brand)
- 1 package Chocolate Frosting (prepared in a piping bag, e.g., Pillsbury Brand)
- 1 package Chocolate Sprinkles/Jimmies
- 1 package Zombie Finger Suckers (candy decoration)
Instructions
- Prepare Cake Batter: In the mixing bowl of a stand mixer, combine softened butter, sugar, eggs, vanilla extract, and milk. Blend these ingredients together until creamy and smooth.
- Mix Dry Ingredients: In a separate bowl, whisk together the flour, baking powder, and salt. Gradually add these dry ingredients into the wet mixture and mix on low speed until just combined.
- Add Food Coloring and Blend: Scrape down the sides of the bowl, then mix on high speed until the batter is smooth and creamy. Add neon lime green food coloring gel drop by drop (starting with 3 drops) and mix well until your desired vibrant green color is achieved.
- Bake the Cake: Grease and flour an 8×8 inch dish or a 9-inch cake pan. Pour the prepared cake batter evenly into the pan. Bake in a preheated oven at 350°F (175°C) for 20 to 25 minutes, or until a toothpick inserted in the center comes out clean. Remove from oven and transfer the cake to a wire rack to cool completely.
- Crumble Cake Base: Once the cake has completely cooled, crumble portions of the cake evenly into the bottom of individual serving dishes or cups, forming the first layer.
- Layer Frosting and Toppings: Pipe a swirl of vanilla frosting over the crumbled cake layer and sprinkle with chocolate sprinkles. Add another layer of crumbled cake on top, then pipe chocolate frosting in a swirl, sprinkle with more chocolate sprinkles, and finally add a generous layer of crumbled Oreo cookies.
- Decorate with Zombie Fingers: Insert two zombie finger suckers into the top of each cake cup so that the finger tops stick out visibly, adding a spooky finishing touch. Serve immediately and enjoy your creepy, delicious treat!
Notes
- Be sure the cake is completely cool before crumbling to prevent the frosting from melting or sliding.
- Adjust the amount of neon lime green food coloring to get your preferred shade of bright green.
- You can substitute store-bought frosting with homemade vanilla and chocolate frosting if preferred.
- Use a sturdy container or cupcake cups for easy serving and decorating.
- Perfect for Halloween parties or themed gatherings with kids.


